
Almost every WordPress theme comes with a built-in header. If you want it to look good, you may need to add important links, social icons, site search tools, and other features.
Here’s how you can customize your WordPress header so you can create fully customized headers for specific pages or for your entire site.
Before going into detail, you should know what is actually the header in WordPress is?
Table of Contents
On a WordPress website, the header is the first section that visitors will see on every page.
Your site’s logo, title, navigation menus, and other important elements are usually displayed in the header.
You can see the header of ThemeLooks on our website here, which millions of readers see every month.

Adding your own personal touch to your site’s header will give it a unique look and more useful functionality. You can display your business phone number or social network icons, and show call to action buttons to improve conversion rates.
However, you can customize your WordPress header using a built-in theme customizer, full site editor, adding a widget area, and adding code. Having said that, let’s dive into the methods by which you can customize your WordPress header very easily.
Though WordPress comes with a new release 6.0, a full site editing feature was available from version 5.9. With this feature, you can edit your full site. As a result, it replaces the need for a theme customizer only if your theme supports this feature.
Otherwise, you need to go with the built-in WordPress theme customizer. However, the number of themes is increasing day-by-day by that support the full site editor option.
Navigate to Appearance > Editor to customize your header when you use a compatible theme. By clicking the button, you will launch the full site editor, similar to the WordPress block editor you use for posting and editing.
Once you click the header here, the template name at top of the page will change to Page Header.
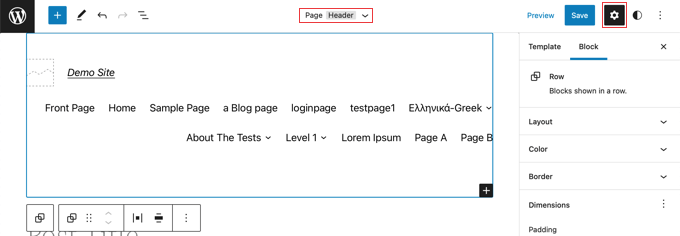
Now, the options to customize- the header’s layout, border, color, and dimensions will appear to you, when you click the Settings icon from the toolbar.
See the below example. Here we’ll be changing the header’s background color. To do so, click on the Color section first to expand it.
And then you need to click on the Background option to choose your preferred background color eventually.
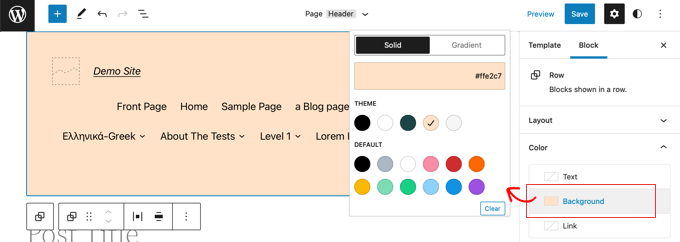
An option to choose a solid or gradient color will appear. Additionally, you can choose from a few different colors. You can change the header’s background immediately by clicking on the color of your choice.
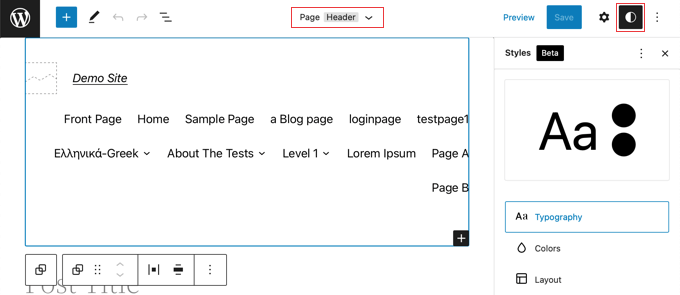
By clicking on the Styles icon from the top, you can view more customization options. With this, you can customize the font, colors, and layout of the header.
Well, you may want to know how you can use the WordPress theme customizer? Well, see our guide on how to use the WordPress in-built theme customizer like a pro.
There are many popular WordPress themes that let you customize the header section of your WordPress layout by using the WordPress theme customizer. Not all themes support this feature, often referred to as a custom header.
To begin, navigate to Appearance > Customize in the WordPress admin area.
N.B: Instead of getting Appearance > Customize, if you get Appearance > Editor (Beta) in your WordPress admin area, you’ll no longer be able to customize the header using the theme customizer. It means your installed theme has enabled for full-site editing feature. In this case, the above method is for you. You can skip this one.
Your theme’s customizer may have a ‘Header’ section or header settings under the ‘Color’ area, however, this varies from theme to theme. Here are several examples:
Some themes, such as Twenty Twenty-One, have no header modification options at all. In this instance, we propose using a drag-and-drop theme builder plugin.
You may add a background picture to the header of the Twenty Sixteen theme, as well as random header images.
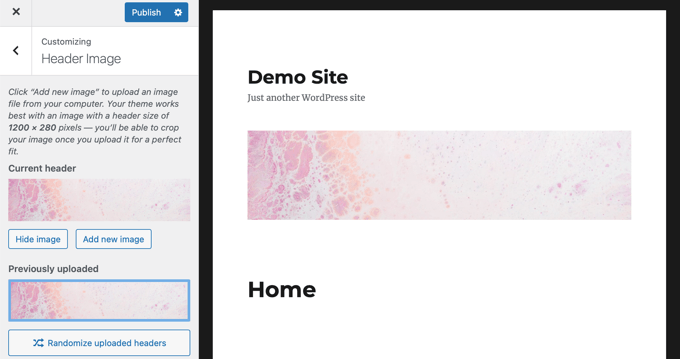
Some paid and free WordPress themes provide even more theme modification possibilities. For example, you could be able to modify the font style, design, colors, and other elements of your header. However, you are restricted by what the theme creator permits.
For example, using the Astra theme, you may use the theme customizer to build a custom header.
In the panel on the left, Astra includes a specific ‘Header Builder‘ option. You may alter the look and design of the header using the options in this section. You may create a custom header in the WordPress content editor by adding blocks, just like you would when editing a blog post or page.
To begin, hover across a blank space in the header and click the ‘+’ symbol to create a header block.
![]()
Following that, you may add whatever blocks to your own header. You may, for example, add widgets blocks, account blocks, search blocks, and more.
Furthermore, the header builder allows you to drag and drop blocks to put them up or down the header.
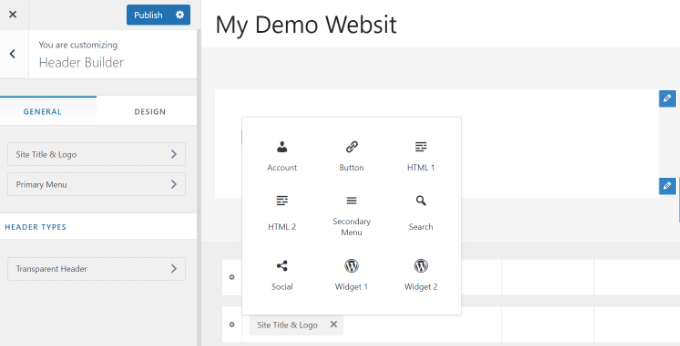
Every block you add to the header may be further customized.
Selecting the Site Title & Logo block, for example, will offer you the ability to upload a site title and logo, modify the width of the logo, show a site slogan, and more.
Aside from that, you may modify the header’s background color or upload a background picture to display in the header.
After you’ve finished modifying the custom header, click the ‘Publish‘ key.
If you’re creating a custom theme from the beginning with code, you might like to add a WordPress widget to your header to catch your visitors’ eyes. Widgets make it simple to add text blocks to particular regions of your theme, however not all themes feature a header widget space.
Some themes, such as the Astra theme, allow you to accomplish this through the WordPress theme customizer. Astra, for example, includes a ‘Header Builder’ option that allows you to totally modify the header, including the addition of widgets.
If your WordPress theme doesn’t already have a WordPress widget section in the header, you’ll need to manually create it by adding the following code to your functions.php file, a site-specific plugin, or a code snippets plugin.
This is a much more technical option because you must know where and how to put the code as well as how to design it using CSS.
function wpb_widgets_init() {

register_sidebar( array('name' => 'Custom Header Widget Area',
'id' => 'custom-header-widget',
'before_widget' => '<div class="chw-widget">',
'after_widget' => '</div>',
'before_title' => '<h2 class="chw-title">',
'after_title' => '</h2>',
) );

}
add_action( 'widgets_init', 'wpb_widgets_init' );
This code adds a whole new sidebar or widget section to your theme.
If you navigate to Appearance > Widgets, you’ll notice a new widget space titled ‘Custom Header Widget Area.’ You may now add widgets to this new section.

Finally, you must add some code to your theme’s header template, which is found inside the header.php file. It will add the widget section you generated previously to your header, displaying the widgets on your site.
You must copy/paste this source code wherever you want the widget to appear.
<?php

if ( is_active_sidebar( 'custom-header-widget' ) ) : ?>
<div id="header-widget-area" class="chw-widget-area widget-area" role="complementary">
<?php dynamic_sidebar( 'custom-header-widget' ); ?>
</div>

<?php endif; ?>
You might also have to add CSS to WordPress depending on your theme to determine how the widget area is presented.
Finally, you can quickly add custom code to the header portion of your site from your WordPress admin area. Because it involves modifying code and needs technical expertise, this approach is intended for experienced users only.
You can discover your theme’s header files in the WordPress admin panel by navigating to Appearance > Theme File Editor. Scroll to the bottom of the site header area in the ‘style.css’ theme files and add or remove code.
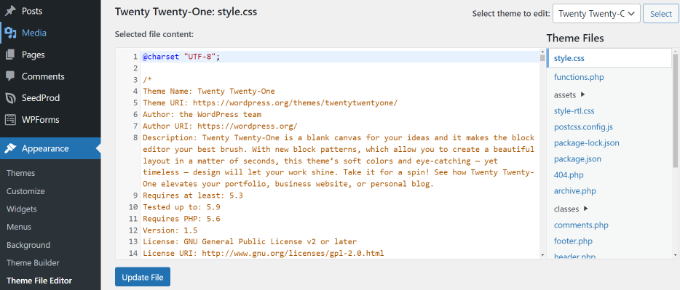
N.B: We do not advocate editing the theme data directly because even the smallest error might ruin your site and mess up the look.
The Insert Headers and Footers plugin make it easy to add custom code to your site’s header.
First, download and install the Insert Headers and Footers plugin. Please visit our article on how to install a WordPress plugin for more information.
After activating the plugin, navigate to Settings > Insert Headers and Footers in your WordPress admin area. Then, under the Scripts in the Header box, insert the custom code.
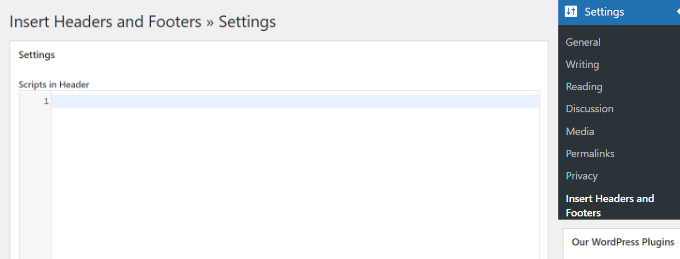
Save your modifications after inserting the code.
Up to this point, we hope the post helped you learn how you can customize your WordPress header. You may want to see our guide on how you can clear cache files in WordPress. You may also like to see our guide on how you can bulk schedule WordPress blog posts.
If you like this post, be with ThemeLooks and subscribe to our WordPress video tutorials on YouTube. We may also be found on Twitter, LinkedIn, and Facebook.