Is there a Telegram chat you would like to include on your site? In this guide, we’ll show you different ways to integrate a WordPress site with Telegram to help you improve customer service.
We live in a rapidly changing world in the 21st century. In today’s competitive environment, instant communication has become more and more critical to success for businesses.
Therefore, to remain in the competition in this fast-paced world, you have to ensure effective communication that is fast and convenient. Talking about fast communication, Telegram would be the best solution of that for you.
Telegram is a cloud-based cross-platform messaging service that is able to work on multiple devices (smartphone, desktop, or PC) simultaneously. There are a bunch of possibilities except just messaging.
Such as, creating groups to work in a team, and creating channels to broadcast your messages in order to expand the audience reach.
And, most importantly, you can integrate your WordPress site with Telegram. As a result, Telegram will be your one-stop tool to communicate effectively. Sounds amazing, right?
N.B: Not only just one account, but you can also run multiple Telegram accounts under one roof.
Why Do You Need to Integrate a WordPress Site with Telegram?
From the plenty of benefits of integrating a WordPress website with Telegram, having updates about the website directly to the Telegram account is the most prominent one. Besides, if you create a group and enable group notifications, all the group members will be notified instantly.
Telegram grouping is undoubtedly helpful for remote workers to communicate effectively. Last but not least, the broadcasting feature of Telegram could work as a marketing tool to skyrocket your business.
However, once you connect these both, whatever you post on your website will be shared with your Telegram audience instantly and automatically.
So, this could be a perfect way how you could maintain an effective connection with your visitors by updating them on the latest news. Boom, you’ll get a live chat bubble adding features to your WordPress site once you integrate these both.
Telegram is more like WhatsApp chats. Users will be able to contact you through the website and you’ll get those notifications on your Telegram account directly. With the end-to-end encrypted messaging feature, Telegram offers the best secure communication service.
You may question, why do you convert into Telegram whereas WhatsApp is doing great? The answer is that nearly 500 million active users are using Telegram now and it’s counting more even though WhatsApp still exists.
However, Telegram has already been considered the most popular messaging service in many countries (Arab, Europe, Brazil).
As of now, you’ve known why you need to use Telegram instead of WhatsApp. Now, let’s move on to the process of how you can integrate a WordPress site with Telegram.
How to Add Telegram to WordPress Website
Integrating a WordPress site with Telegram is a breeze. Quite straightforward but you need to complete several steps to accomplish it. Having said that, all the steps are given below in an orderly manner. The aim will be to make you understand everything as easy as possible.
Configure Telegram on Your Device [Desktop/Laptop]
Step 1: Download and Install Telegram on Your Desktop
- Open any browser on your device and go to telegram.org. Now select the device on which you want to have Telegram. In our tutorial, we picked Telegram for PC.
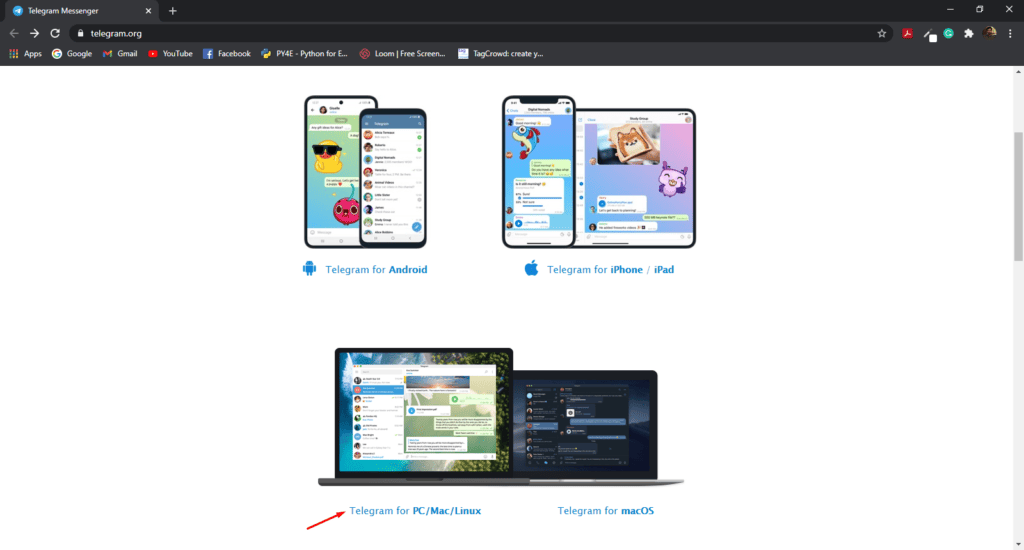
- On the following resulting page, click on Get Telegram for Windows, and the file starts to download. Once your download completes, the installation process comes.
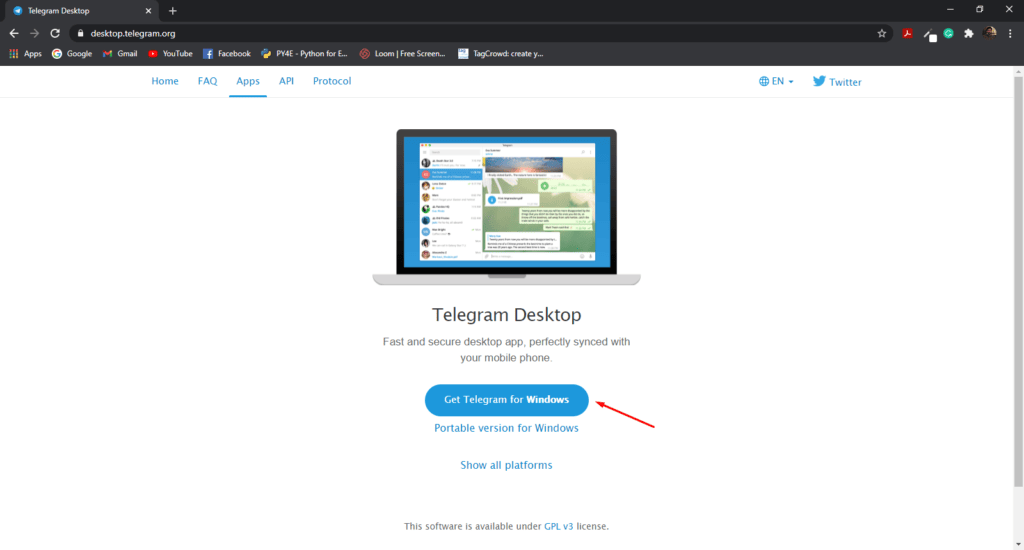
- In order to install, click on the setup. The click will initiate the installation process.
- Now follow the instructions, and select the required (e.g., language, location, menu folder, and so on).
- Once the installation ends successfully, tick the Launch Telegram box and click finish as follows.
Step 2: Create a Telegram Account
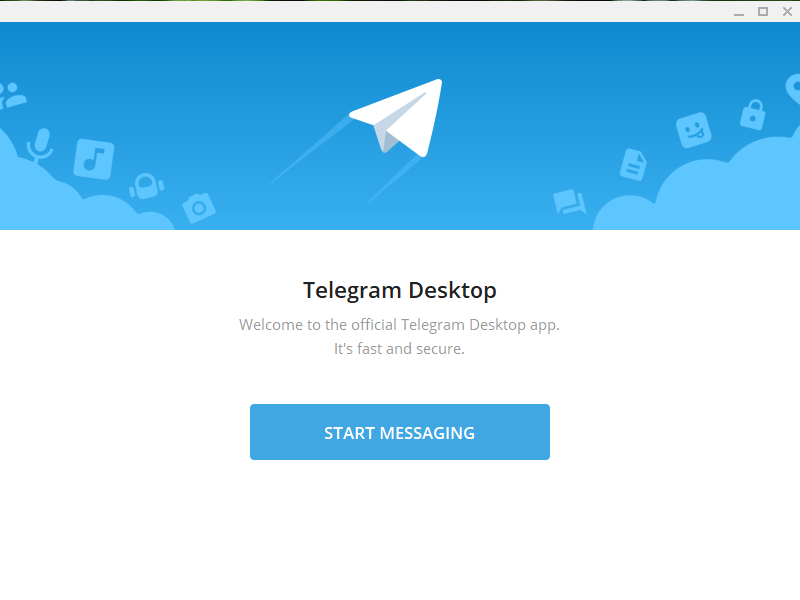
- While launching the app, click Start Messaging on the Telegram desktop app window that appears.
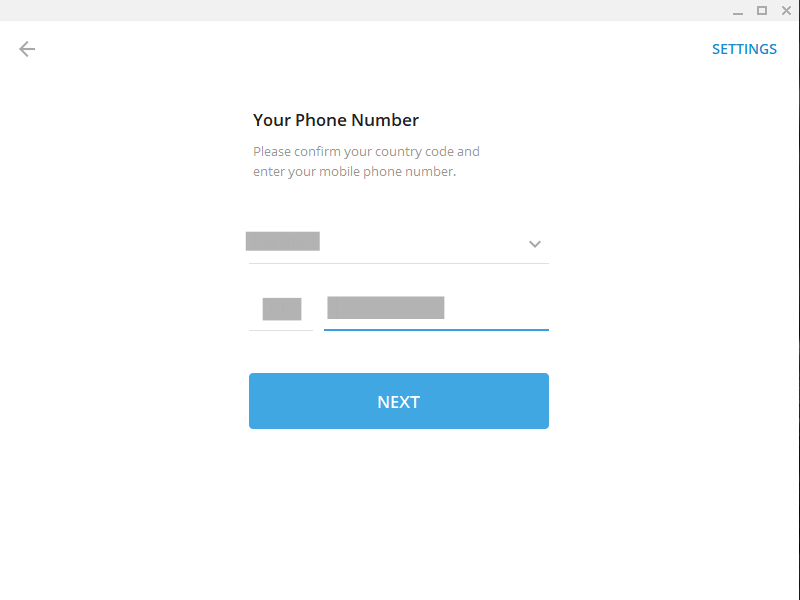
- Put your country, and phone number, then click Next.
- Now you’ll get a verification code on your number (used a few seconds back). Now, type this code where it’s needed, and the verification will complete instantly. Click Next.
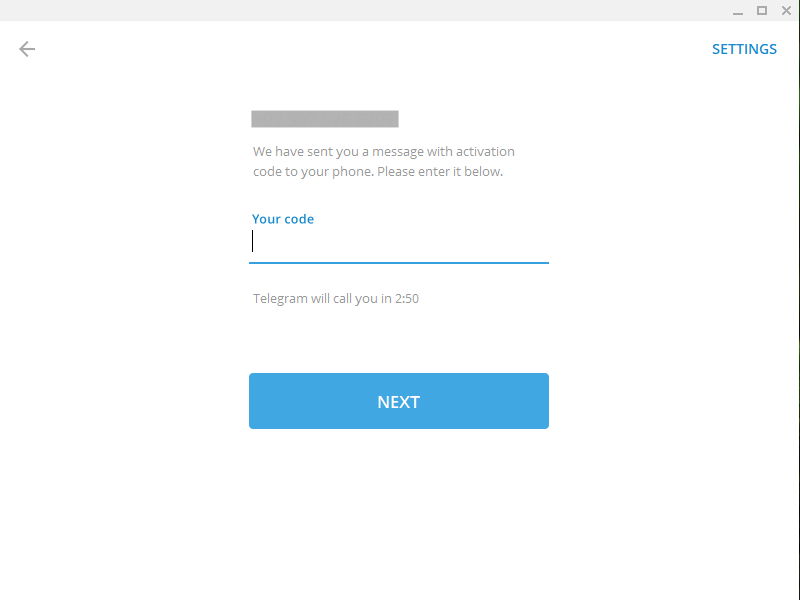
- Finally, put your name and the picture that will appear on your profile. Once you’re done click on the Sign-Up button.
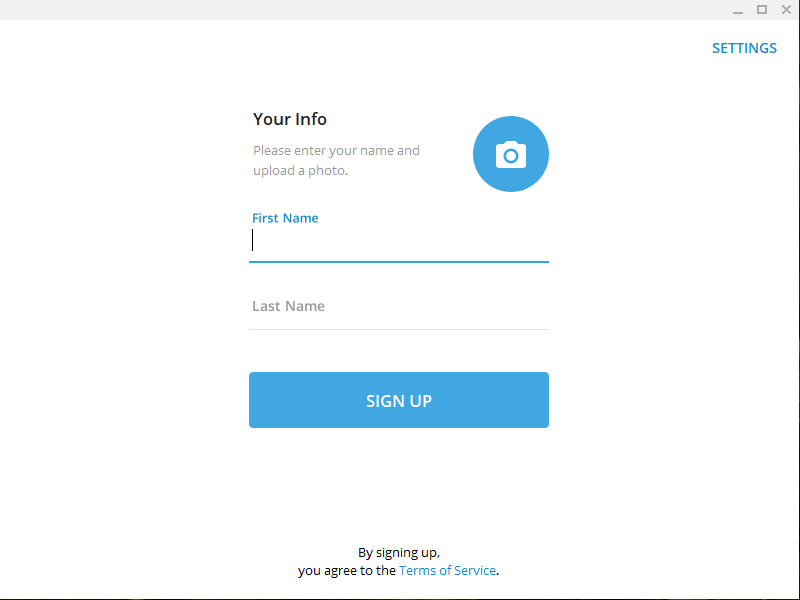
There you have it! Successful installation and signing up for Telegram ends here. Now, let’s move forward to the next section.
Setup WP Telegram Plugin
Step 1: Install WP Telegram Plugin and Activate
- Login to your WordPress admin dashboard, and then navigate Plugins > Add New. And hover over the search box and type WP Telegram. Once you find the plugin, click on Install Now. Activate the plugin right after the installation.
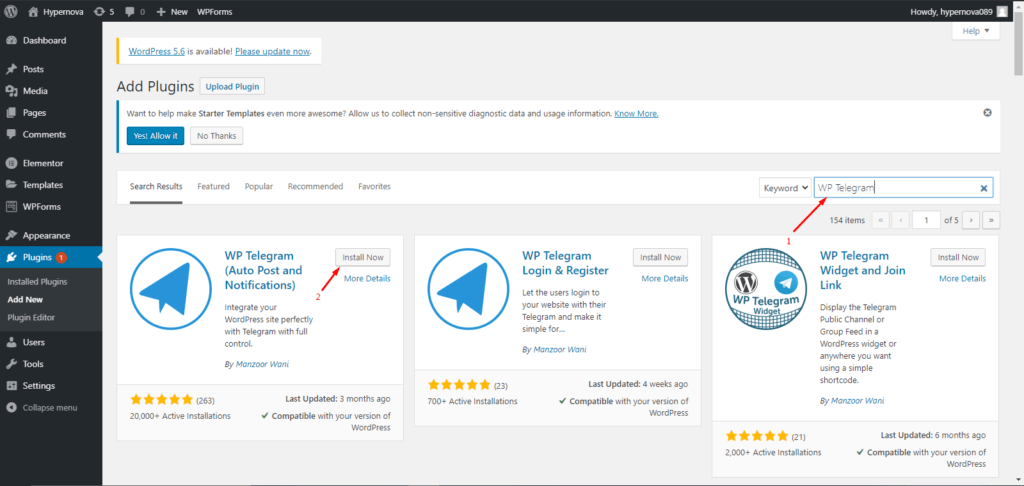
- See your admin dashboard, you’re having the plugin installed on your site. Now click on the WP Telegram tab in order to find all the settings of the plugin. Let’s move on to the setup option.
Step 2: Configure the Plugin
- First, enter into the Telegram desktop app, and type @BotFather in the search box. Pick the first option that has a blue tick and initiate the chat.
- type /newbot into the chat. BotFather will prompt you to give your bot a name and a user id. BotFather will produce a token for your latest bot that you need to copy after you include an appropriate name and username.
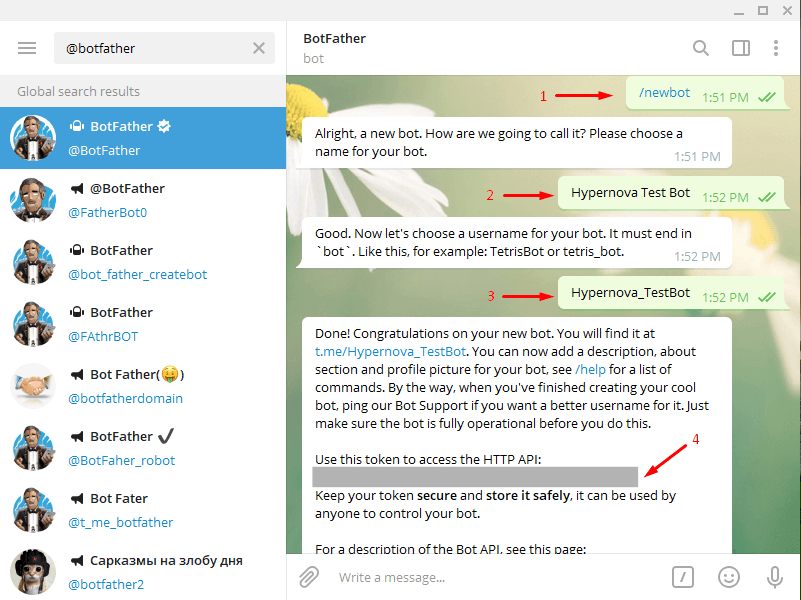
- Now navigate to the WP Telegram tab in the WordPress admin dashboard. Click here to open settings, and then paste the token you just copied into the Bot Token field. Then click Test Token, and the Bot Username field will be automatically updated.
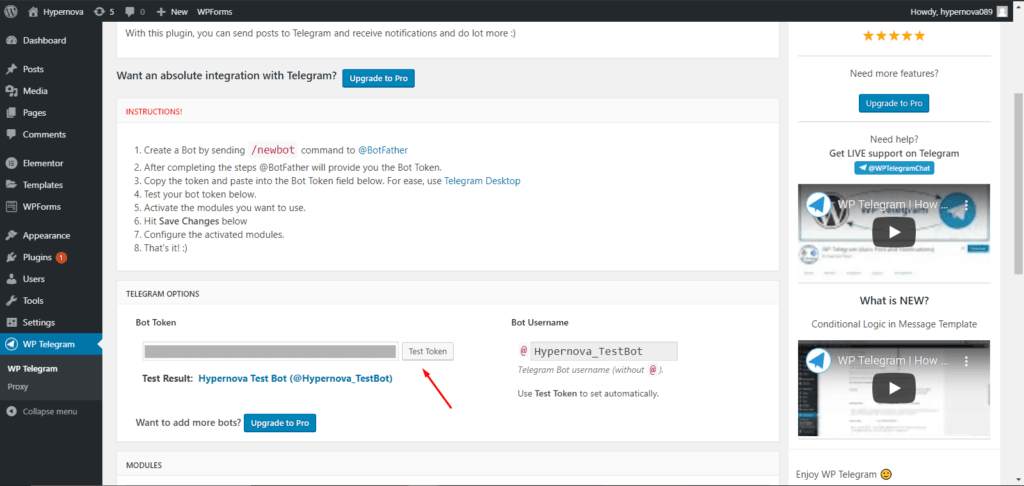
- Then, inside the modules section, look for the Private Notifications and Post to Telegram modules. Allow the components you want to use, then save your adjustments.
Kudos! You have managed to install and activated the plugin. And it is now time to configure WordPress to send Telegram notifications and posts.
WordPress Notifications and Posts to Telegram Accounts
Step 1: Get the Chat ID First
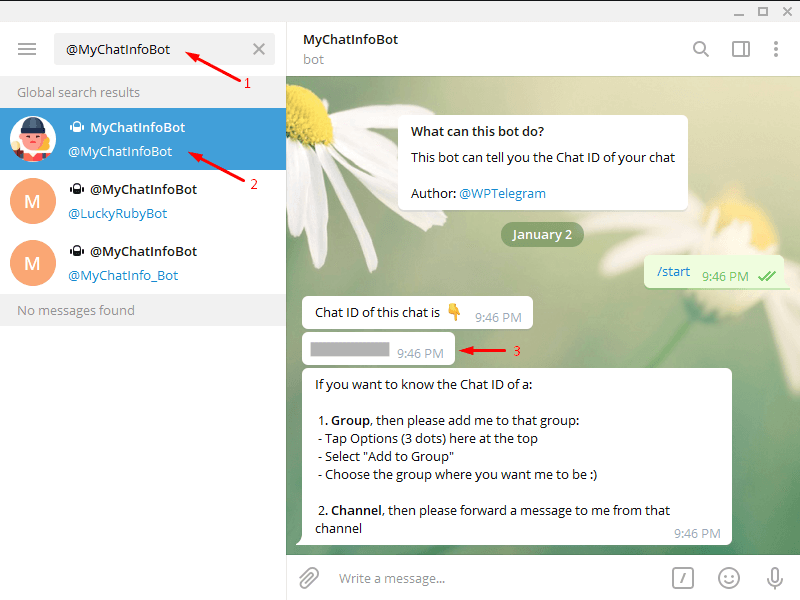
- In order to get a chat ID, go to your Telegram desktop app and type @MyChatInfoBot in the search box. Pick the first bot with the username that we mentioned and type /start. And you’ll get and Chat ID automatically from Telegram in your chat box. Copy the ID, you’ll be in need of it further.
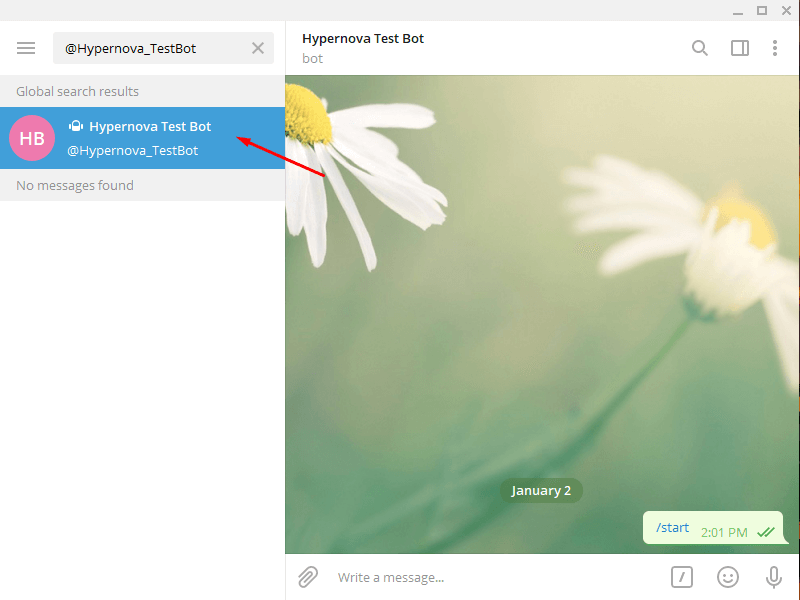
- Let’s test the chat ID you’ve just got from Telegram before going to any further steps. Search the username of the bot you got a few minutes back and initiate a chat with your own bot. By this, you can make sure everything is working well. For this tutorial, our bot is Hypernova_TestBot as you can see below. So we search for it, and we can initiate the chat for testing purposes.
Step 2: Configure Private Notification
- Let’s now configure your Telegram private notifications so you can receive your email notifications through it. To enable private notifications, go to WP Telegram on your admin dashboard.
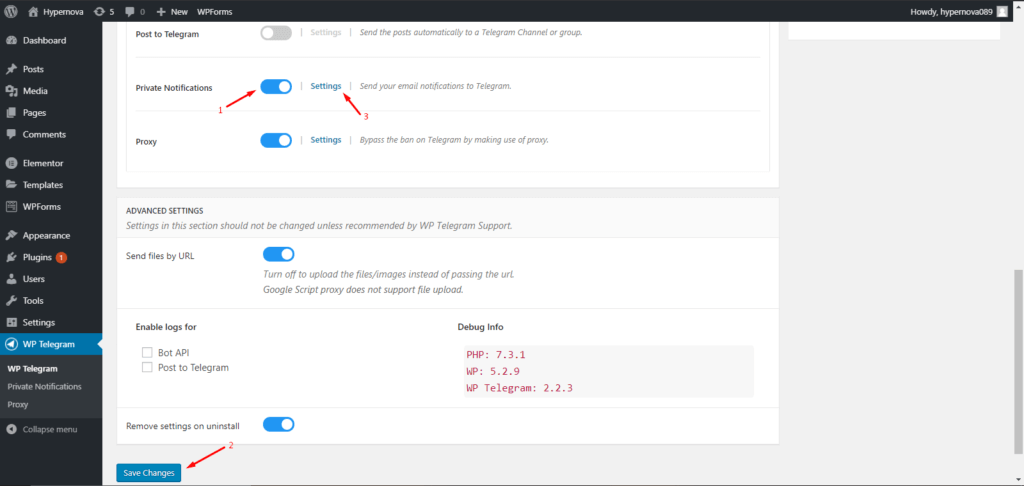
- Enter the email address for which you would like notifications in the “if Email goes to” label under the Private Notifications section. The “Send it to” field is next to it, where you’ll paste your copied Chat ID.
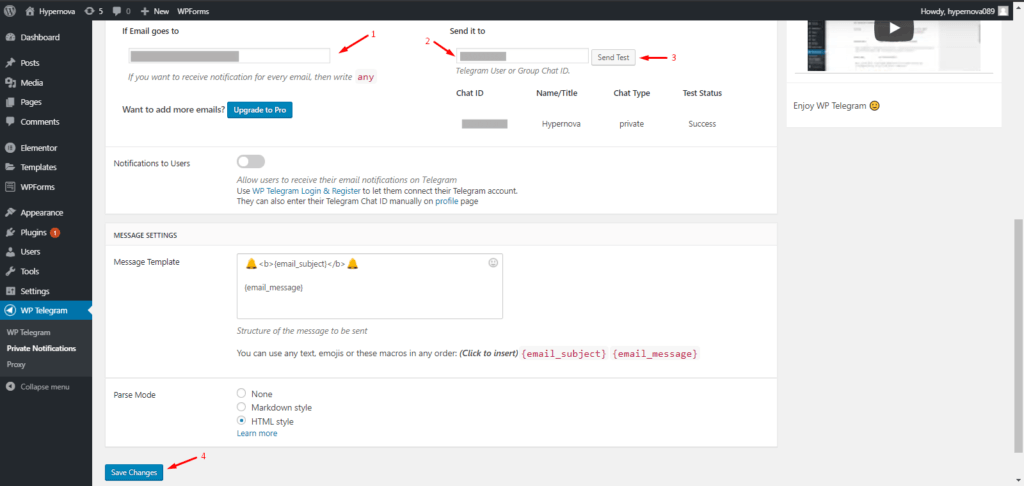
- It is important to confirm that everything is functioning correctly before moving forward. In the “Send it to” field, click on the Send Test button. When the pop-up appears, click OK to return to Telegram. Your inbox will contain the test message if everything is working correctly. Don’t forget to save your changes.
Now that you’ve set up your website’s notifications, you can access them. Let’s see how Telegram and WordPress can be used together now that you’ve integrated them. The next step is to learn how to increase the traffic to your posts by sending them to Telegram.
Step 3: Send WordPress Posts to Telegram
- You must enable the Post to Telegram option in your WordPress dashboard to make sure that it works.
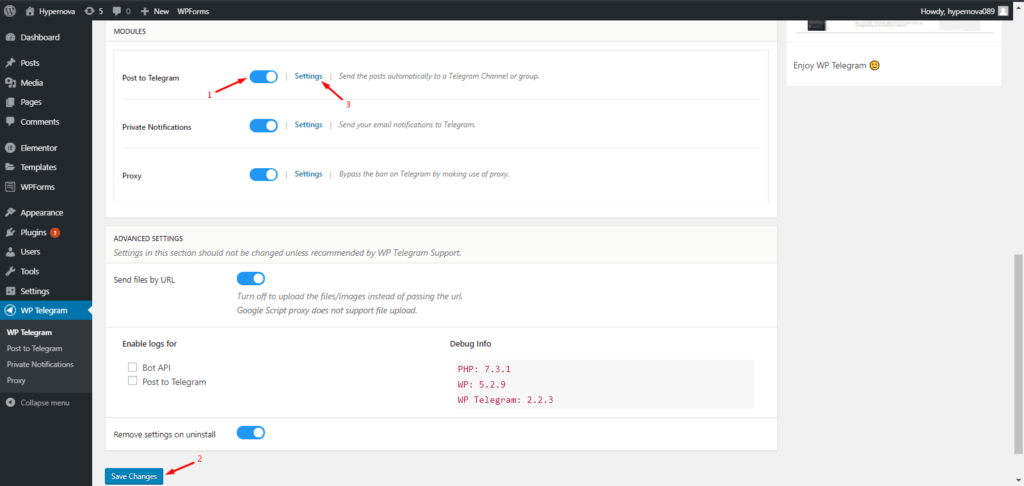
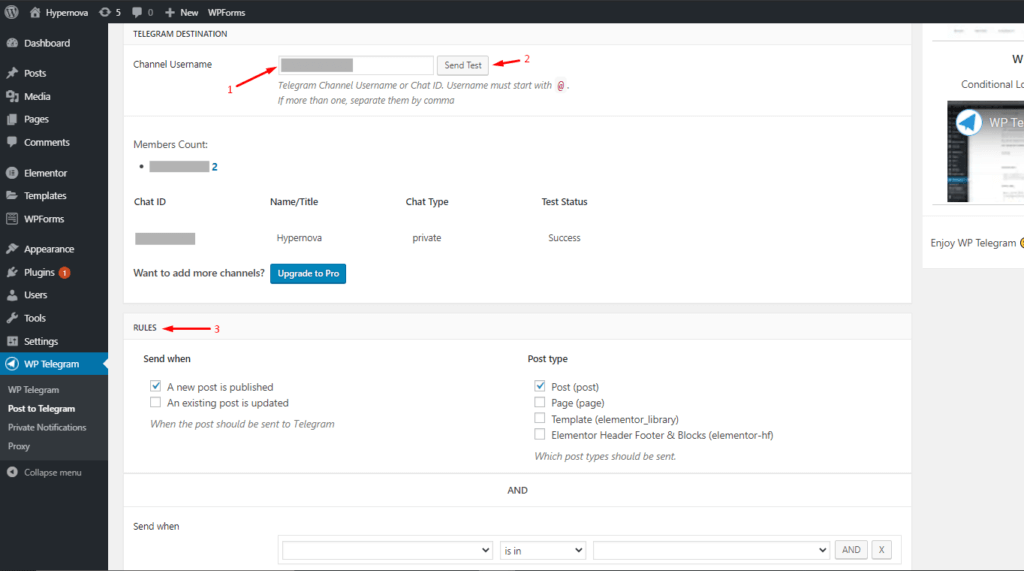
- Enter the Chat ID that @MyChatInfoBot provided and click the “Channel Username” field in the Post to Telegram section. Additionally, you can specify the type of posts that you want to send to Telegram under the Rules section.
- In order to ensure everything is working correctly, click the “Send Test” button and click OK to proceed. Click Save to save the changes.
- Having just set up the system, let’s put it to the test. Using your WordPress admin dashboard, click Posts > Add new to create a new post. To send your post to Telegram, select the option “Send to Telegram” and click “Publish.”
- The link to the post will be sent to you immediately on Telegram if everything is working properly.
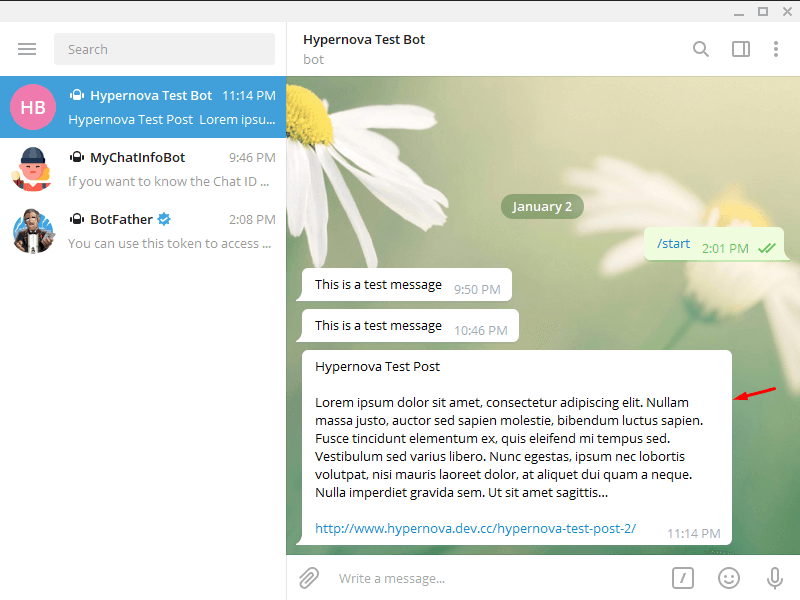
Congratulations! The Telegram app now allows you to post to it. To make the most of Telegram, there are a few things you can do. Let’s see how Telegram Groups work.
WordPress Notifications and Posts to Telegram Groups
It is possible to create groups on Telegram and invite up to 200,000 people. As we will see in Section 5, you should use groups to contact your team and use channels to broadcast content, even though some people use them to promote their content.
Step 1: Run the Bot as an Administration to the Group
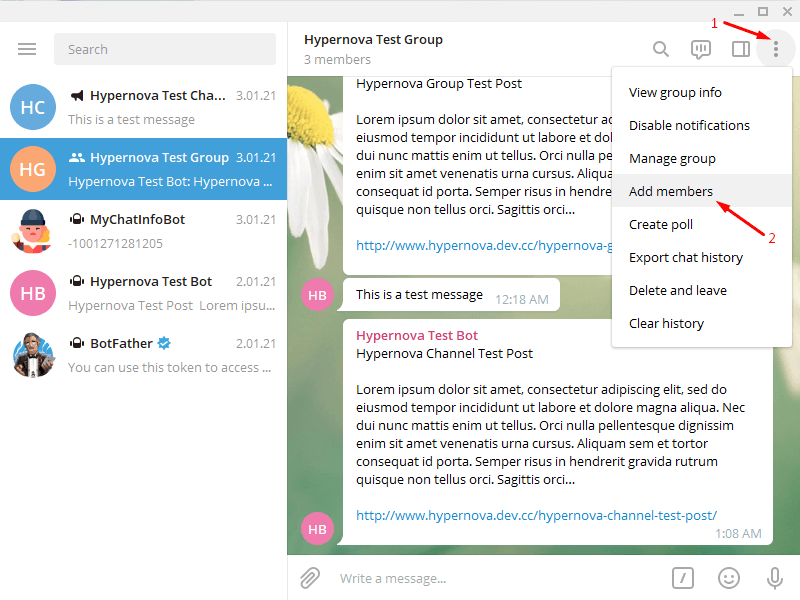
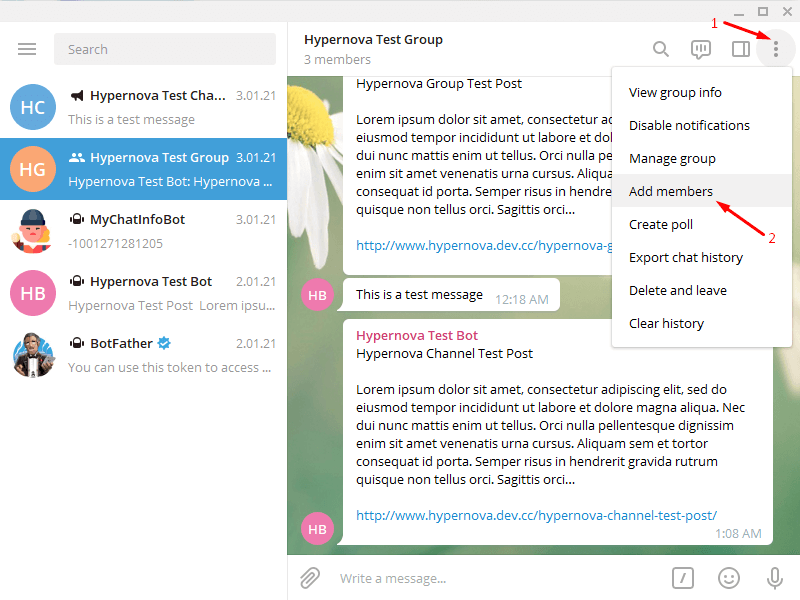
- Launch the Telegram app and open your group. On the top right corner, click the three dots and select Add Members.
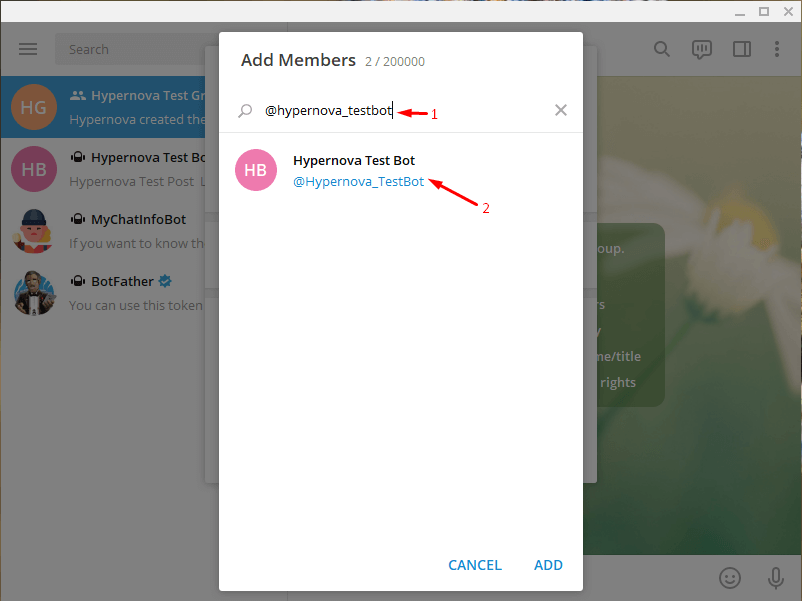
- Adding your bot to the group is as simple as searching for it and clicking ADD.
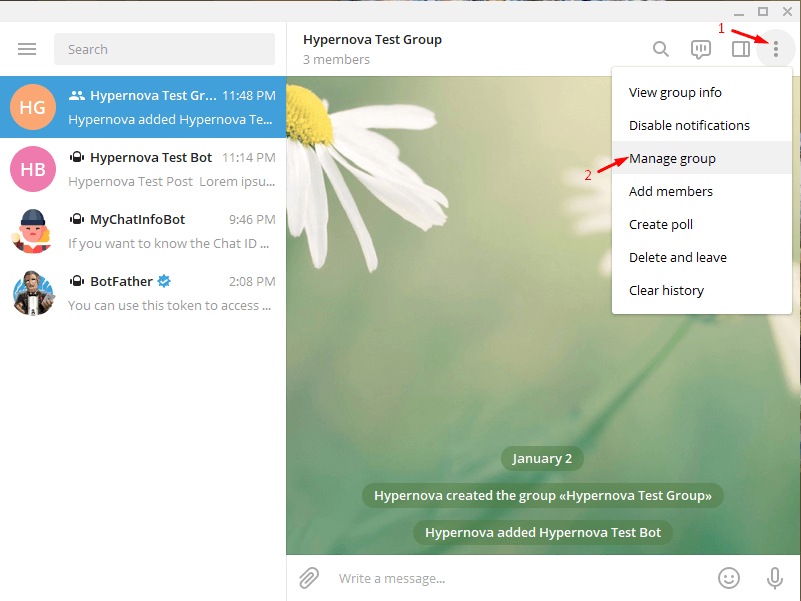
- To manage a group, click the Manage Group link in the group’s settings. Select Add Administrator from the Administrators menu.
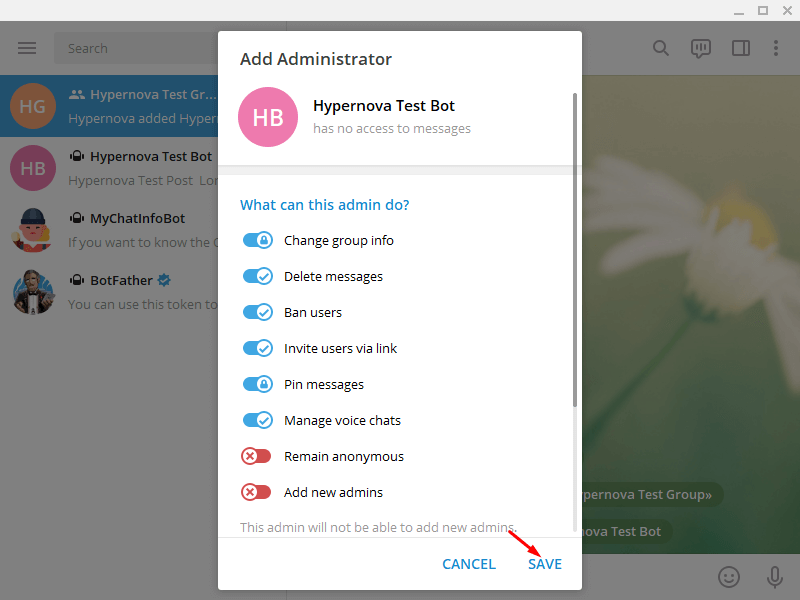
- Click Save once you’ve selected your bot and reviewed its permissions. Once this is done, hit Save again to make your bot the group administrator.
Step 2: Collect the Group Chat ID
- Add @MyChatInfoBot to your group to get your Group Chat ID. You can add @MyChatInfoBot to the group by clicking the three dots in the top right corner, clicking Add members, and then clicking Add.
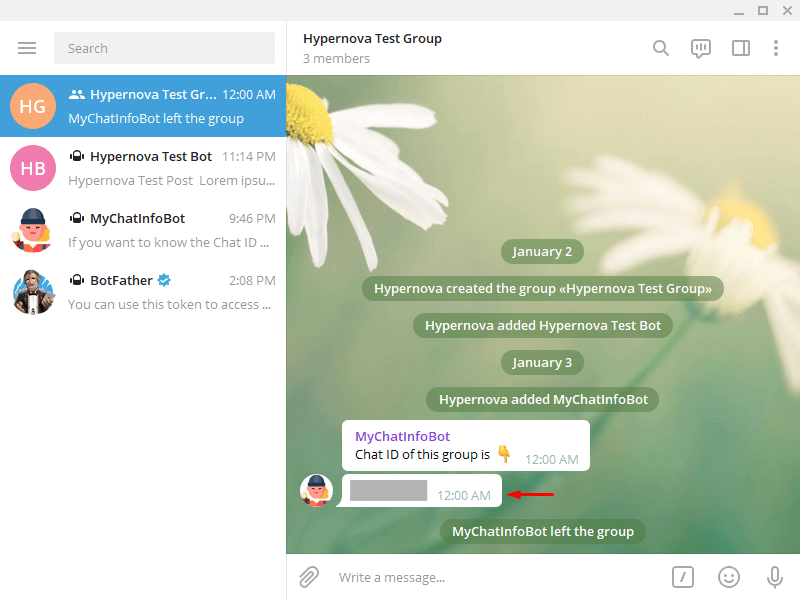
- Group Chat ID will be automatically sent to you by the bot. Make sure you copy it.
Just follow Step 2 and Step 3 from the previous section to send WordPress notifications and posts to your Telegram group. We will now integrate WordPress with a Telegram channel – but with one exception: your Group Chat ID will be used instead of your personal Chat ID. Stay tuned!
WordPress Notifications and Posts to Telegram Channel
Telegram offers a number of powerful features, including channels. Sending messages and sharing content through channels is an excellent method for reaching large audiences. With channels, you can promote your content to an unlimited number of subscribers, unlike with groups. Each message in a channel is also equipped with a view counter that shows how many times it has been forwarded.
Step 1: Create Channel and Add Bot as an Administration
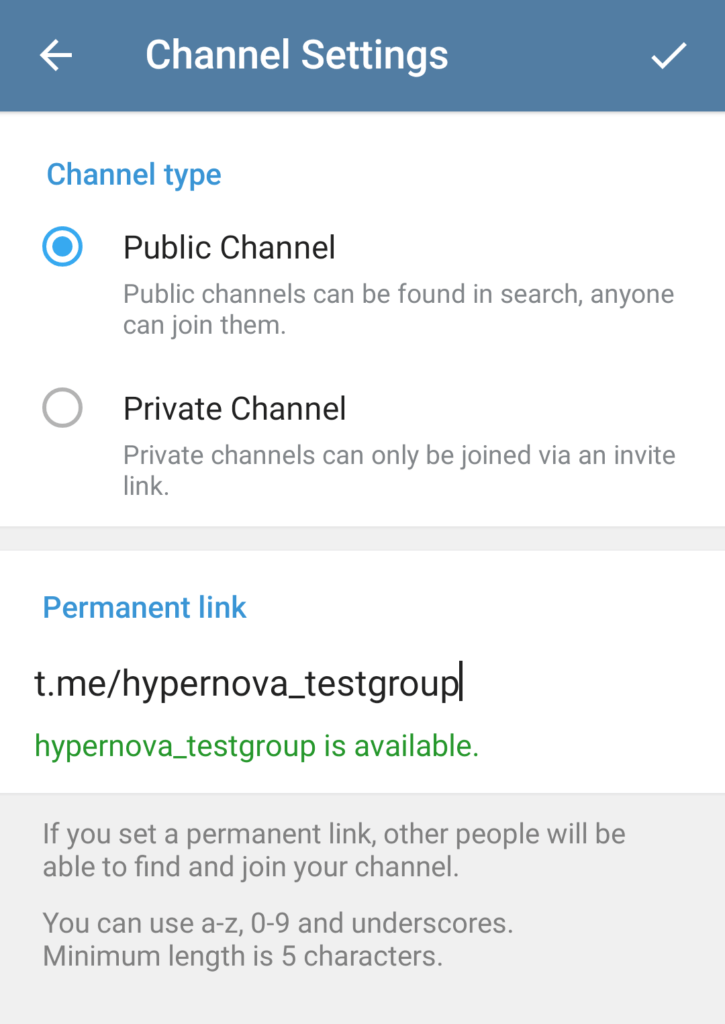
- Creating a channel is as simple as clicking New Message and clicking New Channel. Choosing a name, picture (optional), and description is required. Then, you need to choose the channel type: – Public: Any user can join your channel, Private: Only invited users can join. You’re now ready to go! Just create a permanent link.
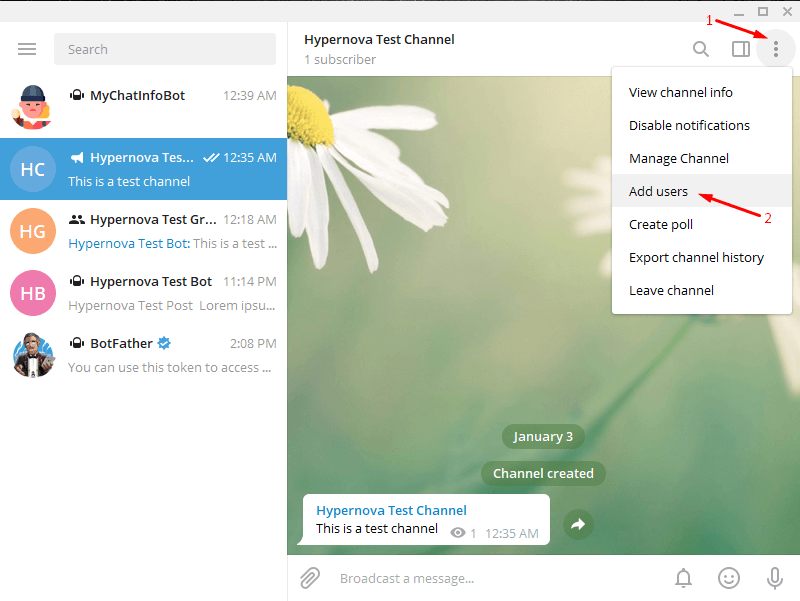
- Launch the Telegram desktop app and click on your channel. To add users, click on the settings (three dots) at the top right.
- To add your bot to the channel, search for it and press the ADD button. Bots can only be added as administrators, according to a pop-up message. Make Admin is selected.
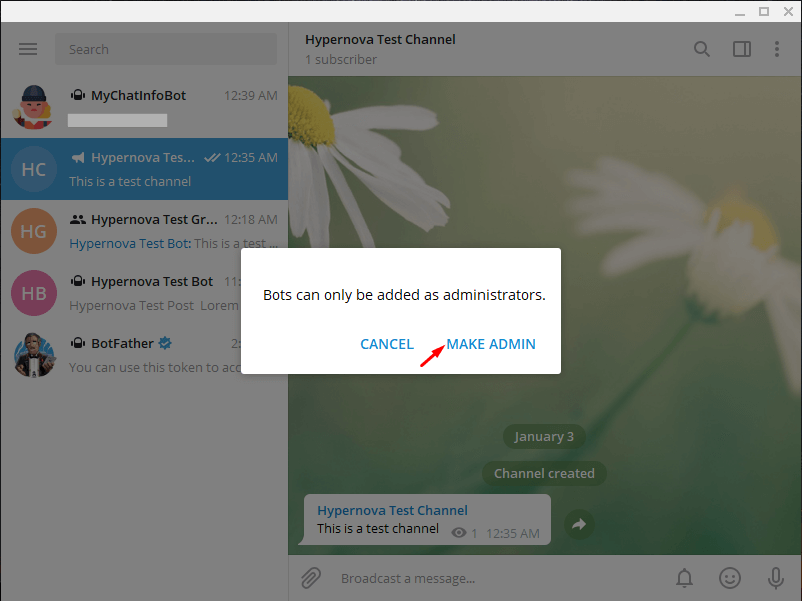
- Then, after going over the permissions, click Save. Your bot is now the group’s administrator.
To explore all the benefits of the Telegram channels along with sending WordPress notifications and posts, you just need to follow steps 2 and 3 of section 3. Just a slight difference here that is, you’ve to use your Channel username in lieu of the chat ID.
It’s done! So far you’ve learned how you can add a WordPress site to Telegram and get your site’s posts and notifications in your Telegram private chat, group, and channel.
What do you think, all ends here? No, certainly not. Telegram has another amazing feature to offer you which is adding a live chat bubble to your WordPress site.
With this feature, users directly can communicate with you in your Telegram account. Having this feature make your response fast to the customers’ query which results in a great customer experience.
Add Live Chat – Telegram to WordPress
For adding a live chat bubble to WordPress we can use the WordPress Telegram Chat widget by Elfsight. We have to create a nice-looking chat bubble prior to adding that to the WordPress website.
Step 1: Create a Chat Widget
- To start with, press the Create Widget button by entering this site. Have a look at all the templates, once you pick one click Continue. See the bottom right corner, the template chat box will appear that you chose.
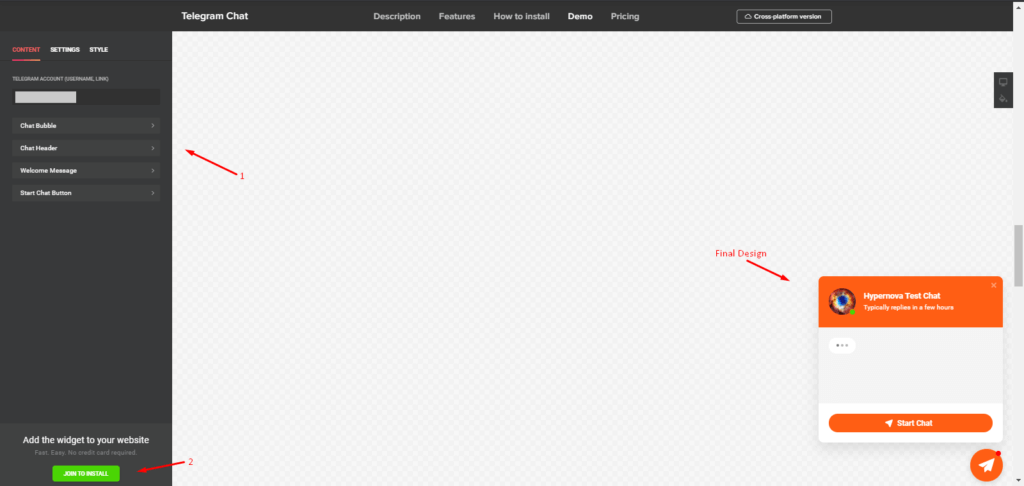
- The bubble chat box’s text, design, and color can be customizable from the sidebar. Once you complete choosing or picking all these things, enter the Telegram username or link into the place where you would like to get the messages. Now click on Join to Install. By doing so, you’ll get a sign-up page to create an account an account in Elfsight. There’s nothing to worry about, it won’t cost a penny.
- Now, have your widget a name, click on Apply and Save at last.
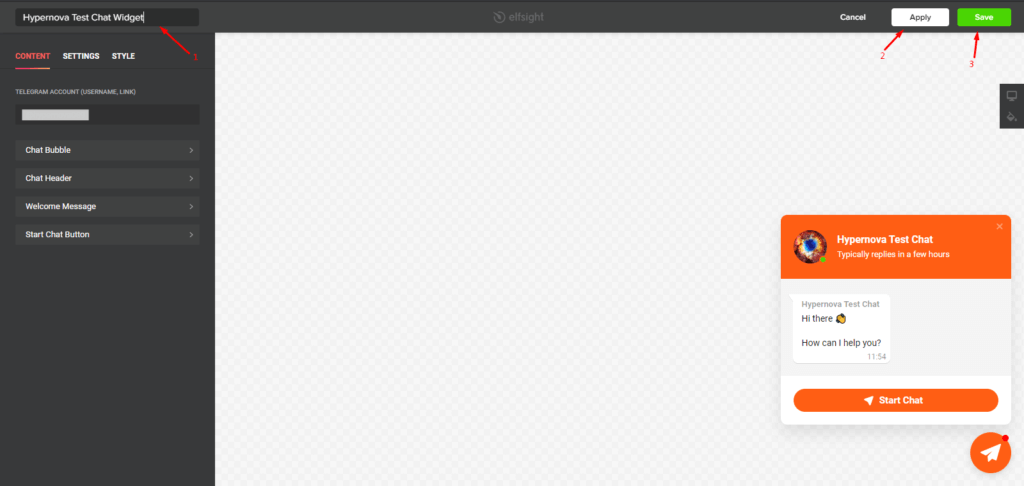
- At this point, you’ll be carried on the pricing plan page. A free version including 3 premium versions you’ll see. The 3 premium version starts at $5/month. Not going with the premium version initially but rather starting with the free version will be our recommendation.
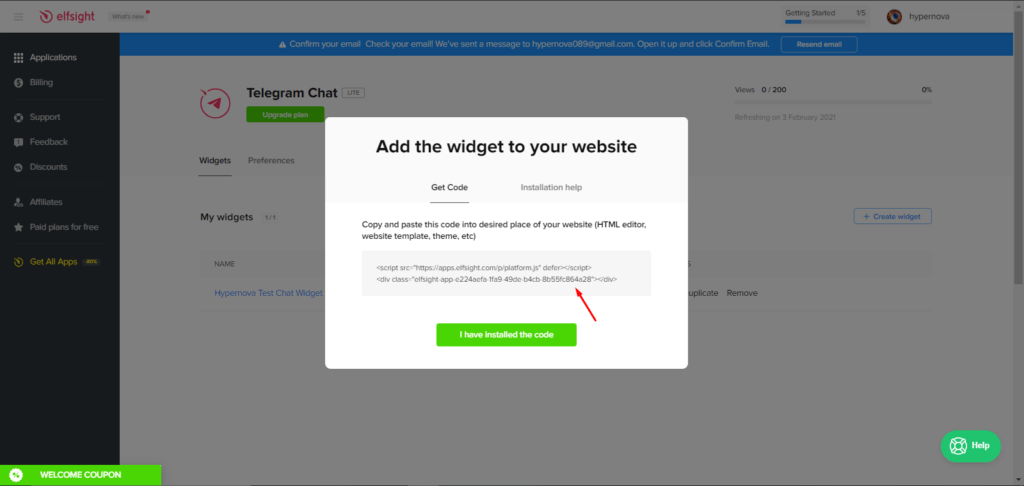
- Once you pick your plan, a short HTML code will appear as a pop-up, copy the code (which will be needed for the next step).
Step 2: Add Live Chat Widget to WordPress Site
- Let’s add the Telegram bubble to the WordPress website. Navigate Appearance > Customize by entering your WordPress admin dashboard.
- On the resulting customization page, find and click on Widgets > Header section. From the options, select Add a Widget and pick Custom HTML. This particular step mary from theme to theme, but it’ll be easy and straightforward no matter which theme you’re using now.
- Now, in the content field, paste the HTML code that you copied in the last step. You can leave the Title blank, click done, and Publish as follows.

- Well, now go to your website to see the Telegram chat bubble.

There you have all! From now on, your users can communicate with you using this Telegram bubble chat directly from your site, and you can manage the conversation using Telegram without entering your WordPress site.
Over to You
Overall, Telegram is among the most widely known messaging apps, with that almost 500 million monthly active users. You could really enhance your customer experience and even advertise your information by linking it to your WordPress website.
Furthermore, its capability to create groups for teamwork and audience interaction helps to make it an indispensable service for any company or organization. We’ve learned from this guide how to:
- Install Telegram on your computer.
- Install and set up the WP Telegram Plugin.
- Send notifications and posts: WordPress to Telegram accounts.
- Send notifications and posts: WordPress to Telegram groups.
- Create a channel and send posts there.
- Create a Telegram live chat bubble on your WordPress site.
That’s all! Using these ways you easily integrate a WordPress site with Telegram easily.
We hope this article was useful in learning about how you can integrate a WordPress site with Telegram. Let me know your insights after reading this min the below comment box. If you could let me know what topics most interest you, I would greatly appreciate it.
Any comments you may have would be greatly appreciated. If you like this post, be with ThemeLooks and subscribe to our WordPress video tutorials on YouTube. We may also be found on Twitter, LinkedIn, and Facebook.
![How-to-Integrate-a-WordPress-Site-with-Telegram-[Full-Guide-2022]](https://themelooks.com/wp-content/uploads/2022/08/How-to-Integrate-a-WordPress-Site-with-Telegram-Full-Guide-2022.png)


