Would you like to add custom fonts in WordPress that you have right now? Using custom fonts on your website will help improve typography and user experience by combining different fonts.
As well as looking great, custom fonts can also assist you in improving readability, creating a brand image, and allowing users to spend more time on your website.
Using Google Fonts, TypeKit, and CSS3 @Font-Face methods, we’ll demonstrate how to add custom fonts in WordPress using Google Fonts, TypeKit, and CSS3.
N.B: Your website may slow down if you load too many fonts. Select two fonts and make sure they are used throughout the site. You will also learn how to properly load them without causing your website to slow down.
Here are a few tips for finding custom fonts you can use so that we can learn how to add custom fonts in WordPress.
Table of Contents
Purchasing fonts is no longer expensive. There are several free web font resources available, including Google Fonts, Typekit, FontSquirrel, and fonts.com.
If you’re not sure how to mix and match fonts, try Font Pair. It assists designers in combining gorgeous Google fonts.
When selecting fonts, keep in mind that employing too many unique fonts can slow down your website. As a result, you should choose two typefaces and use them throughout your design. This will also improve the uniformity of your design.
Google Fonts is the most extensive, free, and widely used font library among website developers. Google Fonts may be added and used in WordPress in a variety of ways.
If you wish to add and then use Google Fonts on your WordPress website, this is by far the simplest and most recommended option for novices.
The first step is to install and launch the Easy Google Fonts plugin. For additional information, visit our step-by-step guide to installing a WordPress plugin.
After activation, navigate to the Appearance > Customizer page. This will bring up the live theme customizer window, where you will notice the new Typography area.

By selecting Typography, you will be taken to various places on your website where you may use Google Fonts. Simply click ‘Edit Font‘ underneath the part you wish to change the font for.
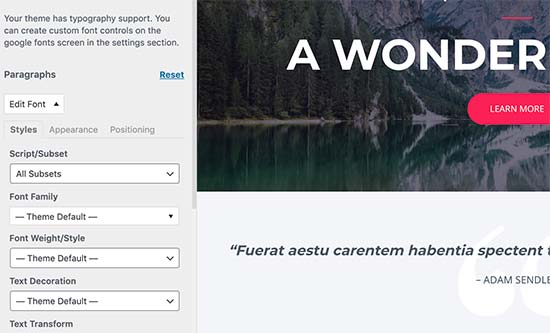
You may use any Google Font you like on your website by selecting it from the font family area. You may also change the font style, font size, padding, margin, and other options.
The number of sections here may be restricted depending on your theme, and you may not even be able to easily alter font choices for multiple areas of your site.
To address this, the plugin also allows you to develop your own controls for changing fonts on your website.
First, go to the Settings > Google Fonts page and give your font control a name. Use anything that will assist you in easily recognizing where this font control will be used.
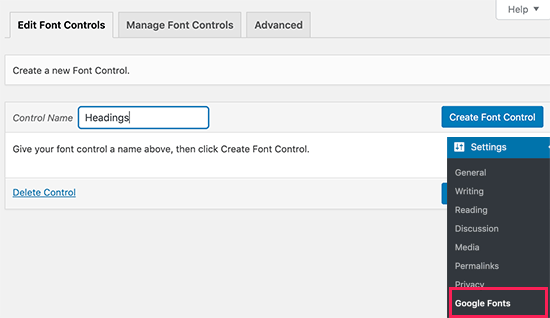
Then, click the ‘Create font control‘ option, and you’ll be prompted to provide CSS selectors.
You can target HTML elements (for example, h1, h2, p, blockquote) or utilize CSS classes.
You may use your browser’s Inspect feature to determine which CSS classes are utilized by the specific location you wish to alter.
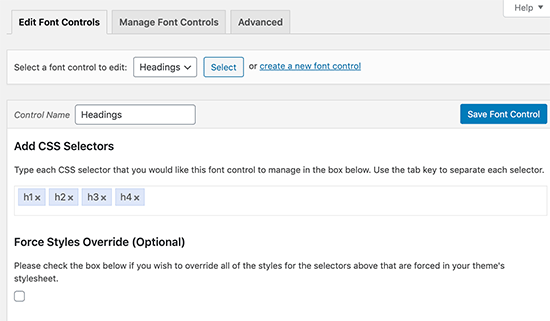
To save your settings, click the ‘Save font control‘ button. For different portions of your website, you may construct as many font controllers as you need.
To utilize these font controllers, go to Appearance > Customizer and select the Typography tab.
There is now a ‘Theme Typography’ option under Typography. When you click on it, it will display your previously made custom font settings. Simply click the edit button to change the fonts and style of this control.

After things are complete, make sure you press the save or publish button for saving all the changes you’ve made.
This strategy needs the addition of code to your WordPress theme files. First, go to the Google Fonts collection and choose a typeface to use. Then, beneath the font, click the quick use button.
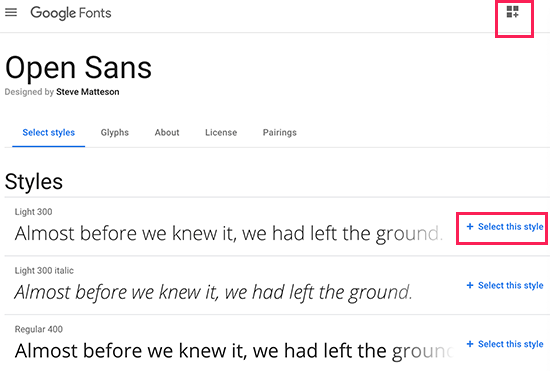
The styles available for the typeface are listed on the font page. Choose the styles you wish to use in your work and then hit the top sidebar button.
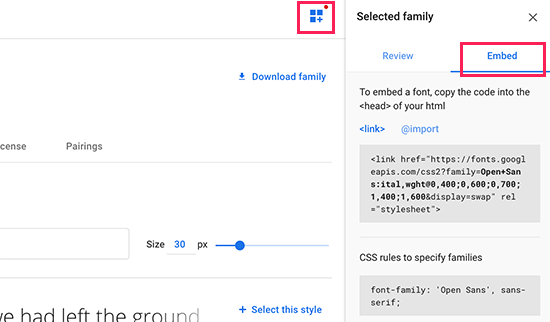
Then, on the sidebar, navigate to the ‘Embed‘ tab and copy the embed code.
You may add this code to your WordPress site in two ways.
To begin, open your theme’s header.php file and paste the code before the <body> tag.
However, if you are uncomfortable with code editing in WordPress, you may add this code using a plugin.
Simply download and install the Insert Headers and Footers plugin. For additional information, visit our step-by-step guide to installing a WordPress plugin.
After activation, navigate to Settings > Insert Headers and Footers and paste the embed code into the ‘Scripts in header‘ box.
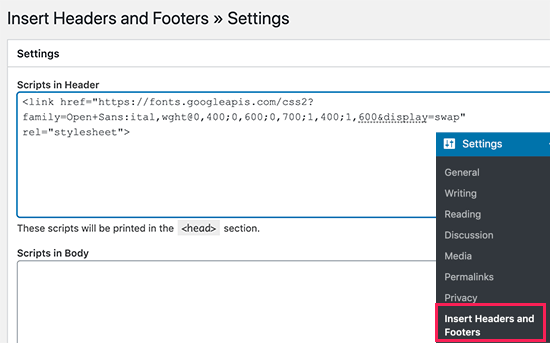
Remember to click the Save button to save your changes. The Google Font embed code will now be loaded on all pages of your website by the plugin.
This font may be used in your theme’s CSS as follows:
.h1 site-title {
font-family: 'Open Sans', Arial, sans-serif;
}

Typekit by Adobe Fonts is another paid and free font source for use in your design projects. You can utilize a premium membership as well as a basic free plan.
Simply create an Adobe Fonts account and navigate to the Browse Fonts area. To pick a typeface and create a project, click the /> button from here.
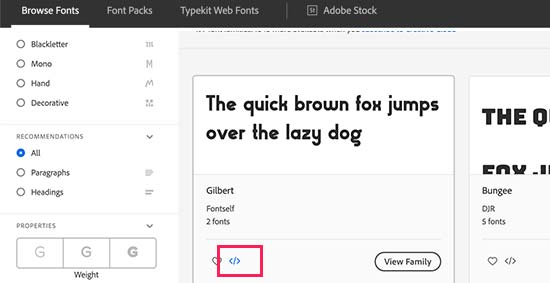
Following that, you’ll see the embed code for your project ID. It will also teach you how to utilize the font in the CSS of your theme.
You must copy and paste this code into your website’s head> section.

This code may be added to your WordPress site in two ways.
To begin, just modify your theme’s header.php file and insert the code before the <body> tag.
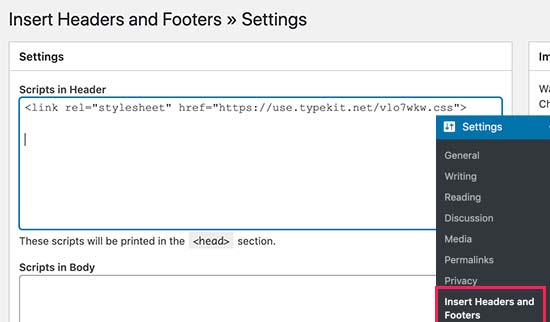
If you are uncomfortable with code editing in WordPress, you may add this code using a plugin.
Simply add the Insert Headers and Footers plugin and activate it.
After activating the plugin, navigate to the Settings > Insert Headers and Footers page and enter the embed code into the ‘Scripts in header‘ box.
That’s all there is to it; you can now use the Typekit font you choose in your WordPress theme’s CSS as follows:
h1 .site-title {
font-family: gilbert, sans-serif;
}
The simplest straightforward approach to adding custom fonts to WordPress is to use the CSS3 @font-face technique. This solution enables you to use whatever font you choose on your website.
The first step is to download the font that you want in web form. If you don’t have the web format for your font, you may use the FontSquirrel Webfont generator to change it.
Once you have the web font files, upload them to your WordPress hosting server.
The ideal location to put the fonts is in a new “fonts” folder in the directory of your theme or child theme.
To upload the font, utilize FTP or the File Manager on your cPanel.
After you’ve submitted the font, use the CSS3 @font-face rule to load it in your theme’s stylesheet, as seen below:
@font-face {
font-family: Arvo;
src: url(http://www.example.com/wp-content/themes/your-
theme/fonts/Arvo-Regular.ttf);
font-weight: normal;
}
Remember to change the font family and URL to your own.
After that, you may utilize that font in your theme’s CSS as follows:
.h1 site-title {
font-family: "Arvo", Arial, sans-serif;
}
Directly loading fonts with CSS3 @font-face is not always the best choice. If you’re using a font from Google Fonts or Typekit, it’s recommended to serve it straight from their servers for the greatest speed.
We hope this article helped you learn how to add custom fonts in WordPress. You may also want to see our guide on how to fix the missing appearance menu in WordPress, and our expert picks of the best responsive WordPress themes you can count on in 2022.
If you like this post, be with ThemeLooks and subscribe to our WordPress video tutorials on YouTube. We may also be found on Twitter, LinkedIn, and Facebook.


