If you want to unpublish a WordPress site and don’t know how to do it, you’re certainly in the right post.
You might be in need of unpublishing a WordPress page sometimes to edit or any privacy issues. Plus, you may be in need of hiding specific pages from a selected group of users.
Having said that, I’ll walk you through some easy methods to unpublish a WordPress page without any tricky hassle.
Table of Contents
It’s very obvious that you need to create and publish pages for your visitors whenever you build a WordPress website.
But, as we all know, each coin has two parts. What if you want to unpublish those pages so that they won’t be visible to the users? What could be the possible reasons -mentioned above already?
For further example, you want to change certain pages or remodify your site to give a new edition. Or, you published some pages accidentally and now you want to remove them.
However, WordPress is very user-friendly. So, it allows you to unpublish any page very easily- hide them or make them inaccessible to specific visitors.
In this entire article, you’ll get to know how you can unpublish a WordPress page. Having said this, I’m going to cover 3 methods of doing this. After explaining all the methods, the decision will be yours which one you’ll go with for unpublishing a page.
If you unpublish a page, it will no longer appear on your website, but you will still be able to edit and republish it later.
Changing the page into a draft is the easiest way to do this. By doing this, the page is hidden from visitors to your website, but logged-in users can still access and edit it.
You can use this tool if you notice inaccurate information on the page, or if you want to improve the content.
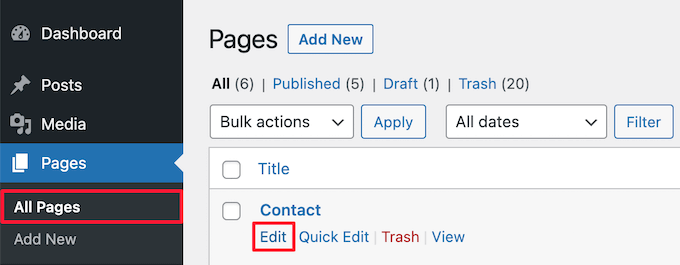
You can do this by going to Pages > All Pages, hovering over the page, and clicking on the ‘Edit’ link.
You’ll be carried out to the page editor section like the below-resulting page.
Now, time to click ‘Switch to draft’ from the top of the page.
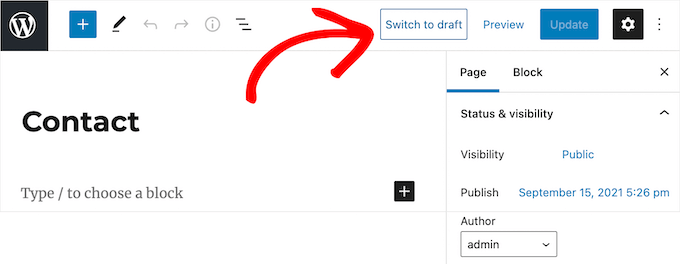
If you’ve followed so far correctly, a pop-up will appear on your screen and ask for your confirmation to switch the page to draft eventually.
Well, click the ‘Ok’ button. It’ll take that page to the Draft.

You can delete the page from your site if you no longer need it or if you think it is out of date.
You can relate this with adding the page to the recycle bin or trash bin on your PC/Laptop.
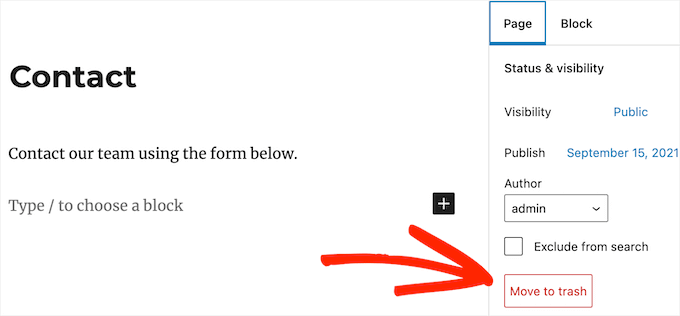
You can move your page from the right bar menu to the trash by clicking the ‘Move to trash’ button.
When you redesign or move a site to a new domain, you might have a bunch of pages you don’t need, or you may just want to make changes. Rather than unpublishing or deleting them one at a time, you can do it all at once.
Go to the Pages section and select All Pages, then unpublish the pages by checking the box next to them.
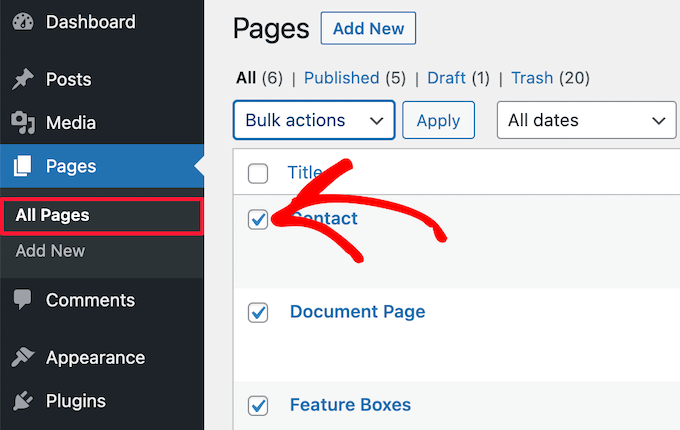
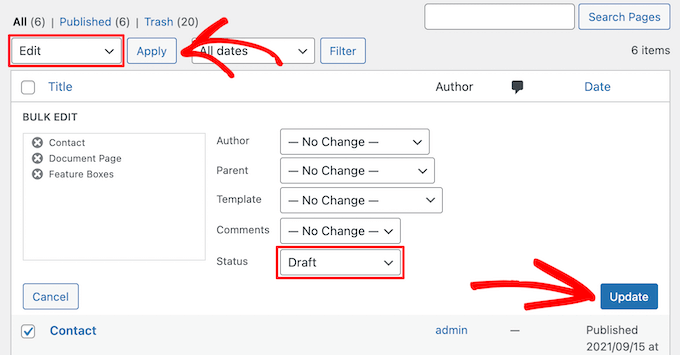
If you click on this, you will see an option box that will allow you to set multiple pages as drafts. By clicking the ‘Bulk actions’ drop down and selecting ‘Edit’, select ‘Apply’.
Next, click ‘Update’ and select the ‘Draft’ status from the drop-down box.
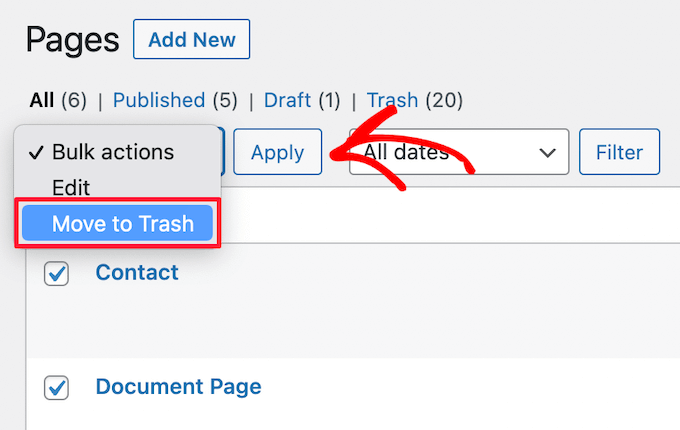
In the ‘Bulk options’ drop-down, you can also select ‘Move to trash’ to move multiple pages to the trash.
Press ‘Apply’ to complete the operation.
If you click on the ‘Trash’ menu option, you can view your trashed pages.
Select the ‘Bulk actions’ drop-down menu and select ‘Delete permanently’ next to the pages you wish to remove completely.
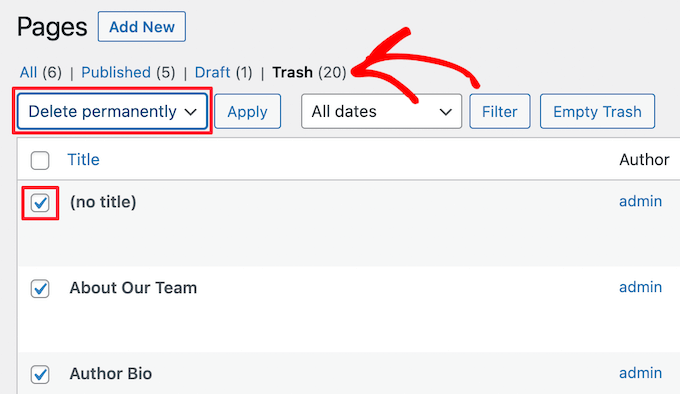
Click ‘Apply’ when you are done. Please keep in mind, that you won’t be able to restore the permanently removed pages. So, before deleting files be ensured that you don’t need them in the future. Delete only if you’re 100% sure about your actions.
If you set a password to any certain WordPress pages, it means you want to keep your users away from those blogs.
Why so? Password-protecting allows you to create a separate area for your clients and team members so that others can enter or view there. Another important aspect is that it helps you hide certain pages that are under maintenance.
Well, let’s see how you set things up easily. First, open the page on which you would like to apply for password protection. Then, find the Visibility section on the right and click on Public.
Finally, select ‘Password Protected’ and enter the password of your own into the box.
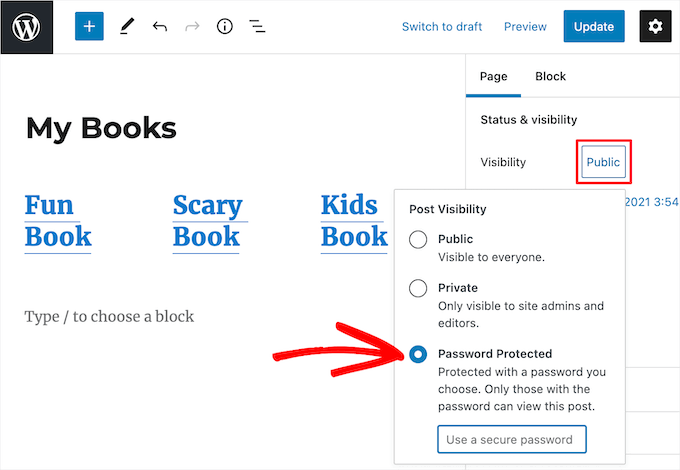
Once you’re done, click on ‘Update’ to save the changes you’ve set. So, from now onwards, your visitors need credentials to enter to view that particular page.

As an alternative, you can make your page private as well. By doing so, the pages will be visible to only those who are logged in to the site.
To do this, find ‘Visibility’ and select the ‘Private’ option.

Well, a pop-up will appear that asks for your confirmation to make the page private. Now, you just need to click on ‘Ok‘. And you’re done, the update process completes automatically.

Now, if you wish to see the pages that are private and password-protected, you need to go back to the WordPress page dashboard.
And you’ll see all the page lists there- draft, published, private, password-protected.

It’s a wrap. From now onwards, you can unpublish a WordPress page by following any of the above-mentioned procedures. Go with the one that seems easy to you.
I hope this post helped you a bit. If so, share it with other WordPress enthusiasts. Be with ThemeLooks for the latest WordPress themes, plugins, and templates to take your website to another level.
Just fill up the contact form to get a free consultancy from our expert. We would be happy to answer you.
ThemeLooks – YouTube – Facebook – Linkedin – Twitter