![How-to-Add-a-Language-Switcher-to-WordPress-[Full Guide-2022]](https://themelooks.com/wp-content/uploads/2022/08/How-to-Add-a-Language-Switcher-to-WordPress-Full-Guide-2022.png)
Are you thinking to make a multilingual WordPress website? Well, adding a language switcher to WordPress is the solution! READ ON!
We would appreciate the decision that you’re thinking of going multilingual, congrats! Undoubtedly, reaching international clients and audiences using a multilingual function is always and will be appreciated enough.
Making the site multilingual is not just about the functionality of having translating option. Of course, the main aim will be translating between languages, but this is not all. Besides this, you’ve to make sure your content is correct and audience-engaging, SEO friendly, great user experience, and so on.
Without any doubt, adding a language switcher to WordPress is essential if you’re or will be working with multilingual websites around the globe.
Table of Contents
Literally, a language switcher is a tiny button that creates big differences!
A language switcher is a button that is clickable and allows users to switch between multiple languages (two or more) within a simple click. When you’ve visitors from different languages on your website, having a language switcher is a must.
Simply put, to provide a great international user experience you need to add a language switcher to the WordPress website.

For example, let’s assume that you have a website that displays 3 languages: English, Dutch, and French. Having this enabled means all your website content can be translated into these three languages.
So users just need to select their preferred language using the language switcher. As a result, they will get a great user experience that improves their audience engagement. So, offer the languages that are familiar to your users and rank your site higher on Google SERPs.
There are many ways and forms of how you can display a language switcher on your WordPress site. Usually, website owners place it at the top right corner of the website. The form of the language switcher can be the language names, flags, or codes.
There are a bunch of tools available to create a multi-lingual WordPress website, but not all of them stand out. A few are mentioned below for you that offers the best features and functionalities, such as you can place the switcher anywhere (menu, footer, or any other place) you want to. Let’s see the options for you-

TranslatePress is a graphical linguistic plugin that features an intuitive front-end translation editor and the possibility of translating 100% of a website’s content.
Among its many multiple languages features and functionality and customization options, the plugin provides three types of language switchers to showcase and personalize on your site: a floating language toggle switch that guides the user on each and every page, a menu item switcher, and a shortcode switcher that can be positioned pretty much anyplace on the site (such as in a widget or in the footer).
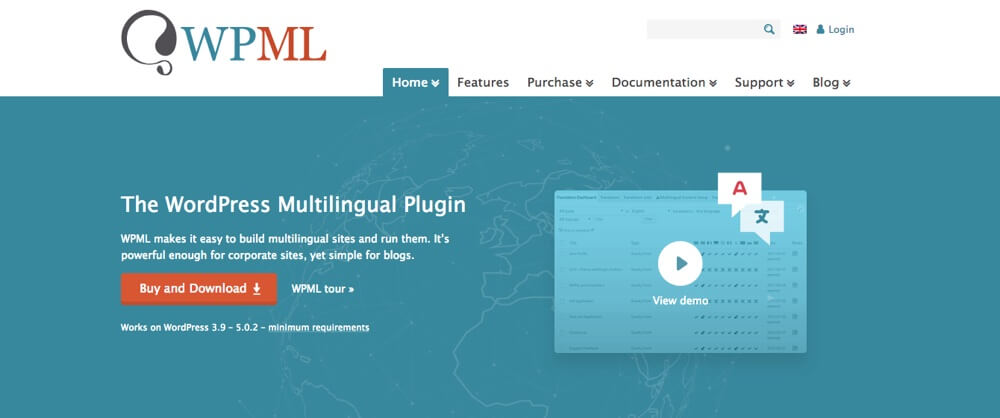
WPML is a back-end-based plugin for website translation purposes. It’s fairly compatible with any plugin or theme that uses WordPress API.
This plugin has 4 types of language switchers to offer you: widget, menu item, footer, and direct links. Moreover, you can easily customize every switcher as you like to have them on your website.

For smaller multilingual websites, Weglot is the solution. It’s a SaaS solution that stores translations on its own servers. It’s totally opposite from other options in terms of providing full control over the translation process.
However, by default, you’ll get a floating selector with Weglot. Despite being this as default, you can customize the position and appearance of it later on. Doing customization, you can move the switcher to the menu, a widget, or any place where the shortcode is supported.

For seamless translation integration to WordPress sites, Polylang is one of the popular multilingual solutions.
The language switcher that Polylang offers has different customization options with many features and functionalities. It comes with a back-end translation interface. A menu switcher, and a widget switcher in included in Polylang. Besides, you can place the switcher anywhere on your WordPress site through the PHP template tag.
There you’ve your options above! All these plugins offer good customization features and functionalities. You can add a language switcher to the WordPress site by using any of it. So, go with the one that you prefer the most.
So far, you’ve known about the options you have, now the important question is, how you can implement the language switcher with all features and functionalities to your WordPress sites. Well, we’ve got you covered here.
To show you the step-by-step process, we’ve picked the TranslatePress plugin. With this multilingual plugin, adding a language switcher to WordPress is a breeze.
To get started, you need to install the TranslatePress plugin first on your WordPress website. If you’re a newbie to WordPress, you can follow our guide on how you can install WordPress plugins easily.
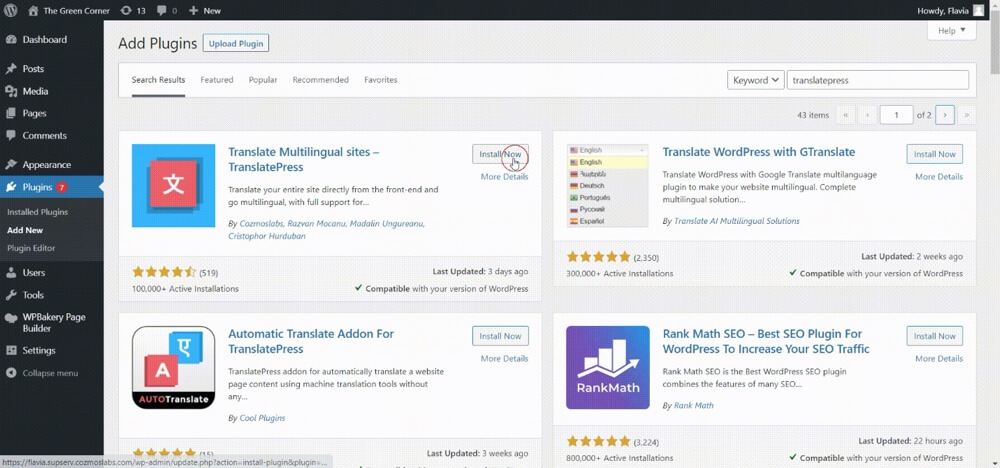
Well, let’s get back to business. In order to install the plugin go to Plugins > Add New in your WordPress admin dashboard. Hover your cursor on the upper right corner search bar and type TranslatePress. Once you find the plugin, click Install Now. After the installation, make sure you activated the plugin.
Once installation and activation are complete and your plugin is up and running, you can move to the picking your languages section of the website.
And to do so, go to the General tab in the admin dashboard, and navigate Settings > TranslatePress. You’ll get a section called All Languages here. Well, choose and add the languages you want to have on your website by clicking the dropdown of this section. Every time you select a language, make sure that you’re clicking the Add button right after the language selection.
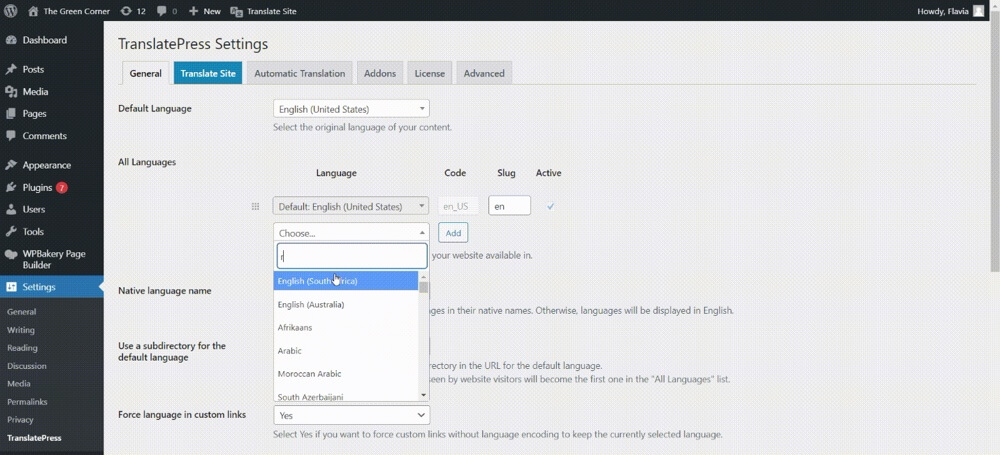
Save the changes, and move forward with the process.
While using TranslatePress as a plugin to add a language switcher to the WordPress site, you’ll get 3 different types of language switchers to use. It’s very interesting that you can use all the 3 types at the same time, combine any two, or any single one.
We know this totally depends on your preferences, but the important thing is you’ve got these various options. 3 types of language switcher are as follows:
Now, in order to choose your desired language switcher to go to Settings > TranslatePress and do a bit of scrolling in the General tab. Here you are, all the 3 types of language switchers are here. You can simply activate or deactivate any of the types by checking/unchecking checkboxes to their left.
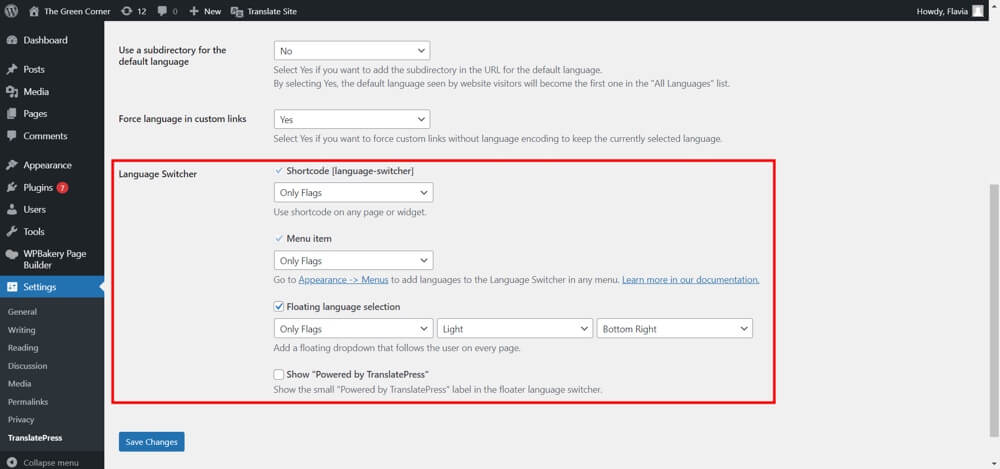
Using any of these language switcher options, you’ll be able to showcase your switcher by displaying language codes, language names, flags, or the combination you prefer (customization is possible). That being said, 5 options are available in TranslatePress for displaying the switchers.
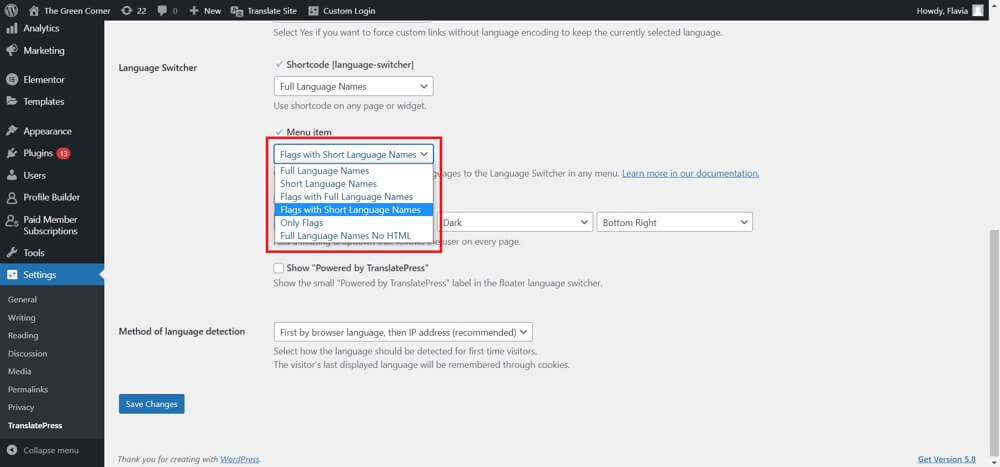
Well, now let’s move forward to the process of showing up each type on your WordPress site.
You can add a language switcher in the main navigation menu (also any other menu if you have one) on your WordPress site using TranlatePress.
In order to add this particular switcher, select the menu to which you wish to add your switcher to from Appearance > Menus of your admin dashboard.
You’ll get different menu items, pick the Language Switcher and click to expand the options. You’ll notice all the languages here that you’ve added to your website along with an item named Current Language.
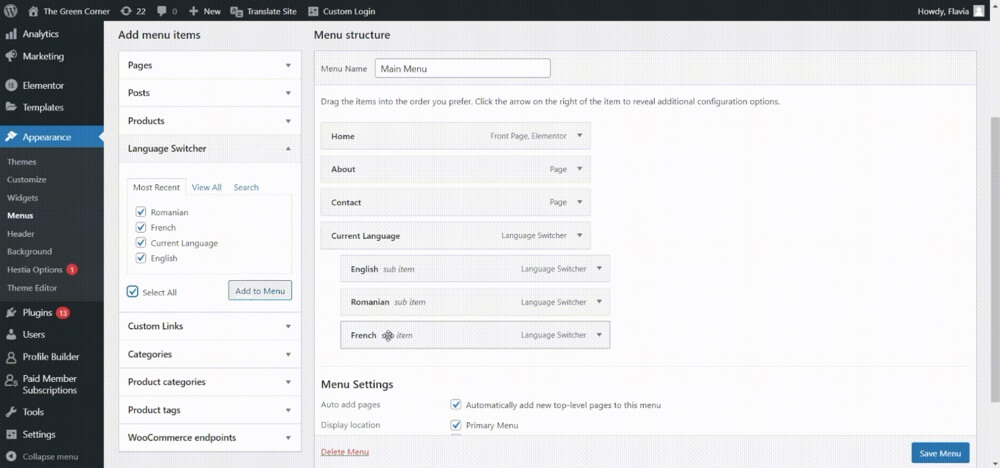
To make your switcher appear in your menu, add all of these items to it, making sure to place all of your Language items under the Current Language item (as sub-items) to create a dropdown-type switcher.
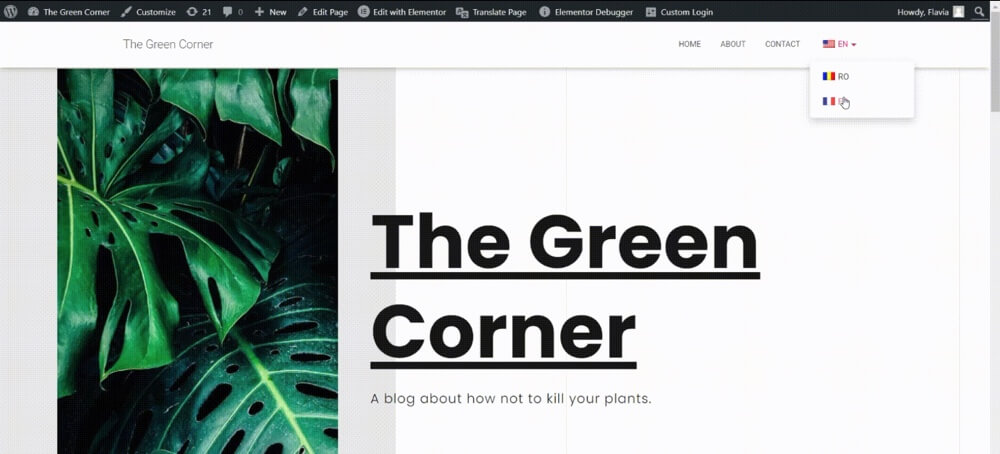
When you’re finished, make sure to click Save Menu. Your new language switcher in the menu should look like this:
This particular switch type is the most convenient for your users. Why is it so? Because your visitors can switch language from any page as the language switcher is a floating one. No matter which page you’re visiting on the website, one click on the floating switcher can translate everything.
The first step is to enable floating language selection under TranslatePress Settings > General.
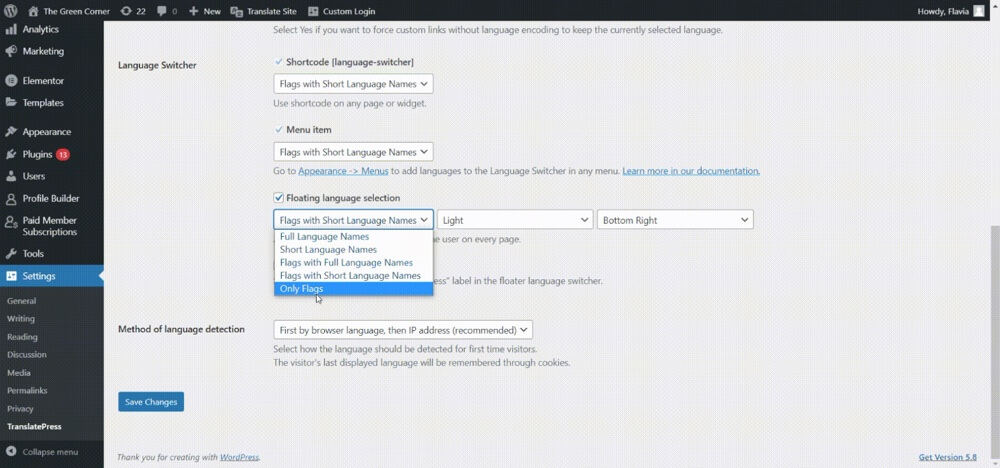
In this section, you are able to choose between the Dark theme and the Light theme, and also the position of the floating switcher on your site. If you want to display this type of switcher, you have the following options:
You’re done! Make your selections, click Save Changes, and then you’re done! View a preview of your floating switcher:
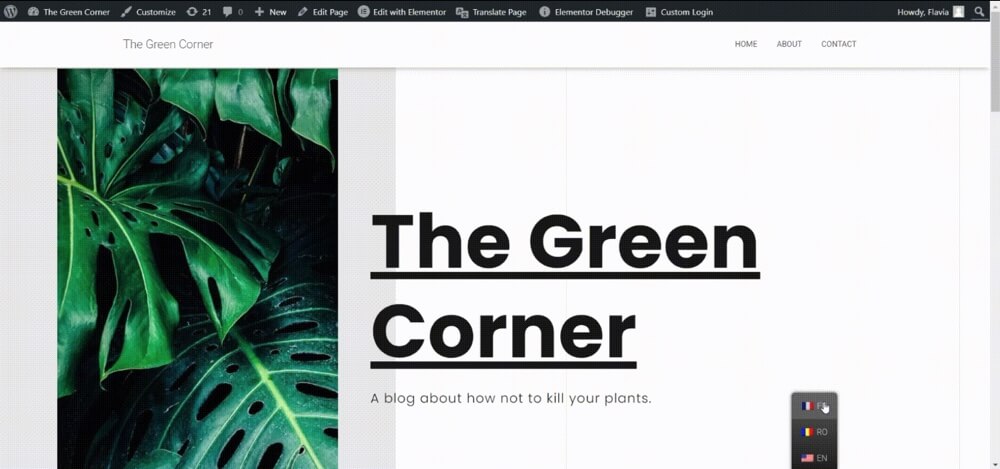
The language switcher widget can be easily displayed with a shortcode in the sidebar or footer of your website. Shortcodes can also be used to position switchers in other places on your WordPress website, depending on your theme.
Start by going to Appearance > Widgets and dragging the switcher widget to the place where you want it to appear, such as the sidebar, footer, or anywhere else you have space.
The Language Switcher Shortcode [language-switcher] needs to be inserted in the text widget. To make it easier for users to identify your switcher on the page, you can add a title, such as “Language.”.
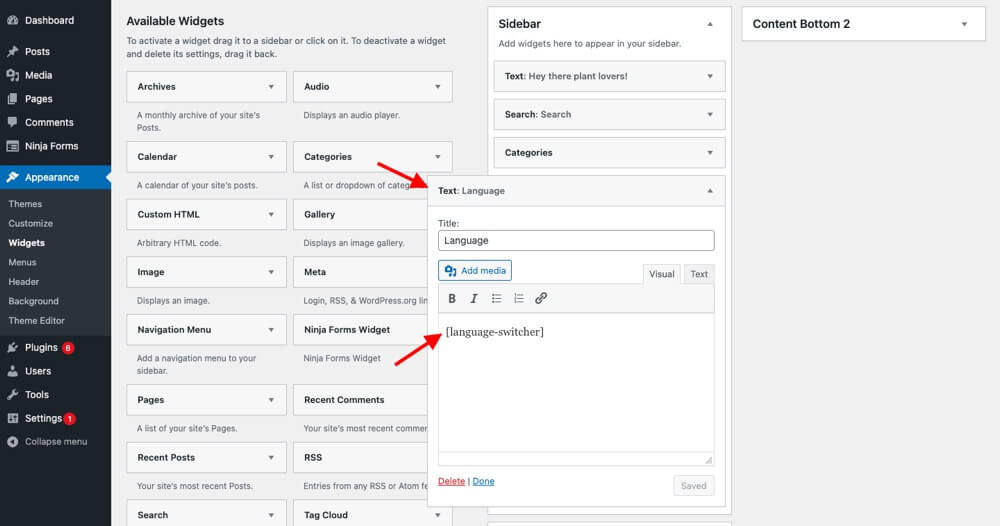
If you want to see your newly added switcher on your page, make sure you click Save.
Using the General tab of TranslatePress Settings, you can customize the look of your switcher with one of the five options available.
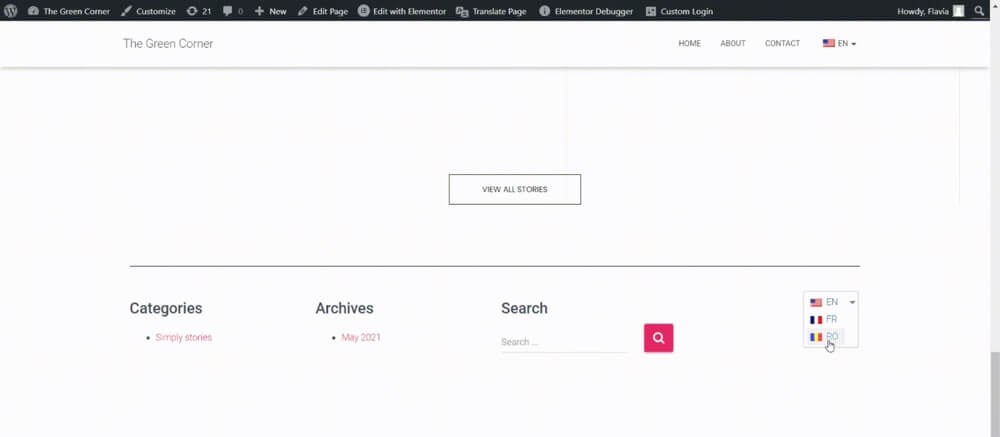
There should now be a language switcher where you selected to place it.
When you’ve completed all the core setups, you can explore other customizability options. The following features are also available with TranslatePress:
When adding a new language to your website, you might not see the language you want in the dropdown languages menu. Despite this, a custom language is always possible.
Alternatively, you can simply click on the Custom Languages button at the top of the Advanced tab in TranslatePress Settings.
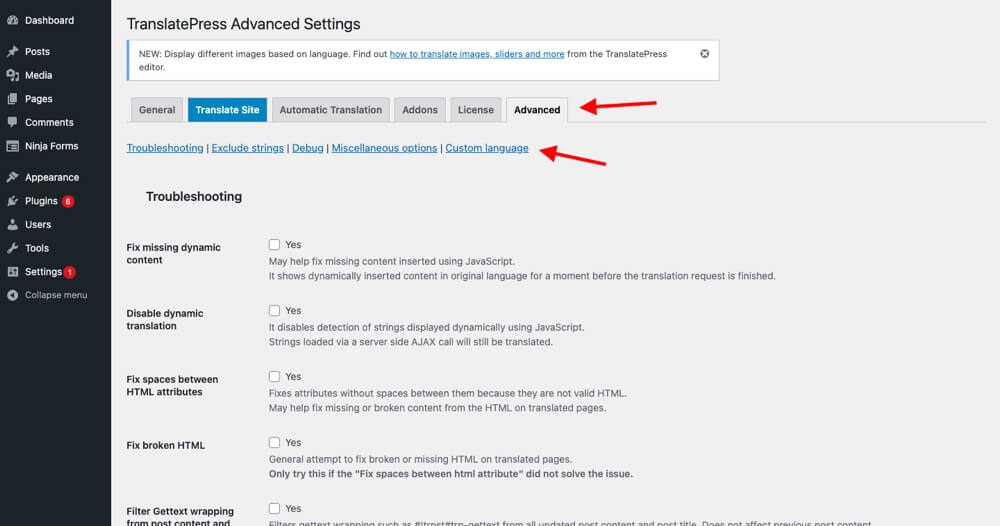
Languages can be added here, along with their native names, ISO codes, and custom flags. After you’ve finished making changes, make sure to save them.
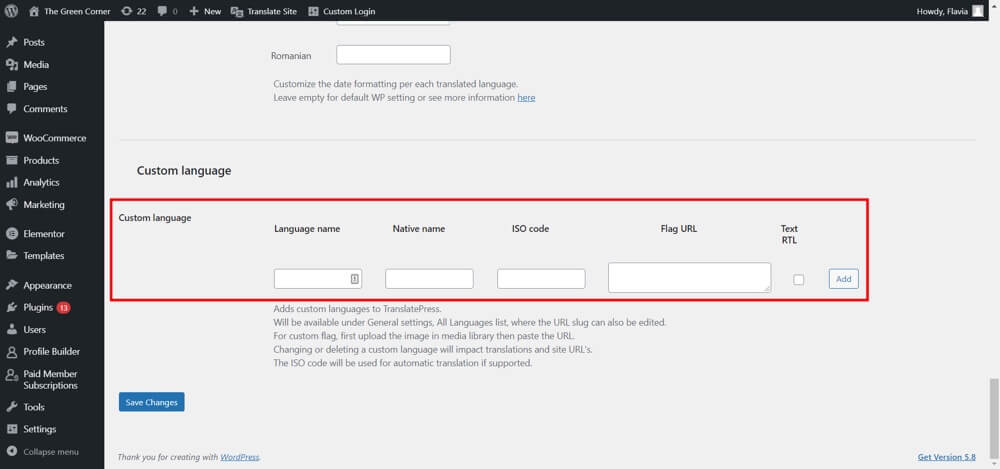
The TranslatePress Settings tab has the General tab where you can add your new custom language to the website’s languages. Remember to add that custom language to the menu also if you chose the Menu Item Switcher (Appearance > Menus).
You can easily replace the default TranslatePress flags with any other picture you have uploaded to the website at any time if your website’s design does not suit the default.
Just go to TranslatePress Settings’ Advanced tab, then go to the Custom Language section and enter the information about your custom language, and enter the image URL under Flag URL.
Adding a language to the dropdown menu can be done with a custom language or an already existing one. When adding this new custom flag to your website, you’ll have to re-enter it as a custom one and remove the original one, since you won’t be using the default one.
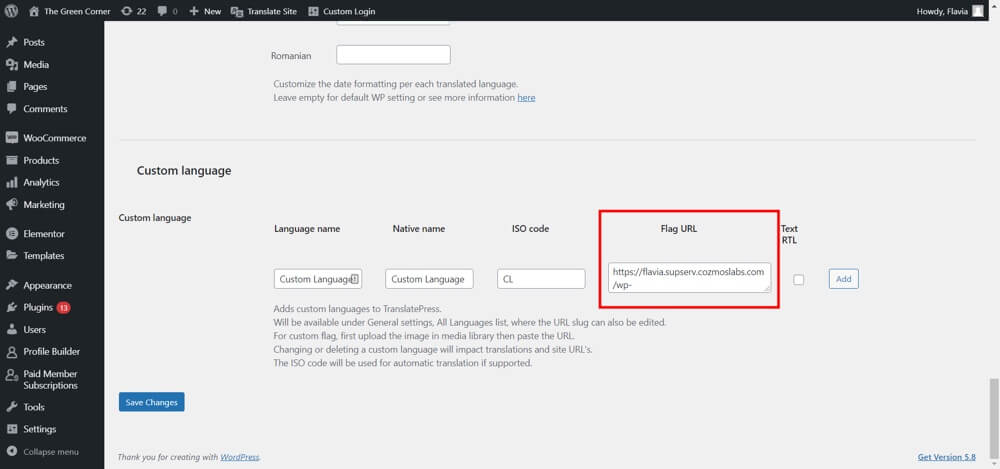
In addition to adding it to the Menu Item Switcher, be sure to add it to the menu, too.
This is all you need to know! You have successfully learned how to add a language switcher to WordPress.
The only thing left to do is start translating (if you haven’t already) so that your international visitors have a smooth experience.
Have fun translating!
Let us know your insights after reading this in the below comment box. If you could let us know what topics most interest you, we would greatly appreciate it.
Any comments you may have would be greatly appreciated. If you like this post, be with ThemeLooks and subscribe to our WordPress video tutorials on YouTube. We may also be found on Twitter, LinkedIn, and Facebook.