
Table of Contents
Choosing the right web hosting themes can make or break your hosting business. A slow, outdated, or poorly designed website drives visitors away, affects search rankings, and lowers conversions. A fast, responsive, optimized web hosting website is essential for success.
A premium web hosting theme offers advanced features, clean code, and built-in performance optimization to ensure your site loads quickly and smoothly. Whether you’re a beginner or an experienced developer, using a high-quality theme saves time, improves user experience, and enhances SEO rankings.
In this guide, we’ll explore the key benefits of premium web hosting themes, how they improve performance, and why investing in the right theme is a game-changer for your hosting business. Let’s dive in!
Speed and design play a crucial role in the success of any web hosting business. A slow-loading website frustrates visitors, increases bounce rates, and can even harm your search engine rankings. On the other hand, a well-optimized, fast website enhances user experience, builds trust, and improves conversions.
Search engines like Google prioritize fast websites, meaning potential customers may never find you if your hosting site takes too long to load. Additionally, a modern, well-structured design ensures easy navigation, making it simple for users to explore your services and purchase hosting plans.
Choosing the right web hosting theme can significantly improve site speed, performance, and design—all essential for attracting and retaining customers. This section will explore why speed and design matter and how they impact your business success. Let’s dive in!
When building a web hosting website, speed and optimization are critical. A slow, cluttered, or poorly designed theme can hurt user experience, reduce conversions, and affect your SEO rankings. But with the right web hosting WordPress theme, you can create a sleek, high-performing site that loads fast and looks professional.
So, how do you choose the best theme? It should be lightweight, SEO-friendly, and fully customizable, ensuring smooth performance without unnecessary bloat. A great example is Bluishost, a web hosting theme designed specifically for hosting companies, offering a balance of speed and modern design. It should also support hosting features like pricing tables, domain search, and service comparisons.
Whether launching a new hosting service or revamping an existing site, the right theme will set the foundation for success.
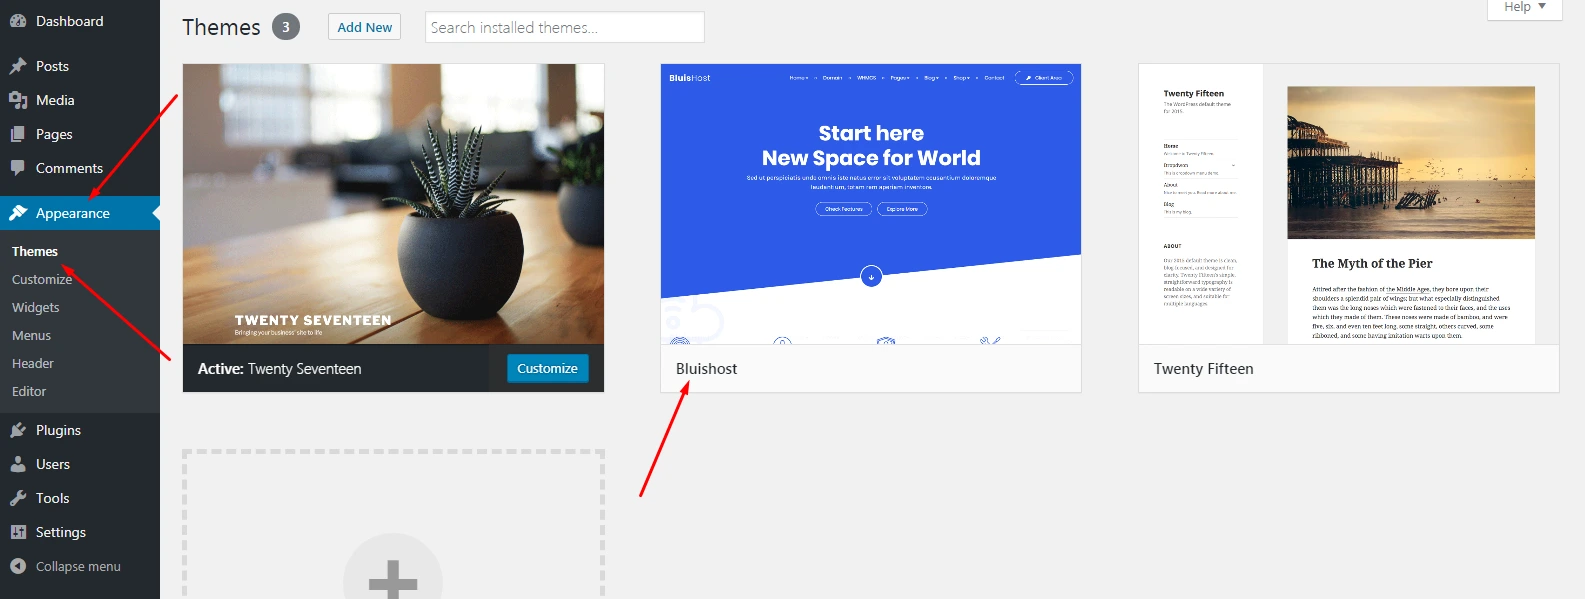
Setting up a professional web hosting website shouldn’t be a hassle. The right theme allows you to install, activate, and launch your site in just a few minutes—without dealing with complex coding. That’s where Bluishost, a fast and optimized WordPress hosting theme, makes a difference.
Once you download the Bluishost Theme, unzip the main item. You will see the following folders:
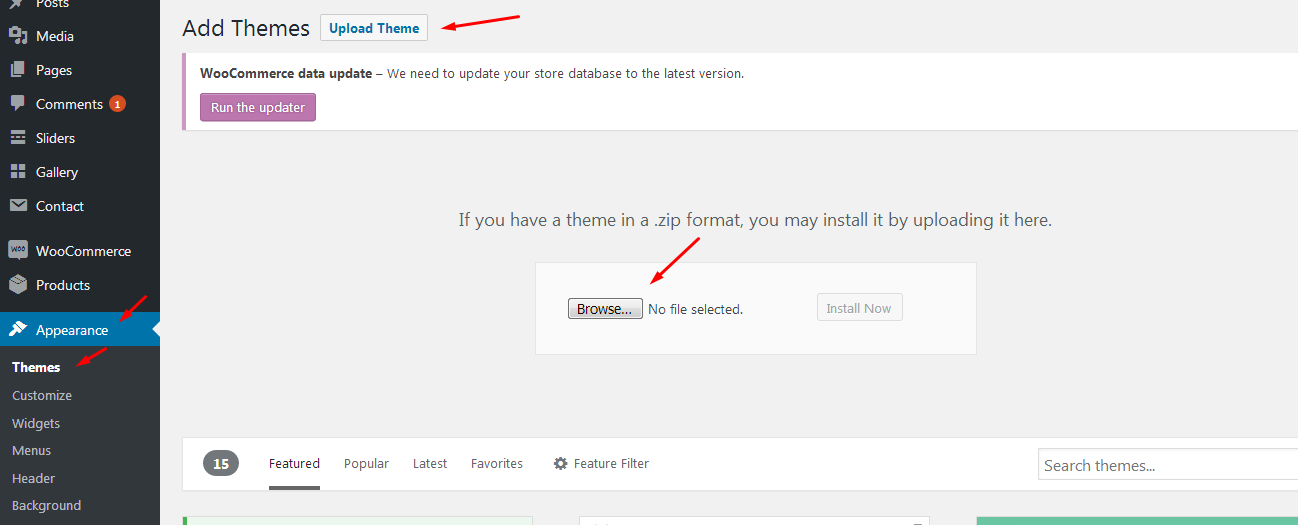
Please be informed that you should not upload the item you downloaded from Themeforest, as you will get an error message about a broken stylesheet file. Instead, locate the bluishost.zip file inside the main file you have downloaded. While installing your theme through WordPress admin, you may encounter an error message saying, “Are sure you want to do this?” This is mainly due to your hosting php settings. In some hosting, the default value for max_upload_limit left default is 2 MB. To solve this problem, you should either increase your maximum upload size (to 50 MB) on your hosting admin panel or ask your host to do it if you do not have the privilege to alter your server’s PHP settings. This is a very common request, and they should be able to help you. Once the limit is increased, you can re-try the installation and get ready.
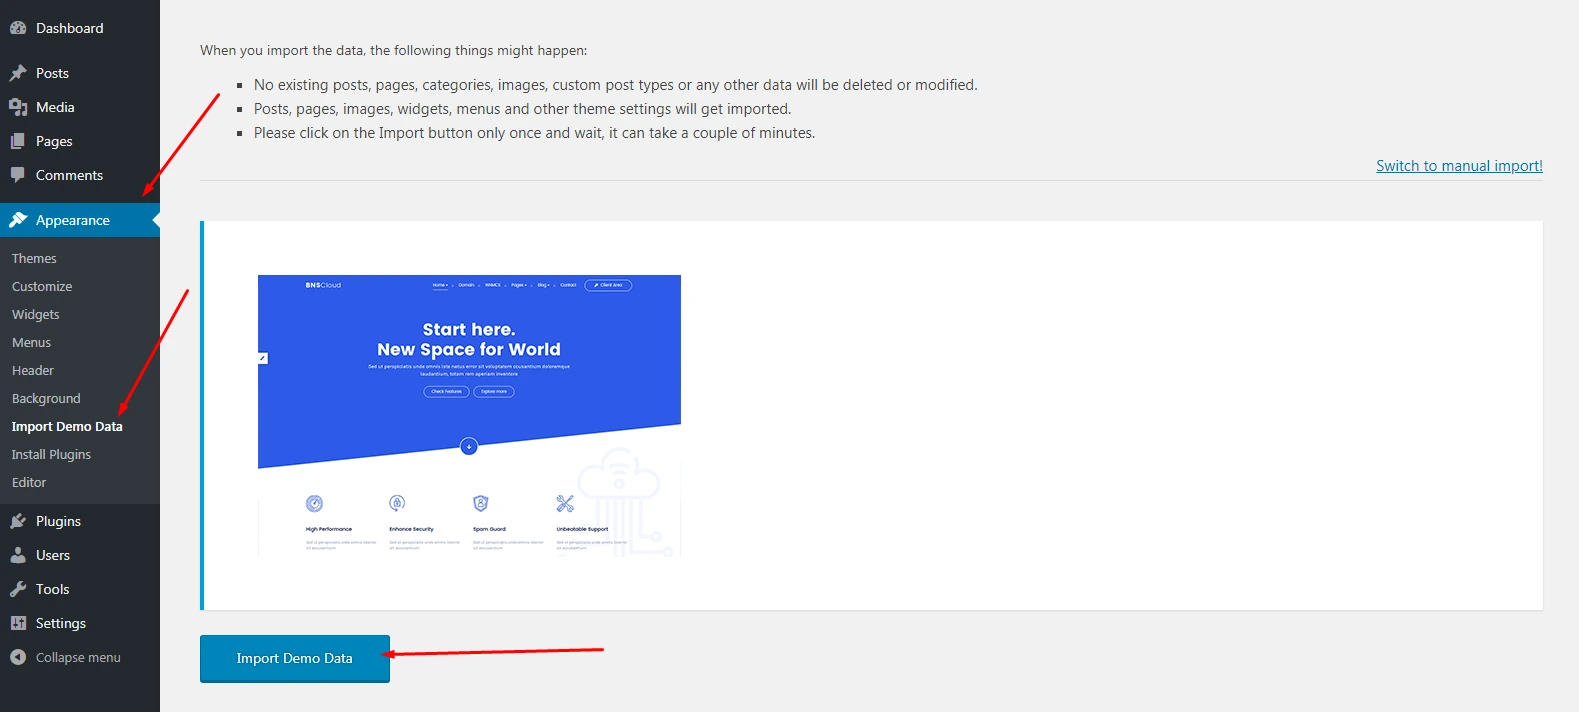
Below is a step-by-step explanation of how to import our demo website content; please read it carefully, and if you face any problems that are not covered here, open a thread in our ticket system.
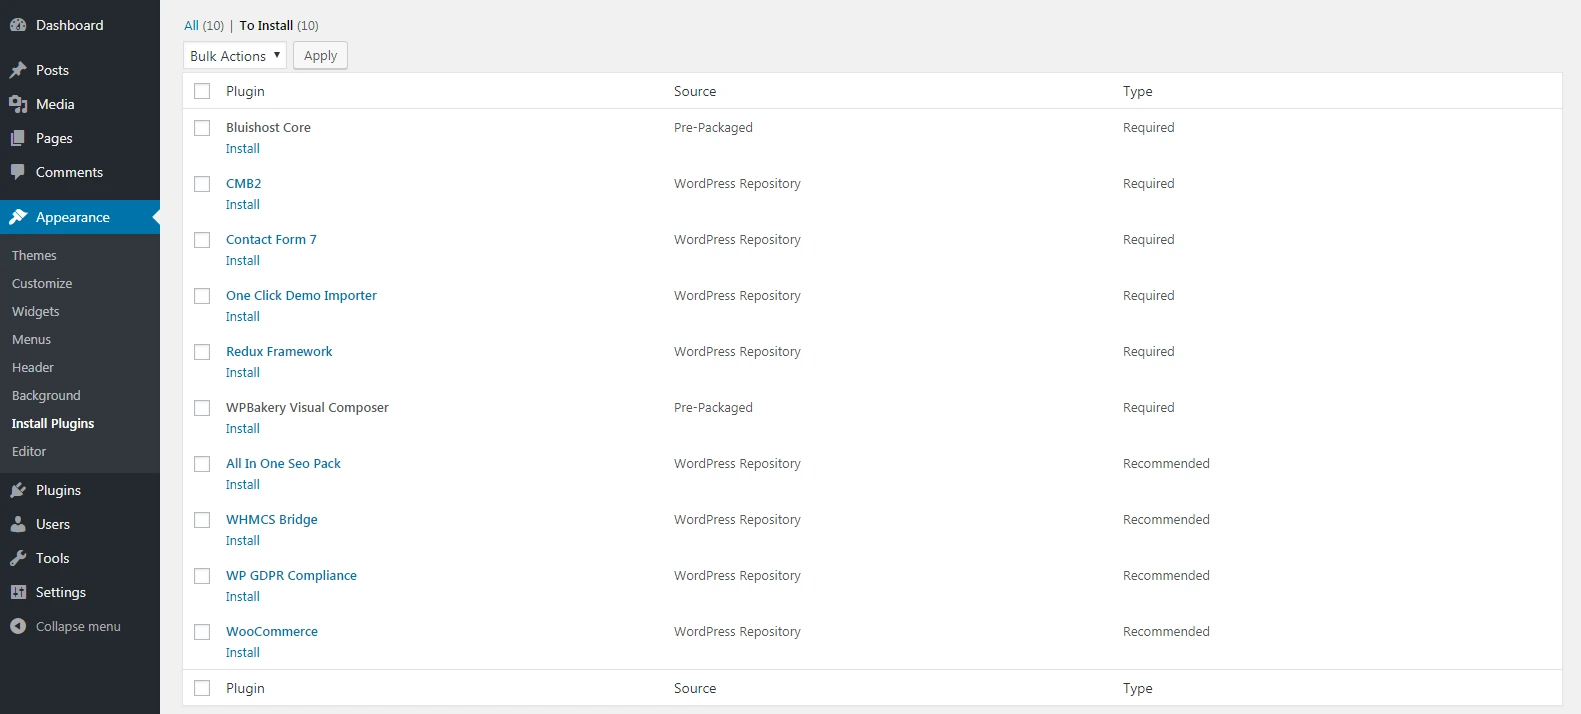
After theme activation, it is advised to install default theme plugins:

Click on Begin installing plugins, select all plugins, and install them. Then activate the plugins with the help of Bulk action:
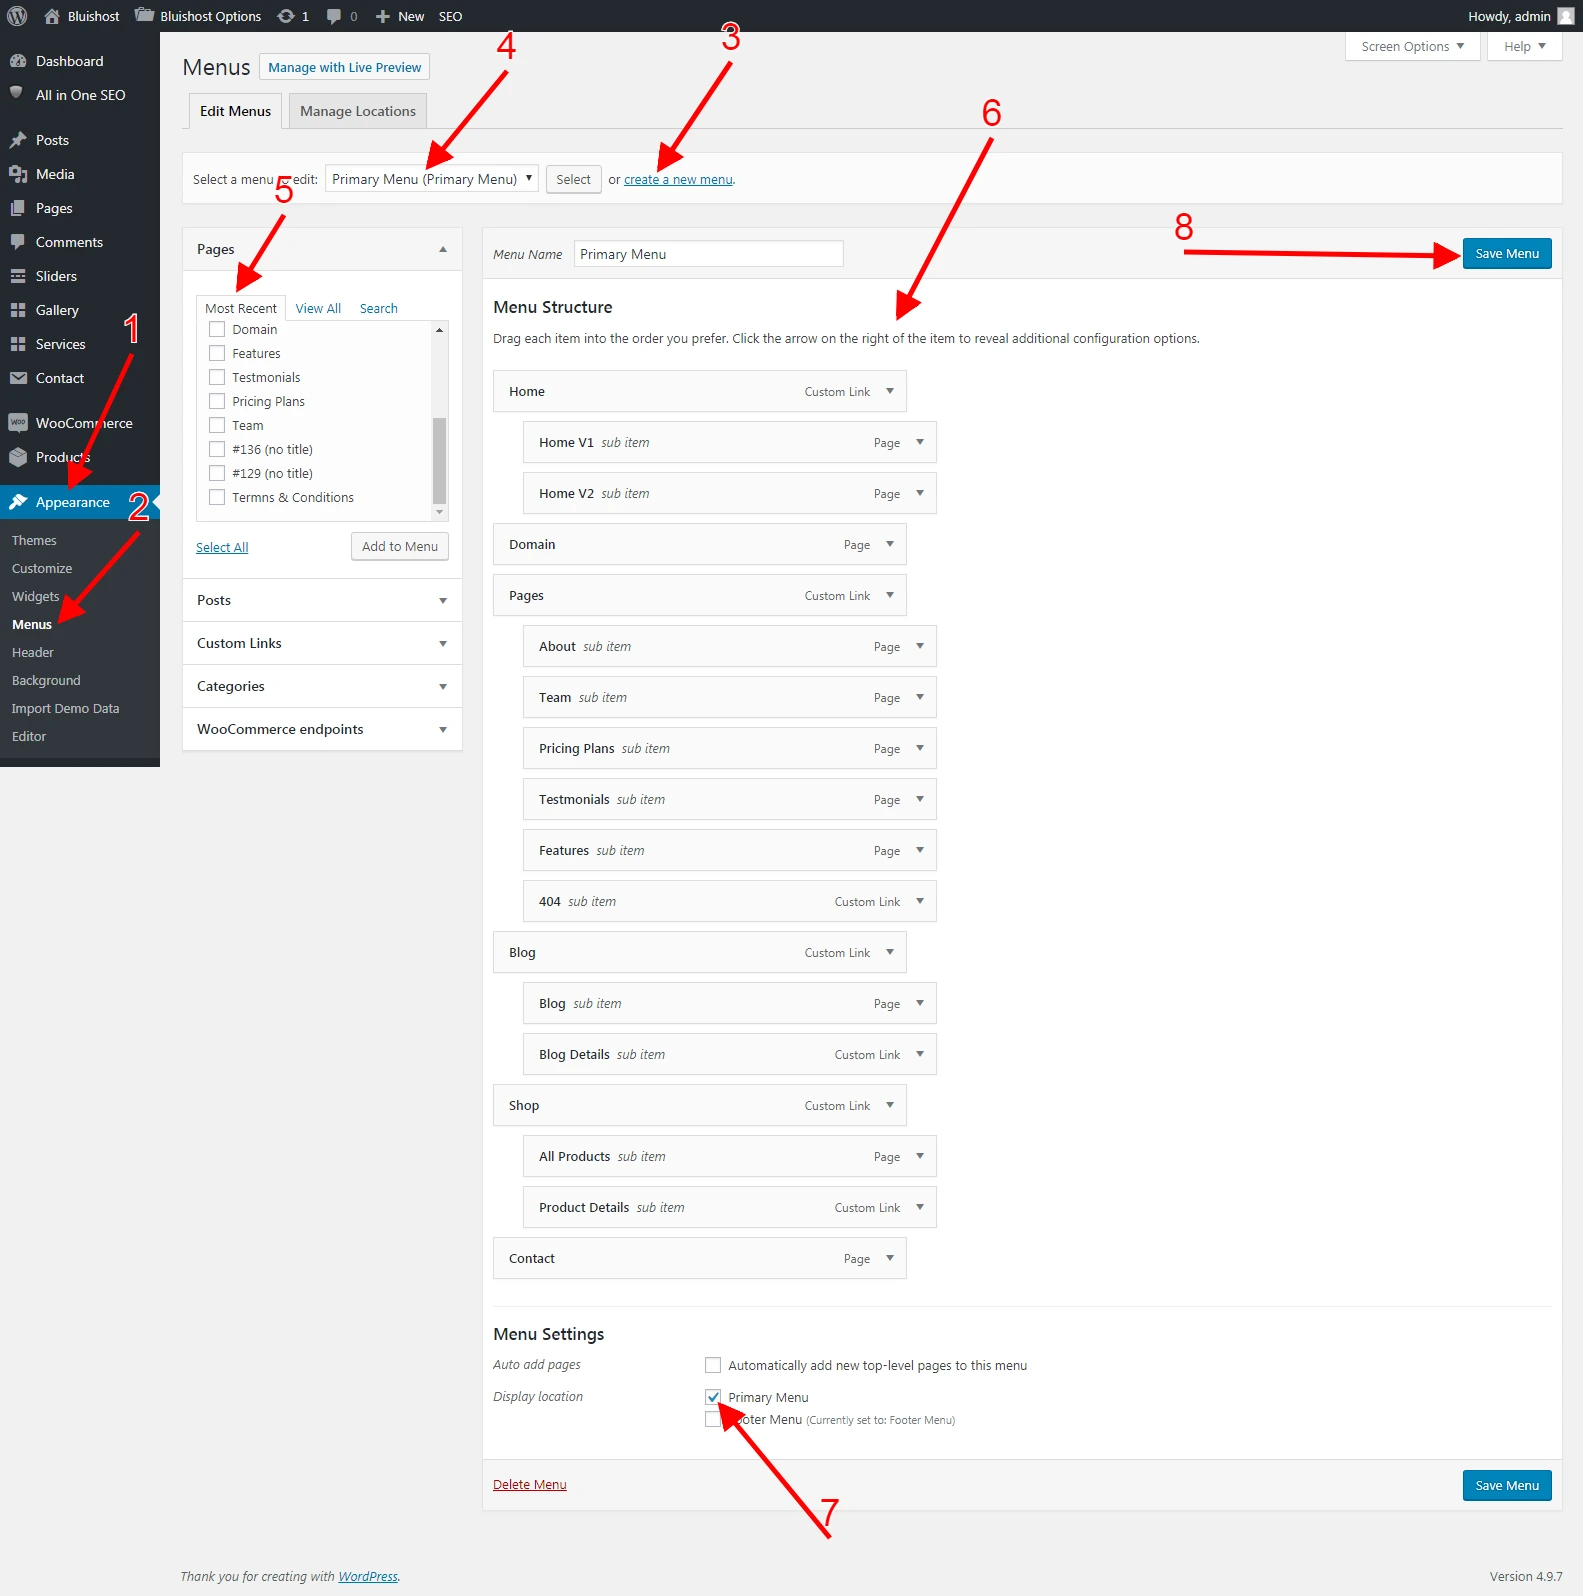
Bluishost custom WordPress menus, with dropdown support for the primary menu.
Note: with importing demos, all menus will be imported, but please set related theme locations by yourself via Appearance> Menus
To set up a new menu, please follow the steps below
Please note that it is better to create your pages first, even if they are blank pages
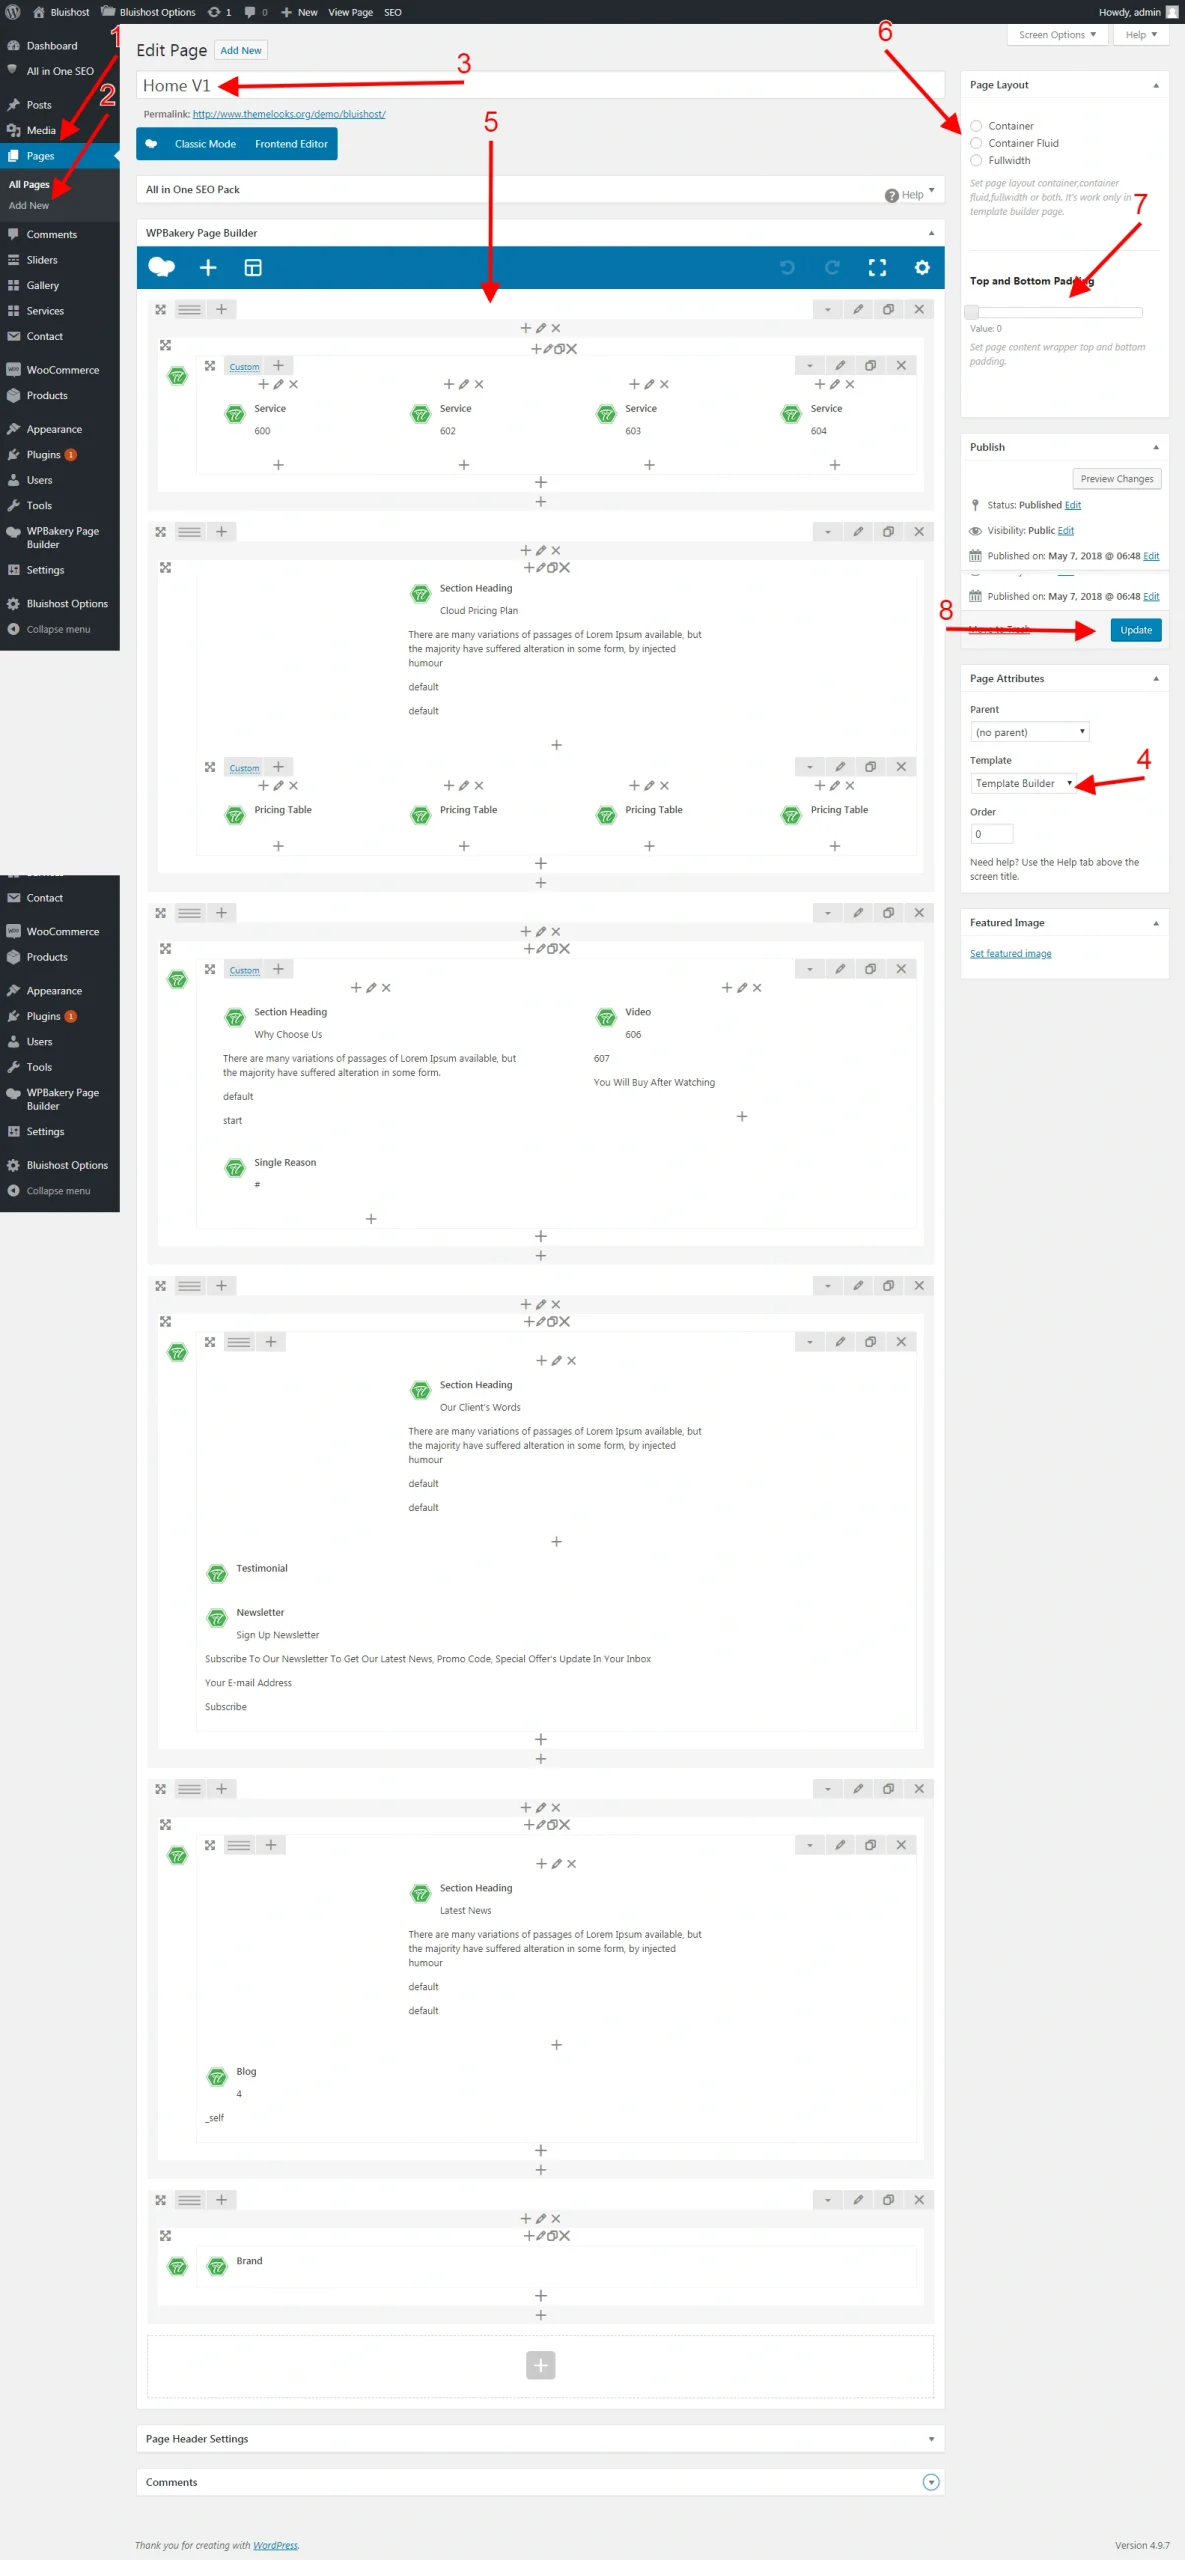
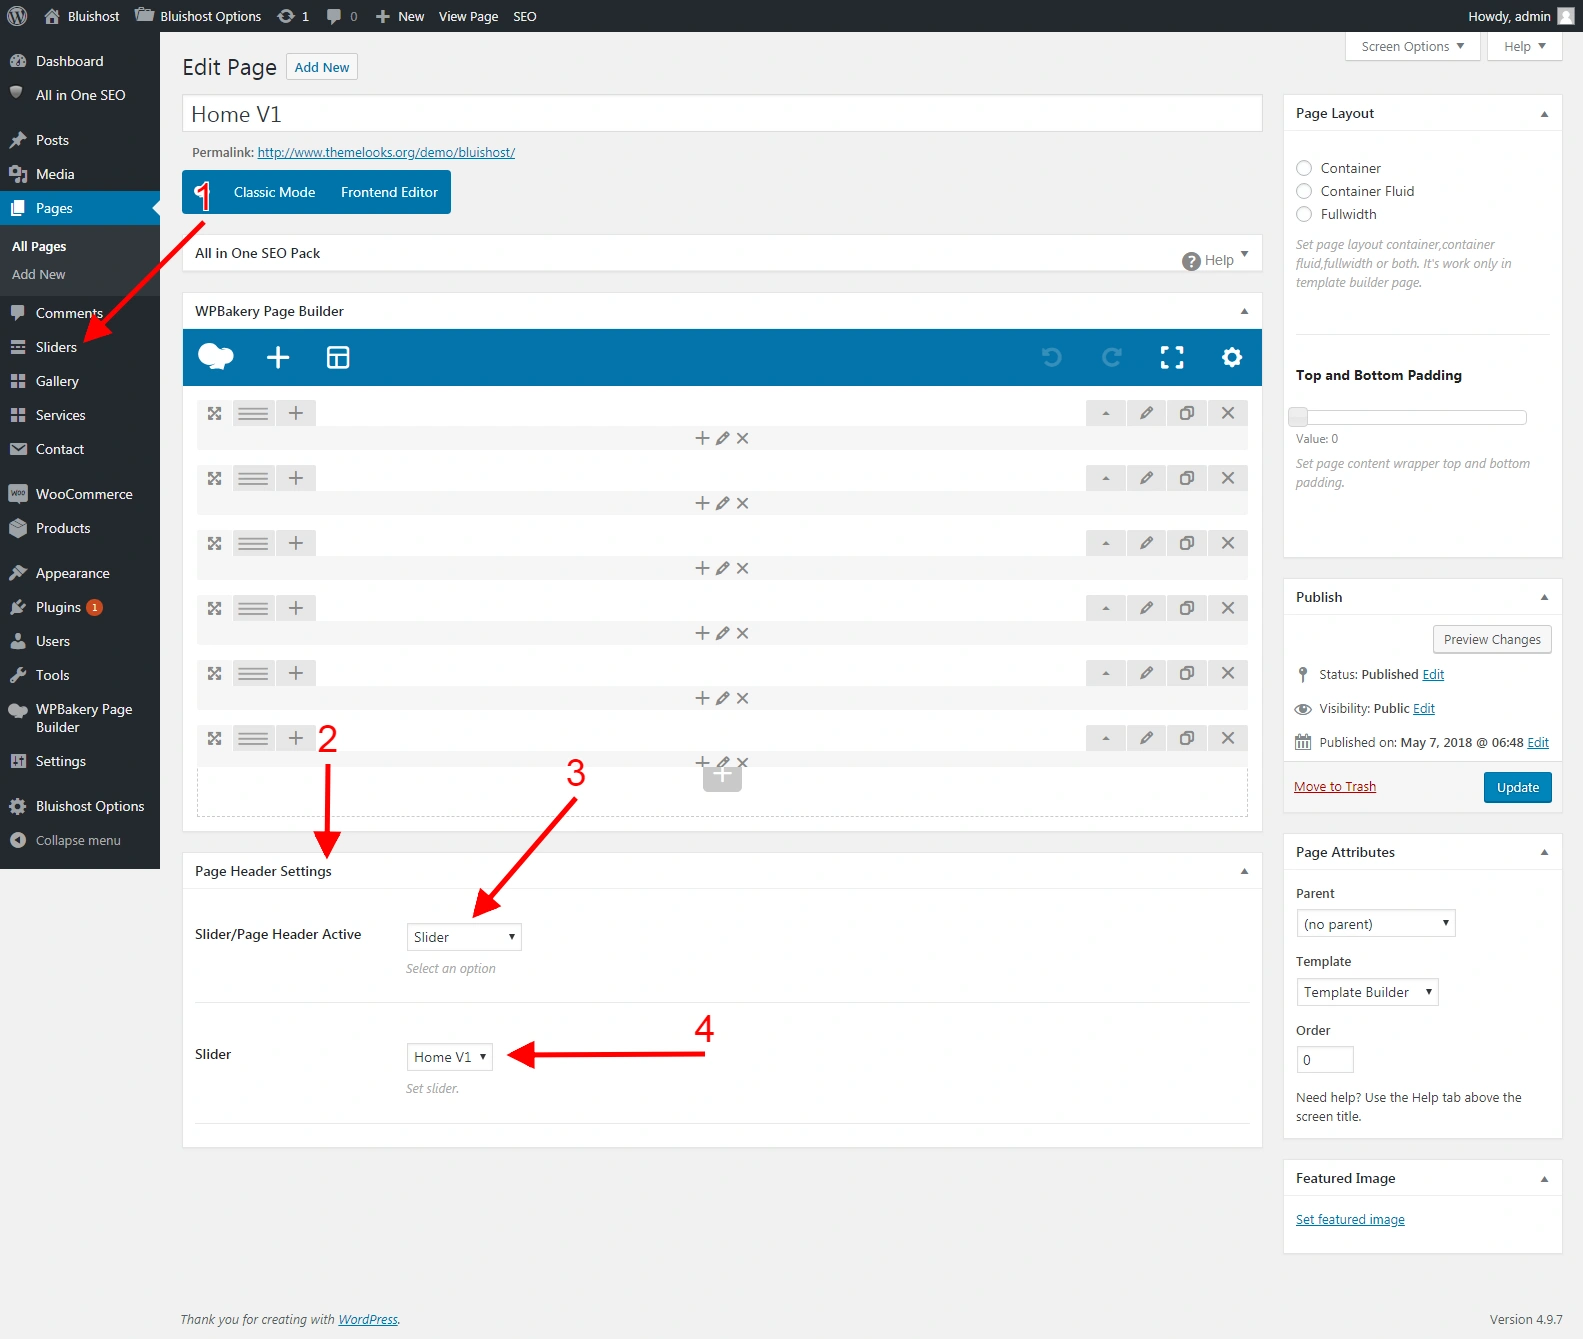
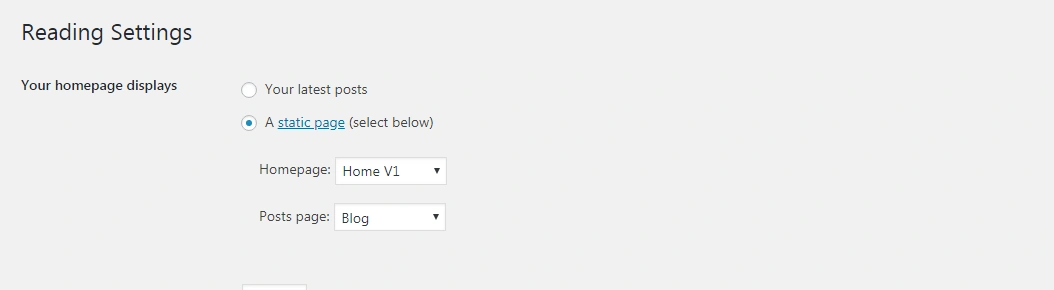
Once you have created your home page, you must select it to show up as the home page. To do this, follow the steps below.
Create any page using the default template. Create a specific page using a custom template like (the front page )
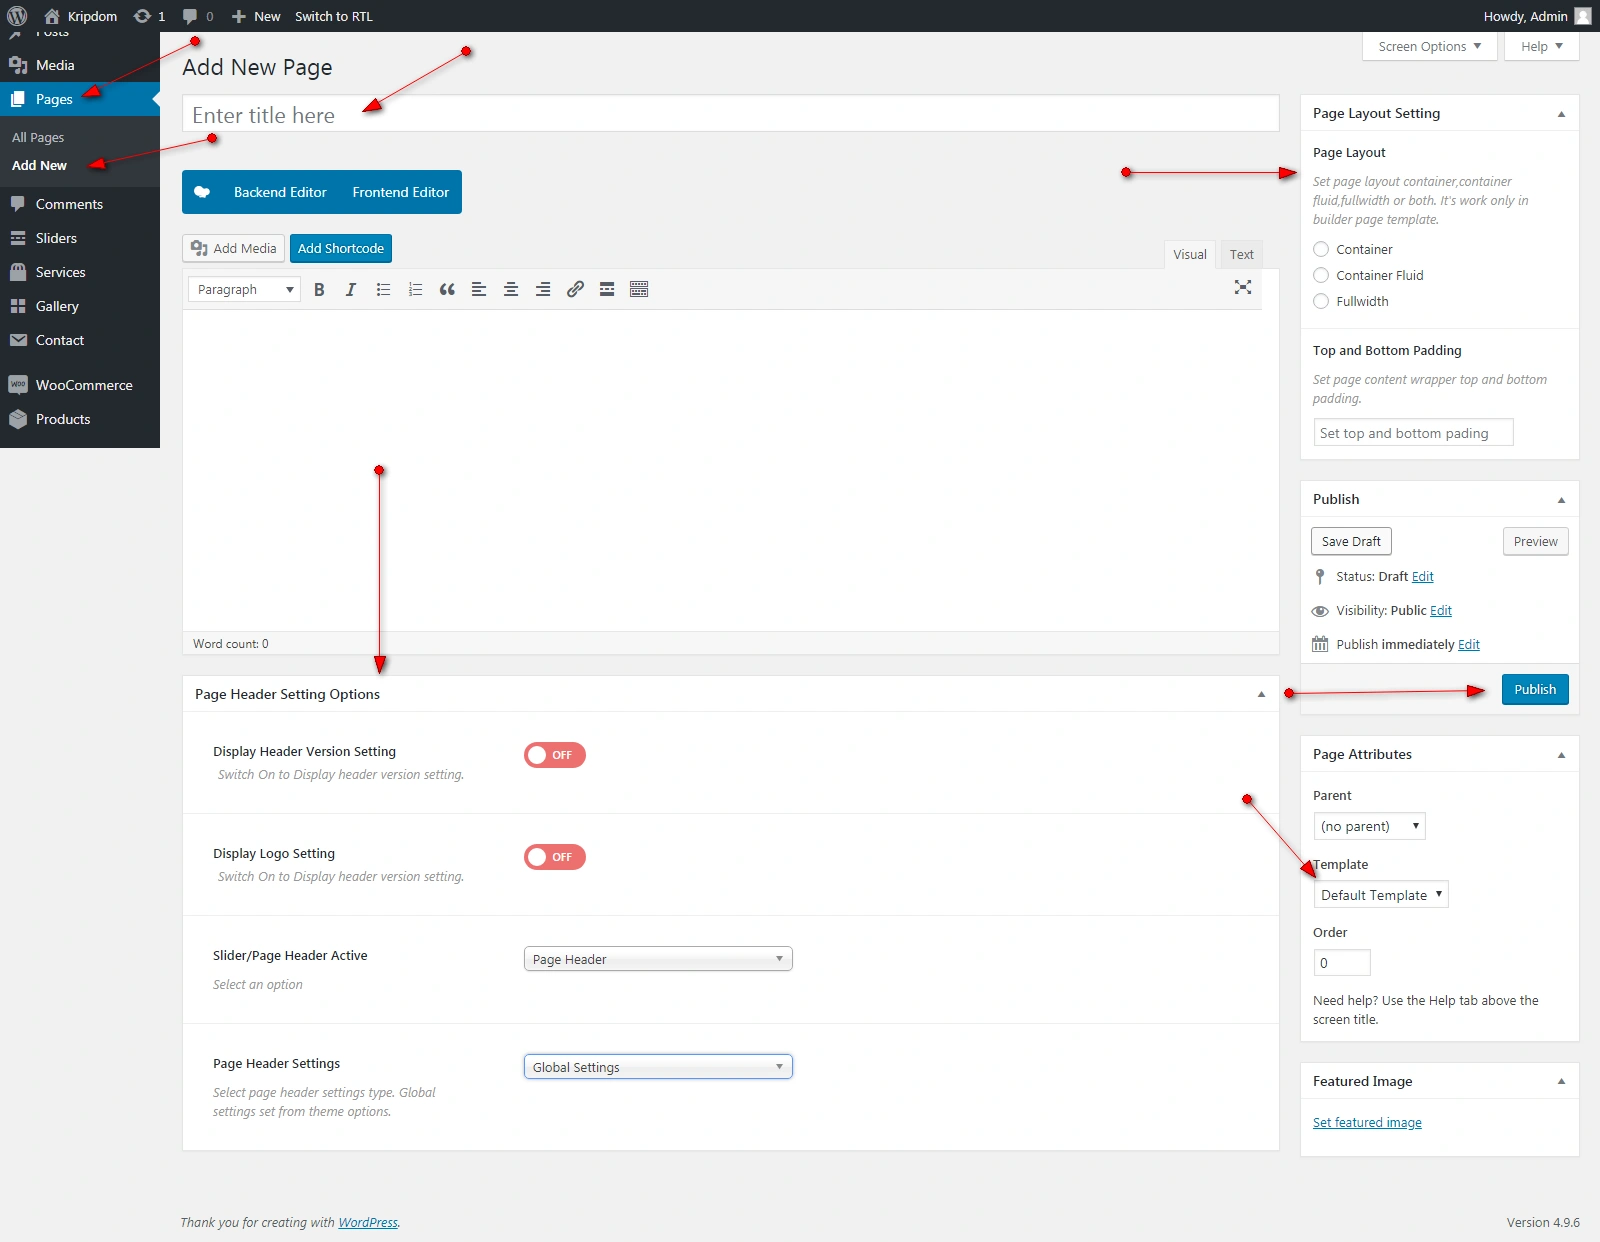
If you use the default template, there is no need to check any checkbox. When you use a front page template, you should choose a page layout like Container, Fullwidth, or both.
After your Blog page is made, you have to create posts to show up on the blog page. Follow the steps below to create a blog post.
All your blog posts are in the Posts section of your WordPress admin. Click on Posts to open the section. At the top of the posts page, click on Add New to make a new post. Create a title and insert your post content in the editing field

On the right-hand side of the post page is the Categories box. To make a new Category, click + Add New Category and give it a name. You can have as many as you want. To apply a Category to a post, check the box next to the Category name. To set the post format, the right-hand side of the post page is the format box. Click format. You can also apply Tags to a post. The Tag box is below the Category box. Insert your tags and separate multiple tags with commas To set a Featured Image. Click the Featured Image box, select an image from the media window, and click Use As Featured Image. Once you have selected everything you want, click Publish, and your post will appear on your blog page.
WordPress Widgets add content and features to your Sidebars and Footer. Examples are the default widgets with WordPress, such as post categories, tag clouds, navigation, search, etc. Widgets require no code experience or expertise. They can be added, removed, and rearranged on the WordPress Administration Appearance > Widgets panel. WordPress Widgets add content and features to your Sidebars. Examples are the default widgets with WordPress, such as post categories, tag clouds, navigation, search, etc. Plugins will often add their widgets.
Go to Appearance > Widgets.
Choose a Widget and drag it to the sidebar or footer where you wish it to appear. The widget areas designated
Once you drop the widget into widget areas, WordPress automatically updates the Theme, which will appear in its area.
Preview the site. Look for the specified area where you dropped your sidebar. For example, if you used the “archive widget area,” you should look for it in the archive loop.
To arrange the Widgets within the sidebar or Widget area, click and drag them into place.
To customize the Widget features, click the down arrow in the upper right corner to expand the Widget’s interface.
To save the Widget’s customization, click Save.
To remove the Widget, click Remove or Delete.

A web hosting website needs the right features to attract customers and provide a seamless experience. With Bluishost, you can integrate essential hosting tools effortlessly.
With Bluishost’s advanced theme options, you can add these features effortlessly—no coding required!
Managing a web hosting business requires automation to handle billing, support, and client management efficiently. WHMCS is the industry-standard tool that simplifies these tasks, making it a must-have for hosting providers.
With Bluishost’s built-in WHMCS integration, you can seamlessly connect your website with WHMCS (compatible with WHMCS v8.10.x), ensuring a smooth user experience. This allows you to:
With Bluishost’s WHMCS template, you can match your WHMCS design with your main website, creating a unified and professional look with minimal setup!
A slow or vulnerable website can drive visitors away and hurt your hosting business. Speed and security are crucial for maintaining customer trust and improving SEO rankings. With Bluishost, optimizing your site is hassle-free.
By leveraging Bluishost’s built-in performance and security features, you can create a fast, secure, and reliable hosting website—without complex configurations!
A significant portion of your visitors will access your website via mobile devices. You risk losing valuable customers if your website isn’t mobile responsive or compatible across browsers. Ensuring your site looks and works seamlessly across all devices and browsers is crucial for user experience and SEO.
With Bluishost, you don’t have to worry about compatibility issues. The theme is designed to be 100% fully responsive, meaning your site will adapt perfectly to any screen size, from desktop to mobile. Plus, it offers modern cross-browser compatibility, including browsers like Chrome, Firefox, Safari, Edge, and even Internet Explorer 11.
By using Bluishost, you guarantee that your hosting website will provide a smooth and consistent experience for every visitor, no matter their device or browser—ultimately improving your site’s performance and boosting customer satisfaction.
Before you launch your web hosting website, testing every detail to ensure everything works flawlessly is essential. A website with broken links, slow load times, or security vulnerabilities can damage your reputation and lead to lost business. Proper testing and optimization are the keys to a successful launch.
With Bluishost, you have the tools to ensure a smooth launch:
Once you’ve completed these final checks, you’re ready to launch your professional, fully optimized hosting website with Bluishost, setting you up for success from day one!
Once your hosting website is live, the real work begins. Regular maintenance and updates are essential to keep your site running smoothly, securely, and efficiently. Neglecting this can lead to slow performance, security risks, or even downtime, harming your business and reputation.
With Bluishost, maintaining and updating your website is simple:
By following these simple steps with Bluishost, you ensure your hosting website remains secure, fast, and user-friendly, providing ongoing success for your business.
Building and maintaining a successful hosting website requires attention to detail, from choosing the right theme to ensuring speed, security, and a great user experience. With Bluishost, you have everything you need to create a responsive, cross-browser-compatible, and customizable website.
Regular updates, security checks, and performance optimizations are key to keeping your site running smoothly and attracting customers. Start implementing these strategies today and set your hosting website up for long-term success!
At ThemeLooks Ltd, We develop SEO-optimized content that helps users understand and connect with our themes, templates, plugins, and services. From writing product descriptions to detailed guides, We turn features into clear, helpful content that boosts visibility and drives engagement, making sure each solution we offer reaches the right audience at the right time.
