Would you like to change the default text selection color in WordPress? Then you’re certainly in the right post. Learn how you can change the default text selection color in WordPress through simple methods.
Pay attention to the little details in your WordPress site, like having text selection colors match your site’s color scheme, to make it stand out.
The following tutorial will teach you how to change the default text selection color in your WordPress theme.
Table of Contents
The color scheme you choose is one of the most important elements of your brand image. This will make your site more appealing so your visitors stay longer, resulting in more sales.
An important detail that is often overlooked is the color used to highlight the selected text. Not every site will look great with the default color.
It is possible that your WordPress theme allows you to change this color, but most do not. For themes that don’t have this, you can change the text selection’s color using a plugin or snippet of code.
Here, we will show you two different methods. You can go with any of them. Both are easy and convenient. But, most of the users prefer the plugin one. It’s easy and simple to do.
The plugin which is preferable to change the default text selection color in WordPress is Custom Highlight Color. This plugin allows you to select a custom text selection color on your WordPress website.
So far, using this plugin is the simplest method for this job, but you’ve to keep in mind one thing. That is, the text selection color result might differ from browser to browser. However, let’s see what you have to do in this process.
Step 1: First thing first, you’ve to install and activate the Custom Highlight on your WordPress. If you’re a total newbie to WordPress, then see this guide on how you can easily install plugins on your WordPress website.
See this guide, in any case, you want to uninstall your installed WordPress plugin.
Step 2: Whenever you finish the installation process and activate the plugin successfully, go to your WordPress dashboard.
It’s time to navigate to Appearance from the dashboard and select Customize from there.
And, finally, select the Colors option from the menu to get going with the default text selection changing process in your WordPress site.
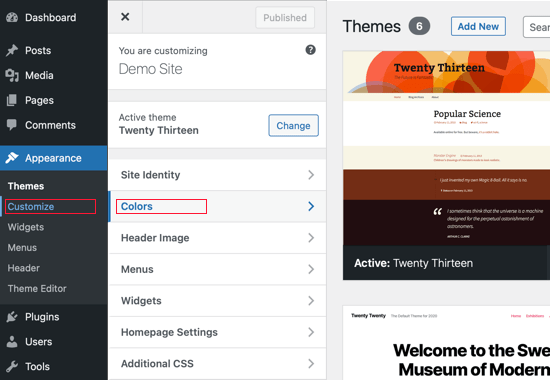
Step 3: Here you are! Right now, you suppose to be on a page that looks like the below attached one. From this page, click on Highlight Color to change the default text selection color in your WordPress.
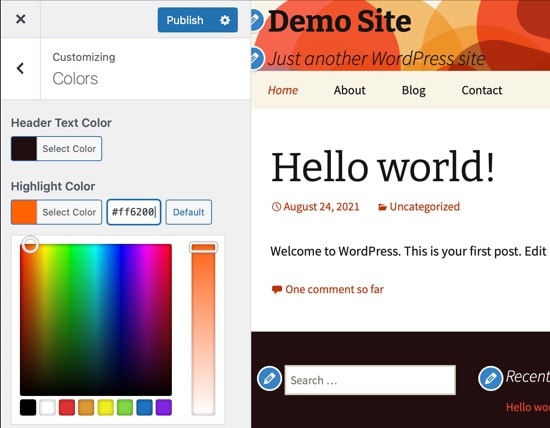
Either you can type the color hex code here or can pick a color from the below color picker. Once you’re done with the text selection color picking, simply click on Publish button from the top.
By doing so, your new highlight color for text selection will activate in your WordPress site.
If you’re not preferring a plugin to change the default text selection color in WordPress, here is the alternative solution. If you know a bit of coding, and CSS then it can be easy for you.
But if you’re not, then going with the above plugin method will be a perfect choice for you without any doubt. Because the slightest mistake can break your WordPress website.
As I said before, this method uses a CSS code snippet. Well, let’s see the below step-by-step procedure on how you can make all things done easily.
No matter how nube you’re, once you complete the process, changing the default text selection color in WordPress will not be a mammoth task for you anymore.
Step 1: The first step for this method is, going to your WordPress dashboard. Navigate to the left sidebar of your dashboard and click on Appearance.
Once you click on Appearance a pop-up result will appear from where you need to select Customize. Once you follow the instruction properly, click on Additional CSS at the bottom of the list.
Step 2: Now simply copy the below styles and paste it there to change the default text selection color in WordPress.
::-moz-selection {
background-color: #ff6200;
color: #fff;
}

::selection {
background-color: #ff6200;
color: #fff;
}
N.B: As you can see, I’ve added two styles here. The ::moz-selection CSS selector is compatible with the Firefox browser, whereas, the ::selection CSS selector works with the rest of the popular browsers- Chrome, Safari, Opera, and IE9+. So, select your preferred one to change the default text selection color in WordPress.
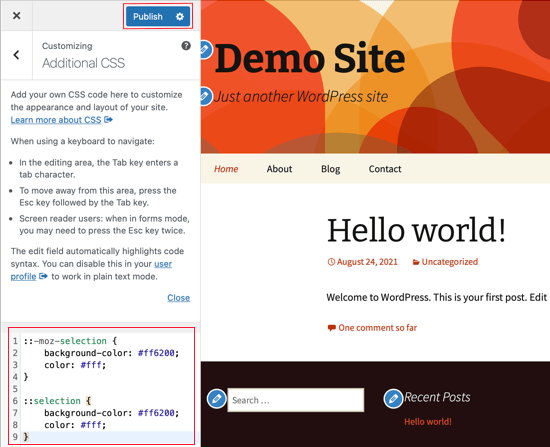
Step 3: Well, changing the background is a must if that doesn’t match your theme scheme’s color. So, if you need to change the background color then change it before clicking on Publish button from the top.
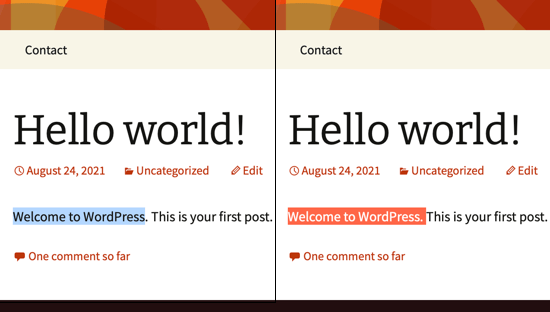
Now, go to your website to see the changes in the text selection color you’re just completed. Below is the example to show you, the before and after scenario of the text selection color of my website.
To sum up, follow any of the above-mentioned procedures to change the default text selection color in WordPress easily. But, my personal recommendation for you would be to go with the plugin method.
You may want to know more tricks and tips about WordPress. Having said that, you may also want to see our guide on how to recover deleted pages in WordPress, and also how to make categories and subcategories in WordPress.
I hope you enjoyed the article. If so, please share your thoughts in the comments area below. Also, if you think this is worth sharing, please share it with your friends and family.
Stay connected with ThemeLooks by subscribing to our WordPress video tutorials on YouTube. We are also on Twitter, Facebook, and LinkedIn.