
Are you thinking about how to install a WordPress plugin? Why it’s necessary to install or add a new plugin to your site? And from where to find and install the plugin?
Well, you’re certainly in the right place because all your questions will be answered here.
With WordPress, you can create any type of website you wish. Your theme choice and plugin choice will determine the span of flexibility and customization.
You will have your initial customized options available by using your theme, which sits on top of the WordPress CMS.
Well, to the entire post you’ll find a complete step-by-step guideline from very scratch. And, we’ll conclude by going over a few ways you can install a WordPress plugin on your WordPress website.
Suggested Read: All-important Free WordPress Plugins for Your Site in 2022
Table of Contents
Plugin, a piece of software that can be added to your WordPress site. Each plugin comes with several functionalities that enrich your WordPress website user experience.
A plugin may add new features to your website, while another may add social sharing functions, improve SEO, integrate your email list, and so on.
Adding new features to your site through a plugin is as easy as pie. You don’t need to have expertise in coding for adding so.
In view of the fact that plugins are created in the similar code that powers WordPress. Well, then let’s integrate your plugins to your site seamlessly.
For functionality that can go even further, there is a selection of thousands of free plugins as well as hundreds of premium plugins out there.
Always ask yourself whether a plugin is essential before installing it on your site. If you install too many low-quality plugins, your site will slow down and you may leave it vulnerable to hackers.
You can search through millions of WordPress plugin results on Google if you simply type “WordPress plugins”. However, overwhelming yourself with plugins is not fun.
So, utilize these below tips instead if you want to quickly locate the exact kind of plugin you’re seeking each time.
This is the place to find whatever kind of plugin you are looking for. The WordPress plugin repository can be called ALASKA, not for gold but for plugins, that’s just the difference.
To get the exact plugins, you just need to search the type of plugin on the search bar. By doing so, you’ll get numerous options to choose from. For instance, this is what we find when we search for “Dark Mode”.
Additionally, through keywords, top downloads, ratings, and so on; you can search for the plugins in the WordPress plugin repository too.
However, to get the best results when looking for plugins here, look for those with a high star rating, and those that have been installed on most websites.
Suggested Read: Best 6 Free WooCommerce Plugins for WordPress
Google is your best friend when looking for plugins. Just make sure your search is specific. For instance, if you wanted to enable dark mode on your site, you might look for the best plugins.
Well, then just type in “WordPress plugins for dark mode” on Google, and you will find the following results:
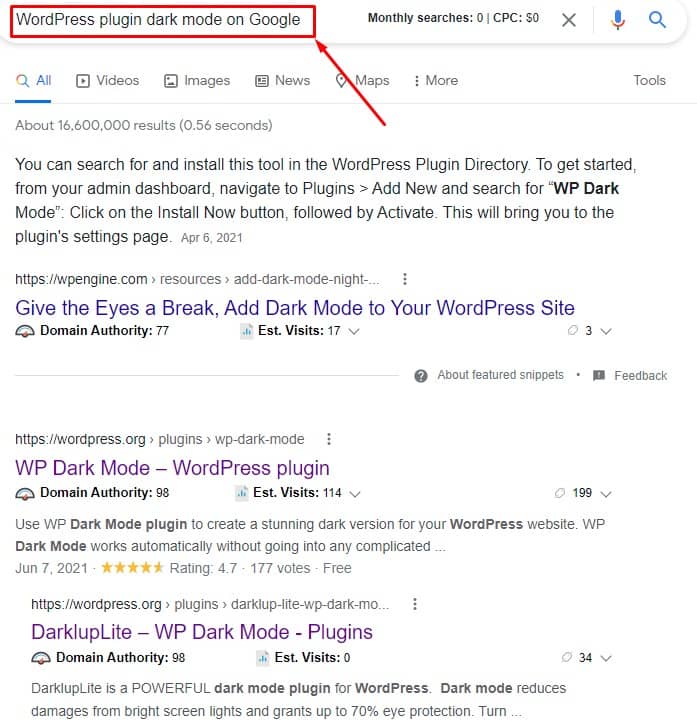
Searching through a few search results will give you a couple of quality plugins to consider installing on your website.
There are several quality plugin marketplaces that offer plugins in addition to the official WordPress plugin repository.
For example, CodeCanyon is the largest marketplace for WordPress plugins. Currently, they offer over 7000 plugins. This is a great place to begin your search for a premium plugin if you are looking for one.
For the same reasons stated in the tip above, we can search for plugin roundups using WordPress-related sites’ search functions.
Take a look at WP Beginner and search for “dark mode plugins”, this will give us some posts we can review to help us decide what plugins to install.
The next step is to install the plugin on your WordPress site after choosing the right plugin. We’ve put together a comprehensive guide for installing both free and premium plugins on your website.
Let’s start with the easiest method!
From the dashboard will be the easiest way to install a WordPress plugin that is free for your website. This method works best if you’re interested in installing free plugins available in the WordPress plugin directory.
The steps are as follows:
Firstly, you need to access your WordPress dashboard. Also, by using the login URL you can access your WordPress admin area.
Typically, the WordPress login URL looks like this: http://example.com/wp-login.php. Use your domain name instead of ‘example.com’.
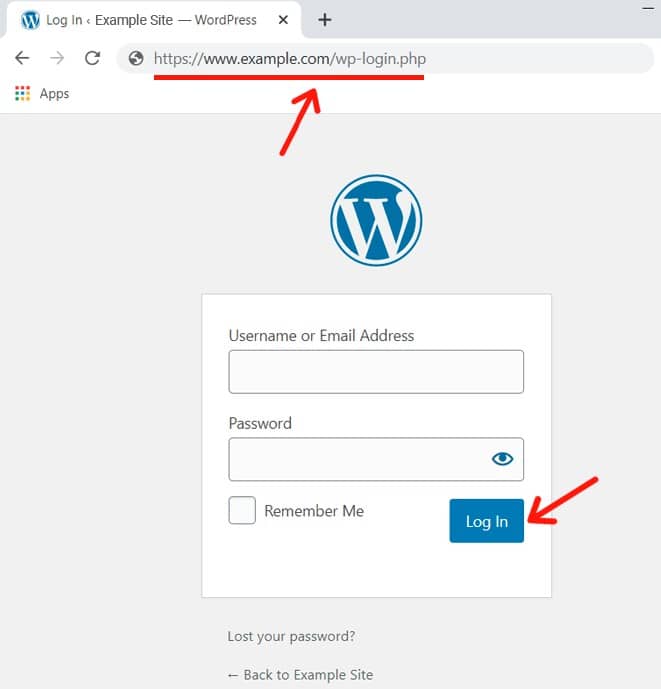
Well, after logging into the WordPress dashboard, your dashboard will suppose to look like the below-resulting page.
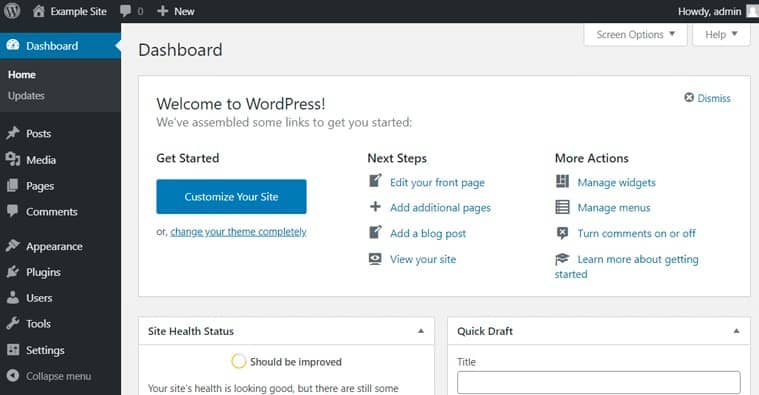
Well, as you’re in the dashboard you can start to install a plugin of your choice. How to? Let’s move further.
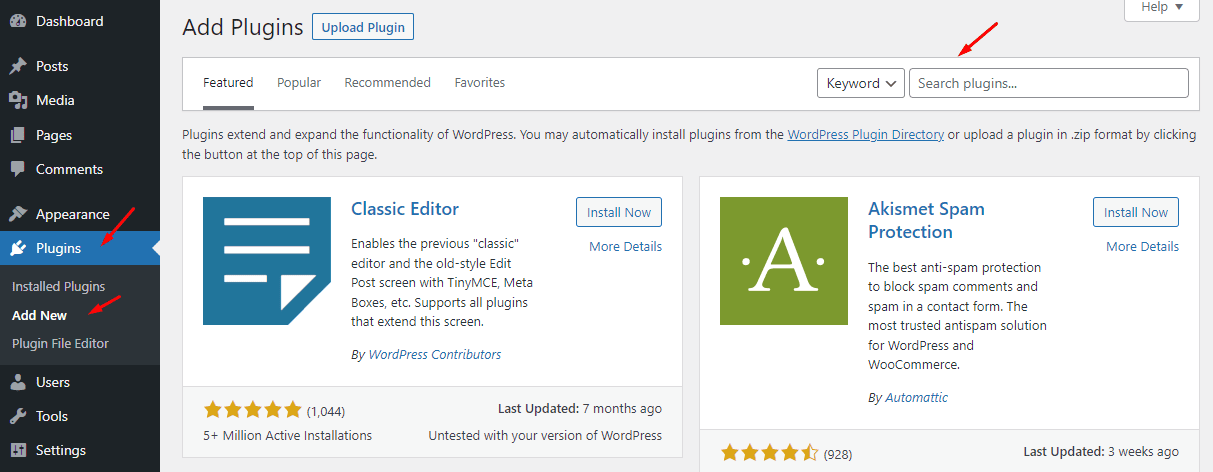
In the below screenshot, you can see that the WordPress dashboard has a left-sidebar with multiple menus. This includes Posts, Pages, Media, Comments, and so on.
The Plugins menu appears just below the Appearance menu. Click here to install a WordPress plugin from this menu.
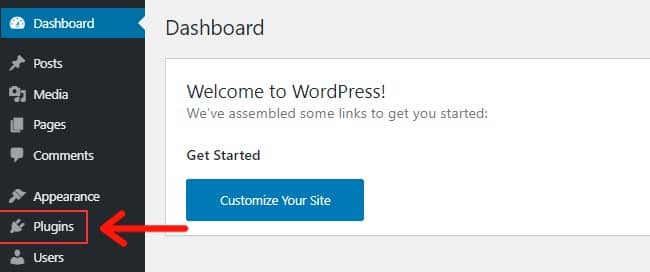
To install a plugin, click the ‘Plugins’ menu. The plugins page will appear. On the plugins page, you will see an option that says “Add New”. Tap it.

Here’s and quick alternative to installing the WordPress plugin easily. From the dashboard select “Add New” from the dropdown menu. As follows, hover over the “Plugins” menu, 3 options will appear, and choose “Add New” to add a plugin. (Plugins> Add New)

Well, in this step you’ll be directed to a new resulting page if you’ve clicked “Add New” by following one of the above methods correctly.
Several plugins will appear on the suggestions. Right on the page, you’ll see a box that says ‘Search plugins’ where you can search for a plugin.
If you want to install a WordPress plugin for your site, type it into the search box. Here, for example, we look for a WordPress dark mode plugin called DarkLooks, developed by ThemeLooks.com. On the plugin list, you can find DarkLooks.
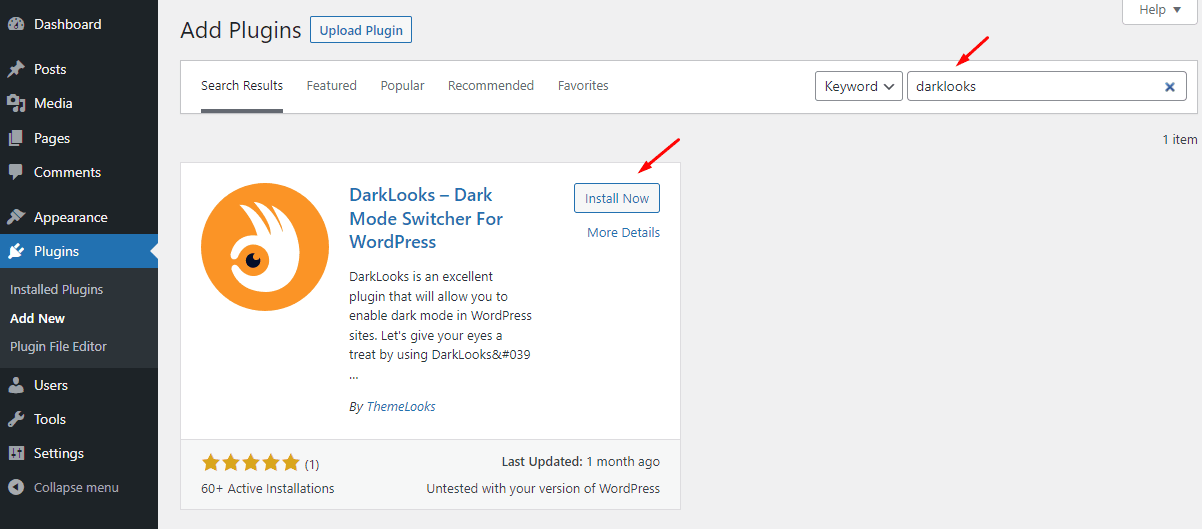
In addition, you can search for plugins using a keyword also. For example, search with “dark mode”. Following that, you will see all of the dark mode plugins available on the WordPress.org repository for you.
Well, now it’s time to review all the plugins and select the best one. But how? For doing so, review any plugins ratings, number of active installations, last update date, WordPress support, etc. And then you’ll be able to choose which one is perfect for you.
Once you’ve selected the plugin you’d like to use, you need to install and configure it. Well, it’s time to click on the “Install Now” button.
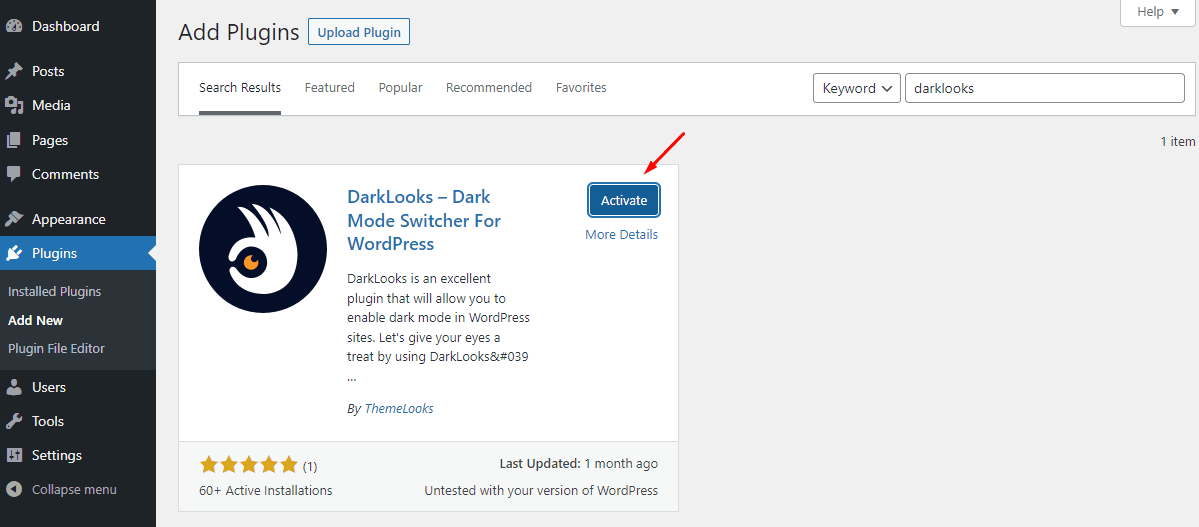
After doing so, your plugin will start installing. The process takes a few seconds.
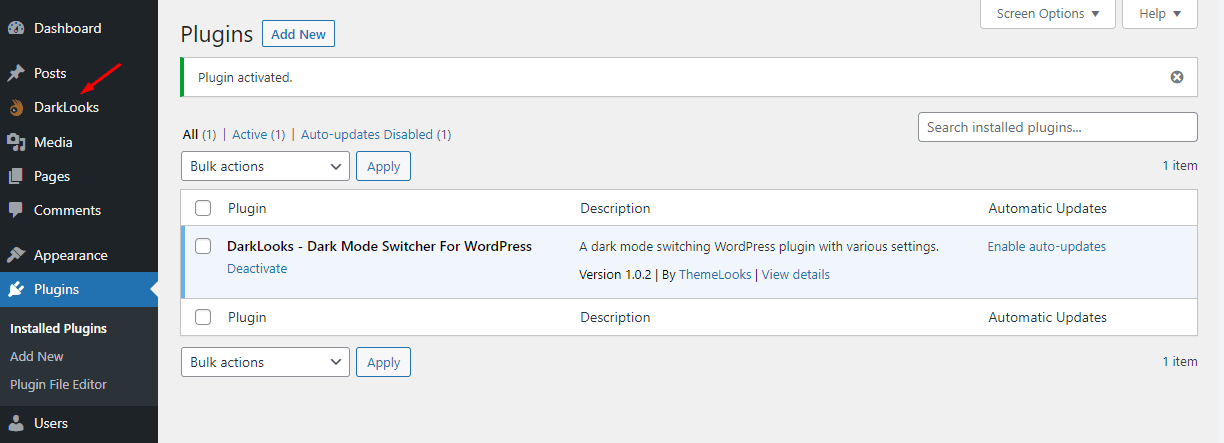
Once the plugin has been installed completely, you will need to activate it. When the plugin has been fully installed, you can activate it by simply clicking the Activate button.
You’ll see a message saying that the “Plugin Activated” after a few seconds. Also, the ‘Installed Plugins’ page will show your recently installed plugin.
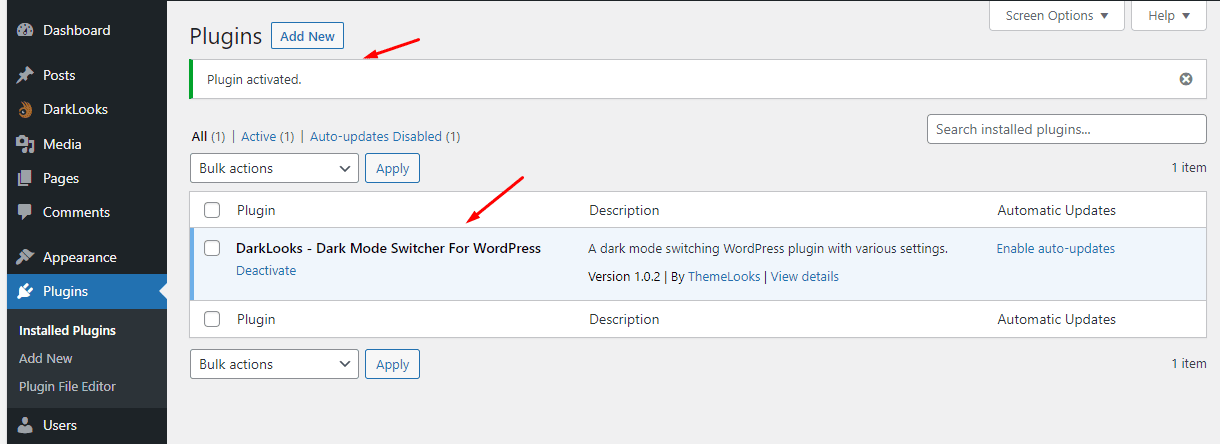
Having installed the DarkLooks plugin successfully, you can now start using it. A few plugins work automatically, whereas others require a few settings.
In the case of DarkLooks, you’ll need to set up the settings first. On the ‘Installed Plugins’ page, click the ‘Settings’ link under the plugin name to start configuring it.
Additionally, you can also use the menu on the left panel to select DarkLooks. It is part of the DarkLooks plugin. All of the features and settings include here of DarkLooks.
Well, you’re all set up. And from now on, you’ll be able to find and install any plugin you want by following the above steps.
Suggested Read: How to Add Dark Mode on WordPress Site: The Easiest Way for 2022
Here’s the second method of installing a WordPress plugin, and it differs from the first one. However, it’s also an easy process to do.
However, using this upload method, both free and premium plugins can be installed on your WordPress site. Let’s download a plugin file on your computer first.
Here’s FoodBook Lite- the best food ordering and delivery system plugin that has been used to demonstrate all the things easily.
Things You’ll Need
In short, for the plugin that you have on your local device, the uploading method is only possible then.
Let’s look now at how we can install WordPress plugins using the upload method.
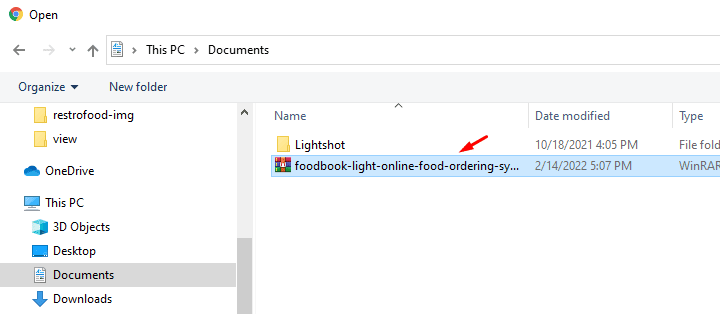
As mentioned, download your plugin file in a ZIP format first on your local device. In case, if the plugin is paid then download it from any official plugin store like CodeCanyon.
Additionally, you can also install free plugins from WordPress.org by downloading them directly from their website (it’s an alternative option to method 1).
Well, if you’ve downloaded the plugin then ZIP the file if it’s not already zipped.
For example, here we’ve downloaded the FoodBook Lite- food ordering and delivery system plugin from CodeCanyon.
Well, you’re ready to upload your plugin file in the next step.
In the same way as method 1, you must first log in to your WordPress dashboard. Simply enter your login details and click the ‘Login’ button on your website’s login page.
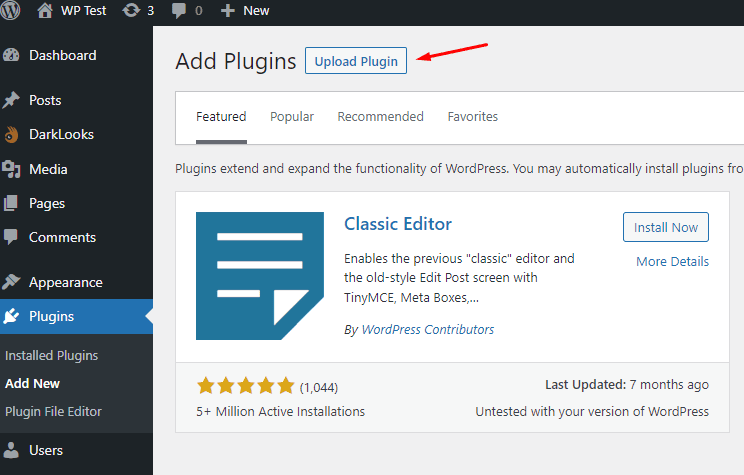
This will let you access the WordPress dashboard. Click on the ‘Plugins’ link in the WordPress dashboard’s left-sidebar. Use the top-right or left-sidebar menus to choose the ‘Add New‘ option.

The ‘Upload Plugin’ option will appear once you click the ‘Add New’ option. Select it.
You will then see a form to upload plugins.
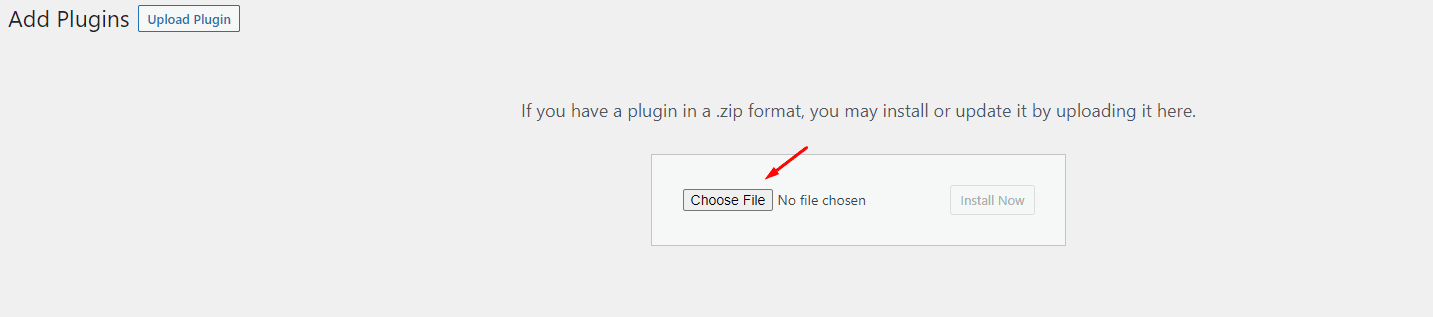
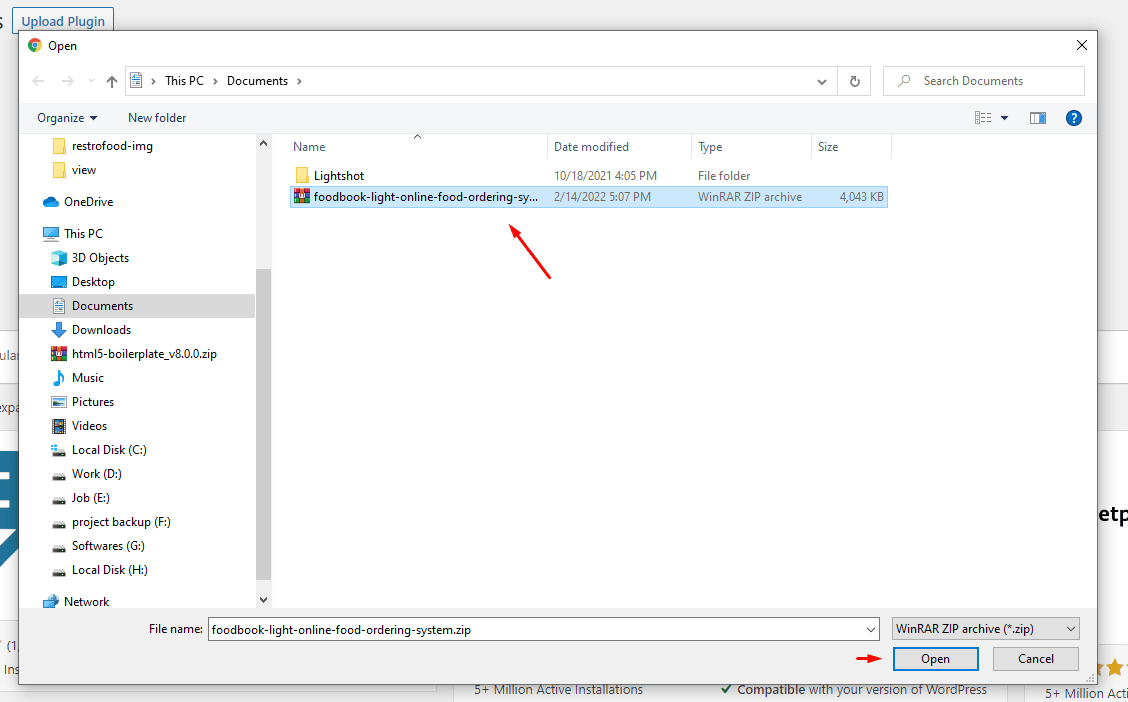
Then, you need to click the ‘Choose File‘ button. Next, click on the ‘Open’ button to select the file of the plugin that you downloaded earlier on your local device.
The ‘Install Now’ button appears after you have uploaded the plugin file. Press that button to begin the installation.

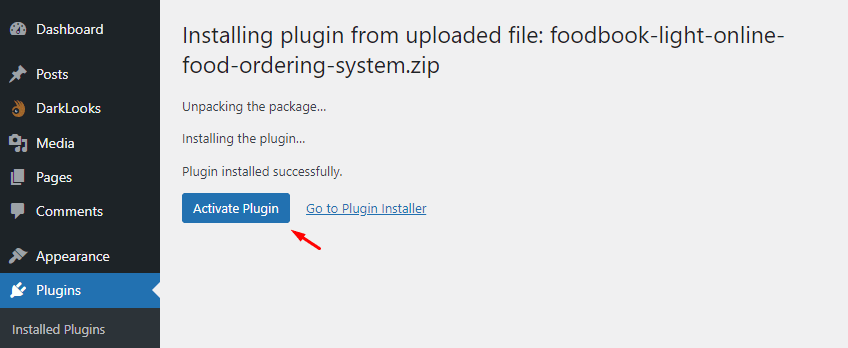
Clicking on the ‘Install Now’ button will begin the installation process. A button called ‘Activate Plugin’ will appear after successful installation.
The plugin will be activated when you click this button.
The plugin will appear in the list of installed plugins once it has been activated with the message ‘Plugin is now active’.
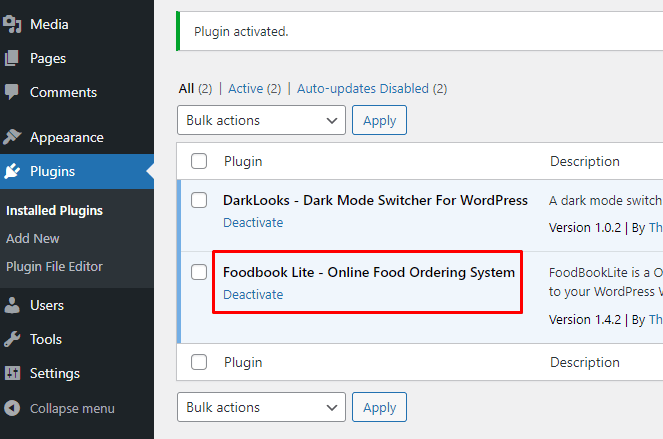
It’s that easy! Congratulations! The Foodbook Lite- food ordering and delivery system plugin is now active and you can start using it from now on your site.
FTP is another option for installing a plugin in WordPress. FTPS is the File Transfer Protocol, a protocol used to transfer files over the internet from one to another system.
FTP allows you to make changes to your website directly from your browser. Your website data can be edited, added to, and deleted through the FTP method without logging into your dashboard.
If the 2 methods above are not effective for you, the FTP method can be useful though it’s a bit technical method.
The steps for installing a plugin via FTP are as follows.
The first step is to download the plugin on your local device that you want to install and activate on your site. The plugin file comes in .zip format.
WordPress.org or any third-party directory such as CodeCanyon, iThemes, etc. offers the plugin zip file for download.
To use it, you need to extract it on your device first. Different tools are available for extracting zip files. Almost all Windows and Mac computers come with an open zip tool.
In this case, we’ll be using the Elementor Pro plugin.
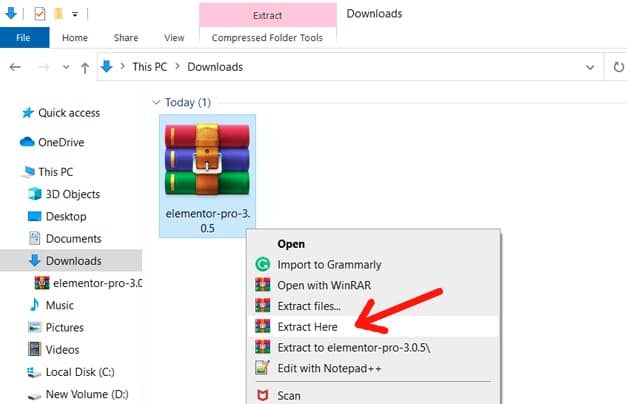
Once extraction will be done, it creates a new folder on your device with the same name.
In order to establish an FTP connection, an FTP client will be needed. Total Commander, FileZilla, etc are the most popular. You go with any of them.
We will create an FTP connection using FileZilla software, for example. FileZilla can be downloaded like any other application on your computer. Well, below you can see how the FileZilla interface looks when it’s opened for the first time.
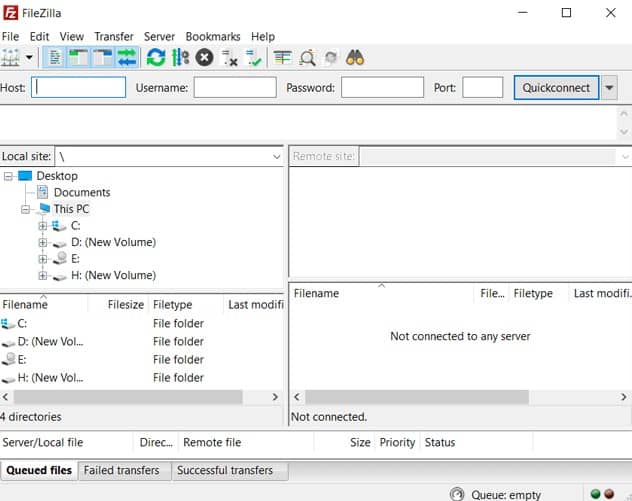
It is however necessary to set up an FTP account before you can use this application.
For doing so, open your web hosting panel (often cPanel or the admin panel) and create an FTP account. Then, navigate to the FTP account section of your web hosting account.
This is an example of what FTP Accounts looks like in Bluehost cPanel.
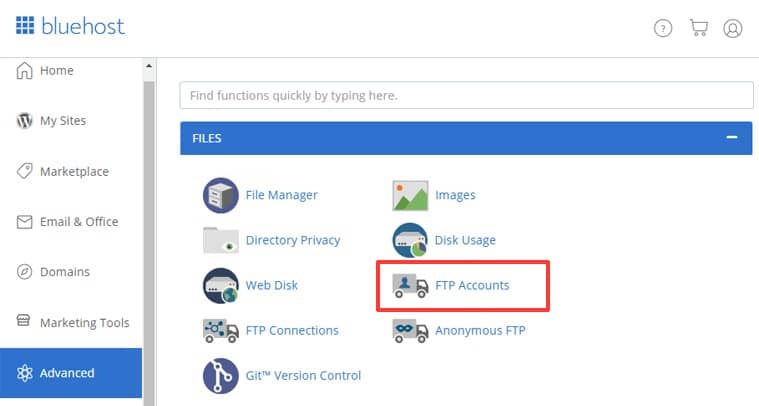
Let’s set one account up. Contact your hosting company for assistance if you don’t know how to do it.
Using the FileZilla app, connect to your server as soon as you have your FTP account details. Enter all the required information: hostname, user name, password and click on the ‘Quick Connect’ button.

As soon as you connect to your site, you can see all the files on your site on the right-hand side of the interface, in the ‘Remote Site’ area.
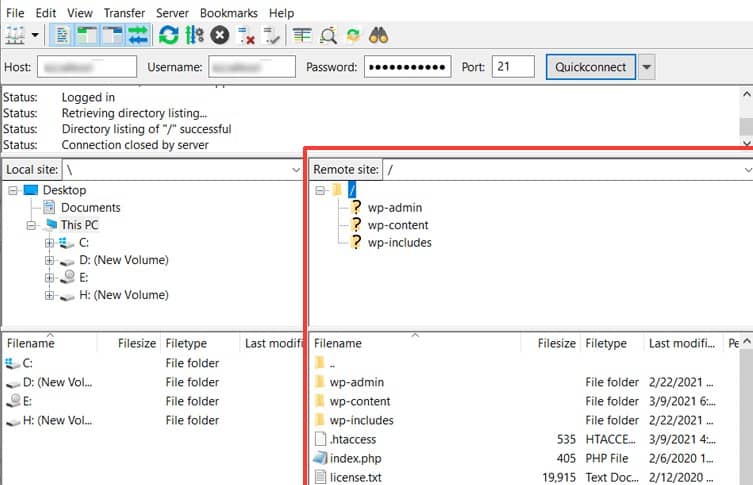
FileZilla displays your local files and folders to the left of the application window.
Transferring the plugin file from the local computer to the remote site will let you upload the plugin to your website.
Right at this moment, uploading files to your website from a local computer is as easy as pie. Let’s see, how?
Well, let’s build and connection between the local site and plugin directory on the remote site to upload a WordPress plugin successfully.
On the local site, for instance, the plugin file is located in the ‘Downloads’ folder. On the other hand; in a remote site, the plugin directory is inside the page titled ‘wp-content’.
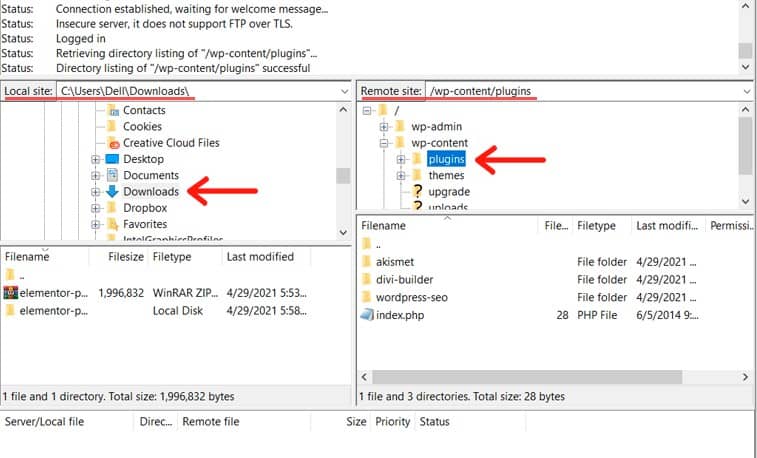
Both sides of the ‘Filename’ section are located below the ‘Folder’ section. On the left side, you can view the files contained in the download folder. On the right-hand side, already installed plugins on your website will appear.

It’s time to upload the plugin to the remote site from the local site. Using the mouse pointer, right-click the plugin file you have unzipped on the left screen. Click ‘Upload’ to finish the process.
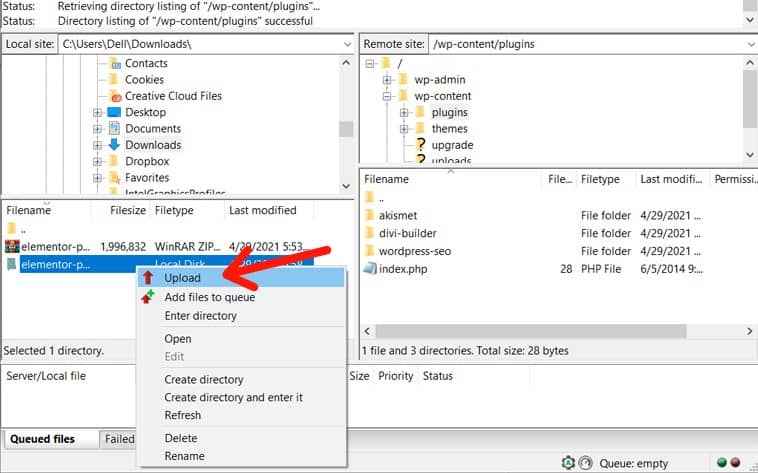
As an alternate, ‘drag and drop’ would be the easiest way here. For doing so, just drag the plugin folder from the local site to the remote site. The plugin will be uploaded in a few seconds to the directory.
You’re all set! Congratulations! The Elementor Pro plugin is installed now.
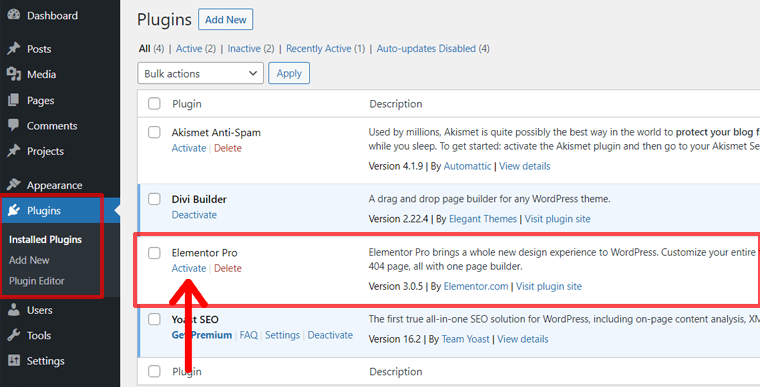
Go to your WordPress dashboard once the plugin is fully uploaded. Click on the ‘Plugins > Installed Plugins’ option in the left-hand sidebar of your dashboard.
Your FTP-uploaded plugin will now appear there. Select the plugin and activate it.
Up to this point, it’s clear that you successfully install a WordPress plugin by following the above instructions, right?
Do you think, your job is done? Certainly not, because you’ve to keep the plugin updated all the time to get some amazing functionalities.
By saying so, new features and functionality come with every new update. As a result, it enables your website to be more secure, while also fixing backward compatibility issues.
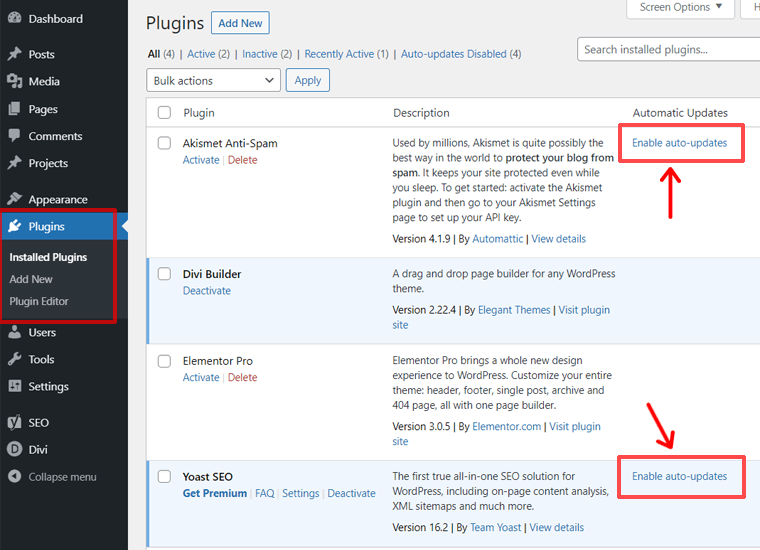
You will be glad to know, many plugins give you the option of automatically updating the plugin. You can find it under Plugins > Installed plugins in your dashboard.
And for some plugins, you will find an option to enable auto-updates. So, keep your plugin updated by clicking on that and getting all things done.
However, most of the premium plugins do not offer automatic updates. Consequently, you have to manually update each plugin. Don’t worry, you can see the notice directly on the plugins page, so don’t worry.
It’s time to wrap things up. As discussed in this article, there are 3 different methods to install a WordPress plugin on any website. Depending on your preferences, you can choose one of these methods.
By far, the easiest method is installing from the WordPress dashboard (First Method). Go with this method, if you would like to install free plugins from the WordPress.org plugin repository.
Plugins that are not available on WordPress.org or are premium plugins can be manually uploaded next. Last, but certainly not least, uploading plugins via FTP is an advanced procedure for only developers!
Hopefully, you can easily and quickly install a WordPress plugin to your site from now onwards. Feel free to share with your near and dear ones, if you find this article helpful.


